FOOD PROCESSOR ICE CREAM
Summer is the perfect time to perfect your Food Processor Techniques. And what better way than to create your own Ice Cream Master Pieces. This article shows you how to use your Food Processor to make Ice Cream. Once you learn the technique you can go on to create your own recipes of frozen fruit desserts or snacks.
I chose Strawberries because they are plentiful right now. In some parts of the world they are only available during the Summer. If that is the case where you live, you can freeze your fresh Strawberries so that you have them available all year long.
To freeze the Berries or other Fruit, first remove the hulls (if using stone fruit, slice in half and remove the pits.
Wash and dry the fruit and then place on a paper towel-lined shallow tray that will fit in your freezer. Once the fruit is frozen you can either place in a plastic bag and leave in the freezer until ready to use. Or you can use immediately once they are frozen.
To make the Ice Cream follow the recipe for Food Processor Ice Cream. http://www.sylveeeskitchen.com/?s=+Strawberry+Ice+Cream
Categories: Food Processor Recipes, Fruit, Main Tags:
THAI BEEF SALAD
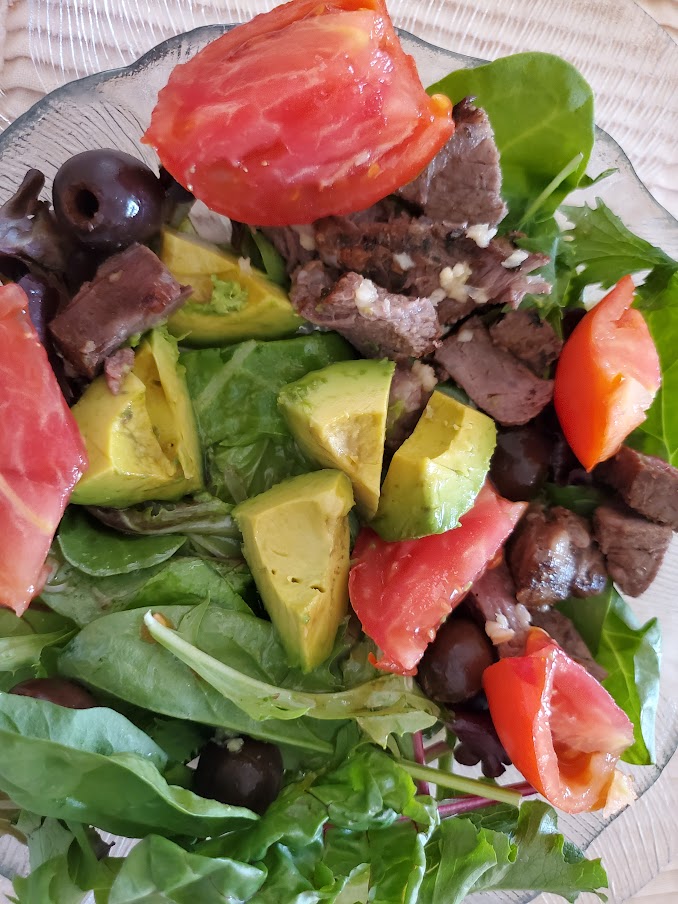
I love Thai Food as long as it is not too hot. Over the years since the first time i ate Thai Food my Taste Buds have become adjusted to some heat – moderate – but super hot. Thai Beef Salad is one of my favorites that I often order when in a Thai Restaurant – I usually order it just below medium and always get a side of Rice to go with it just in case it is too hot. My beverage preference is usually Thai Ice Coffee or Thai Ice Tea. Recently two of my former students from Let’s Get Cookin came to visit and cook. We usually do this about twice a year and the food choice is always theirs. So for our Summer Visit we made Thai Beef Salad. There are different variations on this salad – pulling from the Salads I have eaten out and recipes that I have looked, we created our own version. The Dressing Ingredients are usually Lime Juice, and Fish Sauce. The first time I made it it didn’t have enough potency so I added a little more Fish Sauce. The Lime Juice and Fish Sauce are the key components of the dressing for a Thai Beef Salad. I also like to add a little Peanut Oil and crushed Garlic (to taste, of course). Posted here are photos of different versions of Thai Beef Salad. Starting with the one we made at our last cooking session which also has Avocado in it – (my addition)
In the Photos below one can notice the subtle differences between the different variations and locale. The Thai version has julienned Carrots and Onions in and Cherry Tomatoes.
The Hawaiian version has a lot of Red Onions, Scallions and sliced Cucumber.
The Exotic Thai version has larger pieces of meat, Cherry Tomatoes and sliced Carrots.
There are similarities and differences in all the versions but the in the end they all taste pretty similar depending on the degree of heat used in the dressing. If you are a fan of very spicy food add some Thai or jalapeno Chilies to the Salad.
Have some fun and try creating your own version of this delicious Salad which is a perfect dish for Hot Summer Days!
You can find my recipe at THAI BEEF SALAD – A Culinary Adventure for the Entire Family – Sylveee’s Kitchen – Modern Family Cuisine (sylveeeskitchen.com)

Thai Beef Salad (Thailand)

Thai Beef Salad – Maui, Hawaii

Thai Beef Salad (Exotic Thai – Newbury Park, CA
NATIONAL FRUIT CAKE MONTH
December is National Fruit Cake Month and I am going to start if off by soaking my fruit for our Annual Fruitcake, something my husband loves. All the years of my Childhood and into Adulthood, my Mother made Fruitcakes every single year. She made enough so that my Father could take some to his Co-Workers and we still had more than enough for our consumption. I have actually never been a great fan of Fruitcake, but like Pumpkin Pie for Thanksgiving, I still make Fruitcake and I still do eat it. So here goes. My Fruit Cake Making Saga!
Day One – Sunday December 1st – gather together all the Fruit that I am going to use and cut up what needs cutting – place them all together in a large bowl and pour some Wine over them. Brandy is the usual Liqueur to use but I have Marsala Wine and think I will use that. Strike that – went to the Beverage Store and purchased Gran Marnier – Brandy but Orange flavored and not too strong. For Non-Alcoholic Fruit Cake, try using Orange Juice or Sparkling Apple Cider. Both work quite well! I added just enough Gran Marnier to moisten the Fruit and then covered the Bowl and let it sit overnight.
Day 2 – I prepared the Batter and baked the Cakes.
Make sure the Fruit is in a LARGE BOWL so that you have enough room to incorporate the Batter into the Fruit. Before preparing the Batter, prepare the pans. Cut parchment paper or waxed paper to fit the bottoms of the pans. Spray the bottoms of the pans with a Vegetable Spray and then insert the prepared paper.
Next prepare the Batter and add it to the Fruit.
Once all the Batter is evenly mixed with the Fruit and the Fruit is evenly distributed throughout the Batter fill the pans about 3/4 full. As you can see from the Photo I used loaf pans. One 10″ TUBE PAN can be used instead.
Bake in a slow oven for approximately 1 1/2 hours or until a toothpick inserted in the middle comes out clean.
Cool on wire racks; be sure the cakes are completely cool before removing from the pan. Turn the pans over and the cakes should come right out. If the don’t, gently loosen with a straight-edged spatula and then try again.
Wrap the Cakes tightly in plastic wrap and allow to age for several days or weeks before serving. If liquer on the cakes is desired, place the each cake on a large piece of cheesecloth placed on plastic wrap. Lightly douse with Gran Marnier, Brandy or Rum. Wrap tightly with the Cheesecloth and then the plastic wrap. Finally wrap the whole thing in Aluminum Foil.
If desired, more Liquer can occasionally be added through the Cheesecloth. JUST REMEMBER, THE MORE YOU ADD, THE STRONGER TASTING THE CAKES WILL BE. HOWEVER, THE LIQUER DOES KEEP THE CAKE MOIST AND ALLOW IT TO LAST AND TASTE GOOD THROUGH THE HOLIDAYS.
For the complete recipe go to /holiday-fruit-cake/
Categories: Main Tags:
NATIONAL FOOD DAYS ‘National Cherry Tart Day’

Plated Cherry Tarts
June is the perfect month for ‘National Cherry Tart Day’. Cherries are ripe and ready for picking, at least in California! Cherries are delicious to eat out of hand and are also delicious in whatever dish you decide to incorporate them into. The three main varieties of Cherries available in Southern California are Bing (the sweetest), Mt. Rainer (also sweet) and Queen Anne (in recent years not so easy to find) which are a tart cherry that is perfect for making pies or jams and jellies.
To make a Cherry Tart you will need several components, namely a base for your tart, a custard filling and your cherries. Let’s start with the base. You can use a standard pie crust or a sweet tart crust which is perfect for tarts, large and small. The tart crust will consist of flour, sugar, salt butter, eggs and water and vanilla.
The next component would be the custard filling which consists of eggs, milk, sugar, butter and again vanilla or better yet, almond extract which will enhance the flavor of the cherries. Almonds, Cherries, Peaches and Nectarines all have similar enzymes which contribute to the flavor of the fruit. Adding Almond Extract to Cherry, Peach or Nectarine pastries will enhance the flavor of those fruits.
Lastly, you will need the Cherries. For my Cherry Tart, I used sweet Bing Cherries. First place the Cherries in a colander and rinse the under cold water. Shake out as much of the water as possible and then put them in a bowl that has been lined with paper towels or a clean dish towel. Set the Cherries aside while you prepare the other components.
The first component that you want to prepare would be the Tart Crust as it is easier to roll when it is chilled. For the complete recipe please see the recipe section of this blog. sweet-tart-and-pie-pastry/ Once your tart crust has been prepared, flatten it to disc about 1” thick, wrap in plastic wrap and refrigerate while you prepare the Custard for the filling.
For the Custard filling, please see the recipe section of this blog. pastry-cream/ When you have finished cooking the Custard, place it in a bowl; let stand until it stops steaming and then cover with plastic wrap, being sure to place the plastic wrap directly on top of the Custard. This will insure that a skin does not form on top of the Custard. Refrigerate the Custard until you are ready to prepare the tarts.
The next step would be to roll out and bake the Tart Shell. If you are making a large tart (8 or 9”) you can roll out the dough in one piece. Be sure and lightly dust your rolling surface with flour. Flatten the Dough into a round disc and roll out to approximately ¼”, using a stockinette covered rolling pin. You can rub flour into the stockinette which will prevent the rolling pin from sticking to the dough, without adding additional flour to your dough which would toughen it.
If you are going to make individual tarts, divide the dough into several sections, depending on the size of your tart pans. In the photo below, the pan I am using has 12 tiny tart indentations. The dough should have been divided into 12 pieces. In the case of the tiny tarts, you can just flatten the dough and then minimally roll it out to fit the pan. Once you have fitted the dough into the pan, take your rolling pin and run it around the rim of the pan to cut off the excess dough. Many tart pans come with removable bottoms which makes it easier to remove the tart from the pan, especially in the case of the larger tart. With the smaller tart, you can easily lift the baked crust right out of the pan.
To bake the crusts, first poke holes in the bottom with the tines of a fork and then place a piece of foil into the bottom and up the sides of the pan. Place some pie weights on top of the foil. Pie weights can be aluminum weights that you buy in your local culinary shop or dried beans that you keep just for this purpose. Once the beans are used for weights they can no longer be cooked.
Bake the Crust at 325 F. with the weights for about 15 minutes. Then remove the weights (you can easily lift out the foil as it doesn’t get too hot – and then just dump the weight back into their container.
Brush the Crusts with an Egg Yolk beaten with a little cream of milk and then return to the oven until they are a light golden brown – about 10 more minutes.
Remove the baked crusts from the oven and once they are cool enough to handle place them on a serving plate. This would be for the individual ones. If you are making a large tart, remove the sides of the pan but leave the crust on the bottom or if you can easily remove it without breaking it, place it on a serving plate.
While the crusts are baking, you can finish preparing the Cherries. You can use the Cherries uncooked, but cooking them slightly, brings out the flavor and add a natural syrup to them which coats them and preserves them. The first thing you have to do though is to remove the pits. There are several ways to do this. The easiest is to use a Cherry Pitter that will remove the pits from multiple Cherries for you. If you don’t have this type of Cherry Pitter, then you can use one that remove the pits, one Cherry at a time. Barring that, you can do what we used to do when I was small and that was to use a large tapestry needle to remove the pits individually from each Cherry. That was always my job after we had gone Cherry Picking and my Mother made Jams, Jellies and Pies. Today, though if you have the proper tools, it is much easier to do.
Heat a sauté pan and add about half cup of wine (I used Marsala but you can also use Madeira, Burgundy or even Kirsch, which is a Cherry Liquer. Bring the liquid to a simmer and then add the Cherries. Cook until the Cherries release their liquid and continue cooking until the liquid becomes syrupy. This will take from 5 – 10 minutes but no longer. Transfer the Cherries to a shallow bowl and allow to cool.
Place the Custard in the bottom of the Tart(s) and then add the Cherries to the top. Refrigerate until ready to serve. In the case of small tarts, one per person (depending on the size) should be sufficient for each person. The Tiny Tarts pictured would be perfect for a Dessert Buffet which would allow each person to sample several desserts without becoming too overloaded with sugar.
Try this version of Cherry Tarts or try creating your own. Whichever you do, you should enjoy making them and your family and/or friends will enjoy eating them!
Categories: Main Tags:
MY ADVENTURES WITH LIONS MANE MUSHROOMS
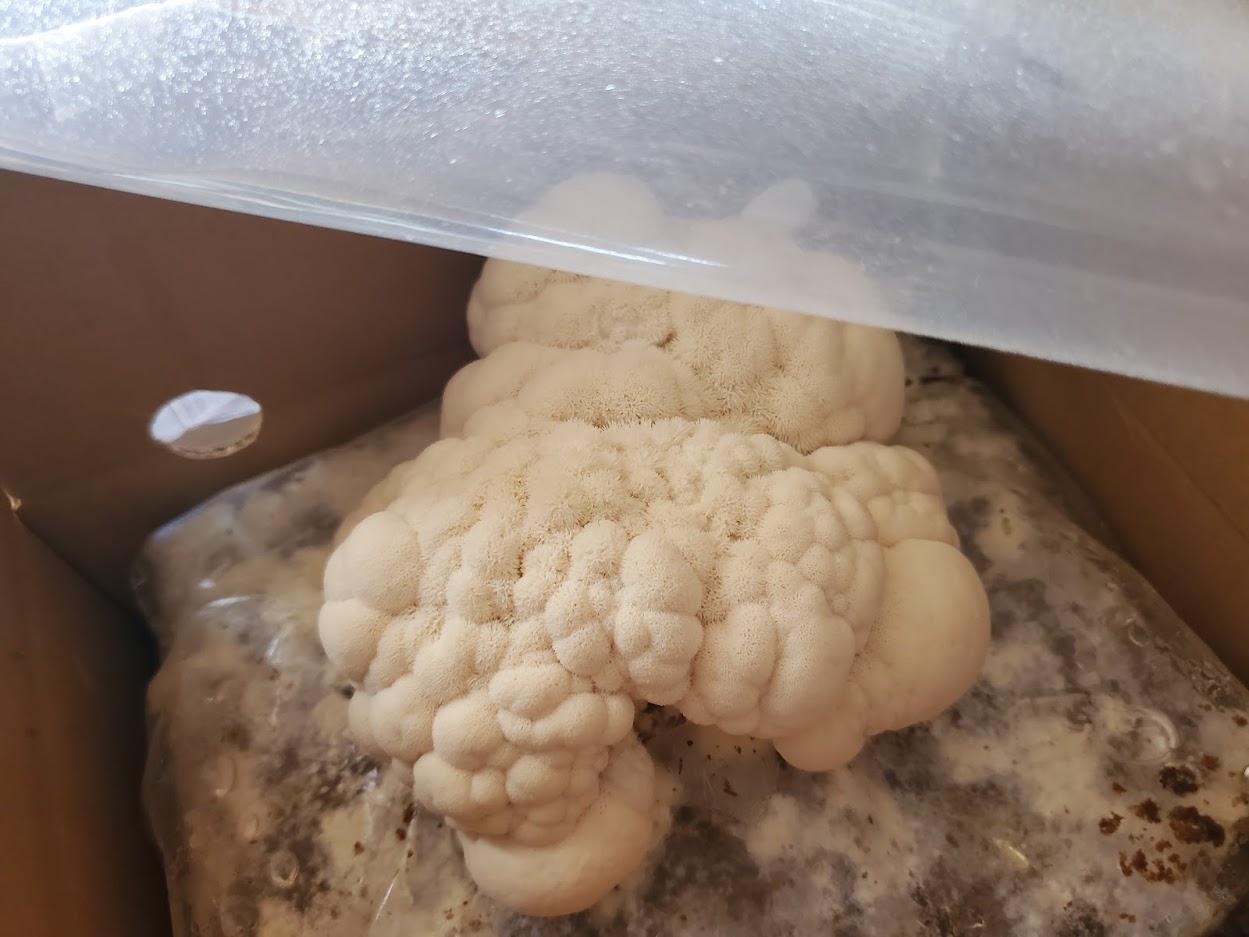
On a whim (almost) I decided to try out Nearby Naturals Mushroom Grow Kit. They have a monthly plan that I decided to try. Not knowing that you could choose which type of mushroom you wished to receive I just went with the plan and hoped that what I got wouldn’t be Lions Mane because of all the Mushrooms I have ever eaten, this one is the first that I have not actually liked. They have sort of a mealy taste if you slice it and cook like a normal mushroom. They can also be torn apart and cooked like noodles but they are too soft in this form for my taste. The reason they are called Lions Mane is because when they are pulled apart the individual spores look like lions mane.
Well, my Lions Mane grew to full size from nothing in less than two weeks and here is where my adventures start. In trying to figure out what to do with them, I went on line to see what other people were doing with them.
The first thing I tried doing was to slice and fry them. I served them with Spinach, Asparagus and sliced Tomato. This was okay but not something I would want to do again. The on-line video showed the chef just loving this sliced mushroom?

Sliced and Fried Lions Mane Mushrooms

Sliced Lions Mane Served with Spinach, Asparagus and Tomatoes
Another instance was ‘Egg Drop Soup’. The on-line video used only water and corn starch as a thickener. I decided to go the traditional ‘Chinese Way’ and use Chicken Broth along with some other vegetables. This was okay and palatable but still something I would not do again. With this recipe you pull apart the individual spores and they look like noodles. They were somewhat soft though and did not taste like noodles.

Lions Mane torn apart into individual spores

Egg Drop Soup Cooking

Finished Egg Drop Soup
For the recipe for the soup go to http://www.sylveeeskitchen.com/egg-drop-soup-with-lions-mane-mushrooms/
My final recipe for this crop of Lions Mane Mushrooms is ‘Fried Rice’ Lions Mane. I took the remaining Lions Mane and extruded them through the medium shredding blade of my Food Processor. I also shredded some Carrots and slivered some Green Onions. I then proceeded to fry the ingredients as I would have for Fried Rice.
For the complete recipe go to http://www.sylveeeskitchen.com/recipes/dinner/vegetable-fried-rice/ and substitute the Rice with the shredded Lions Mane Mushrooms. For a photo of the Rice please go to https://www.facebook.com/photo.php?fbid=4166532770023611&set=p.4166532770023611&type=3
Categories: Dinner Ideas, Main, Soup, Soup Tags:
CULINARY MAKEOVER #22 – FROM BROWNIES TO FUDGE BROWNIES

Old Brownies – dried out
For those of you who have been reading my ‘Makeover’ Articles, you probably know by now that I love to recreate new dishes from old leftover (yet viable) ones. This addiction started when I purchased my first Blender many years ago. The Blender of course, then advanced to the Food Processor which has been a ‘must have’ in my kitchen almost ever since it hit the U.S. market.
Our household now consists of only two people and our appetites aren’t what they used to be and even if they were, we would be pounds overweight if we consumed everything that I baked (let alone cook) and since I hate to throw away good food (especially when i created it), I have the fun of turning these dishes into new ones.
This weeks was turning my Husband’s Brownies into new Fudge Brownies. Ev is supposed to watch his sugar content but he still loves his chocolate and has to have his fix every night after dinner (even if it is smaller than what he had been used to in previous years.) Sometime I manage to remember to divide the batter in half and freeze one and bake the other one. Of course, this takes smaller pans to do so and it isn’t always feasible.
So I took the leftover Brownies which were dried out but still good and cut them up into small pieces which I then put into the Food Processor with the Chopping Blade. I pulsed the Brownies pieces until they were broken up into much smaller pieces. I then turned the Processor on full speed and chopped up the small pieces to resemble a coarse flour or meal. Next step was to measure the resulting Chocolate Crumb.
The ingredients including the Chocolate Crumb are listed below:
2 cups Brownie Crumbs
1 cup All-Purpose Flour
1/4 cup Cocoa Powder
1/4 cup Sugar
2 Eggs
1 cup Sour Cream (1/2 cup Butter can be used instead)
1 cup Chocolate Chips
1 cup Marshmallows (quartered)
DIRECTIONS ARE AS FOLLOWS:
1. Return the Chocolate Crumb to the Food Processor.

Measured Crumbs in Processor
2. Add the Flower, Cocoa Powder and the Sugar.

Remade Batter
3. Pulse, just to combine the ingredients.
4. Add the Eggs and Sour Cream (or melted or softened Butter) and Pulse, just until the
ingredients are combined.
5. Stir in the Chocolate Chips.
6. Butter or Spray a 9 x9″ baking dish; add the quartered Marshmallows to the bottom of the dish.

Cut Up Marshmallows
7. Spread the Batter evenly over the Marshmallows.
8. Bake in a preheat (350 degree) oven for 25-30 minutes or until a cake tester comes out clean.
9. The Brownies may be served warm or cooled. And they are delicious served with Vanilla Ice Cream.

Remade Fudge Brownies
Categories: Cales, Cookies, Cooking for Kids, Culinary Makeovers, Dessert Ideas, Family Fun, Leftovers, Main, Quarantine Cuisine Tags: baking, Children's Cooking, Chocolate, Cookie Recipes, Dessert Ideas, Eggs, kids cooking, Leftovers
CULINARY MAKEOVER # 21 – FROM OATMEAL RAISIN COOKIES TO OATMEAL RAISIN WAFFLES
We love Oatmeal/Raisin Cookies but it seems that we had overlooked the remainder of the last batch that I made. They were inside our Cookie Tin (Coincidentally one that was a commemorative tin for Quaker Oatmeal. The Cookies were still good, if a little on the dry side. And since I love recycling leftovers and turning them into new dishes, I decided to recycle the Cookies.
I broke them up and put them in the Food Processor.

Oatmeal Raisin Cookies in Processor

Leftover Oatmeal Raisin Cookies
I measured the resulting ‘cookie meal’ and then added what I decided would be enough flour to make a viable waffle batter. I then added a proportionate amount of Eggs, Milk and Butter. And voila, we had Oatmeal/Raisin Waffles for Breakfast.

Waffles Baking
For exact directions on how to recycle the cookies go to Recycled Oatmeal Cookies
As you will see when you read the recipe the recycling did not stop at Waffles. Since we are currently a household of two people and the resulting Waffle Batter was enough to feed four people, I decided to make muffins from the leftover Waffle Batter. Surprisingly, the Muffins turned out to be an excellent accompaniment for our breakfast the following morning. Same ingredients, but turned into a completely new item. The Muffins were served with Scrambled Eggs and Bacon. Fortunately, we were able to finish the Muffins over a couple of days and did not have to recycle them anymore.

Oatmeal Raisin Muffins
Categories: Main Tags:
ENCHILADA CASSEROLE
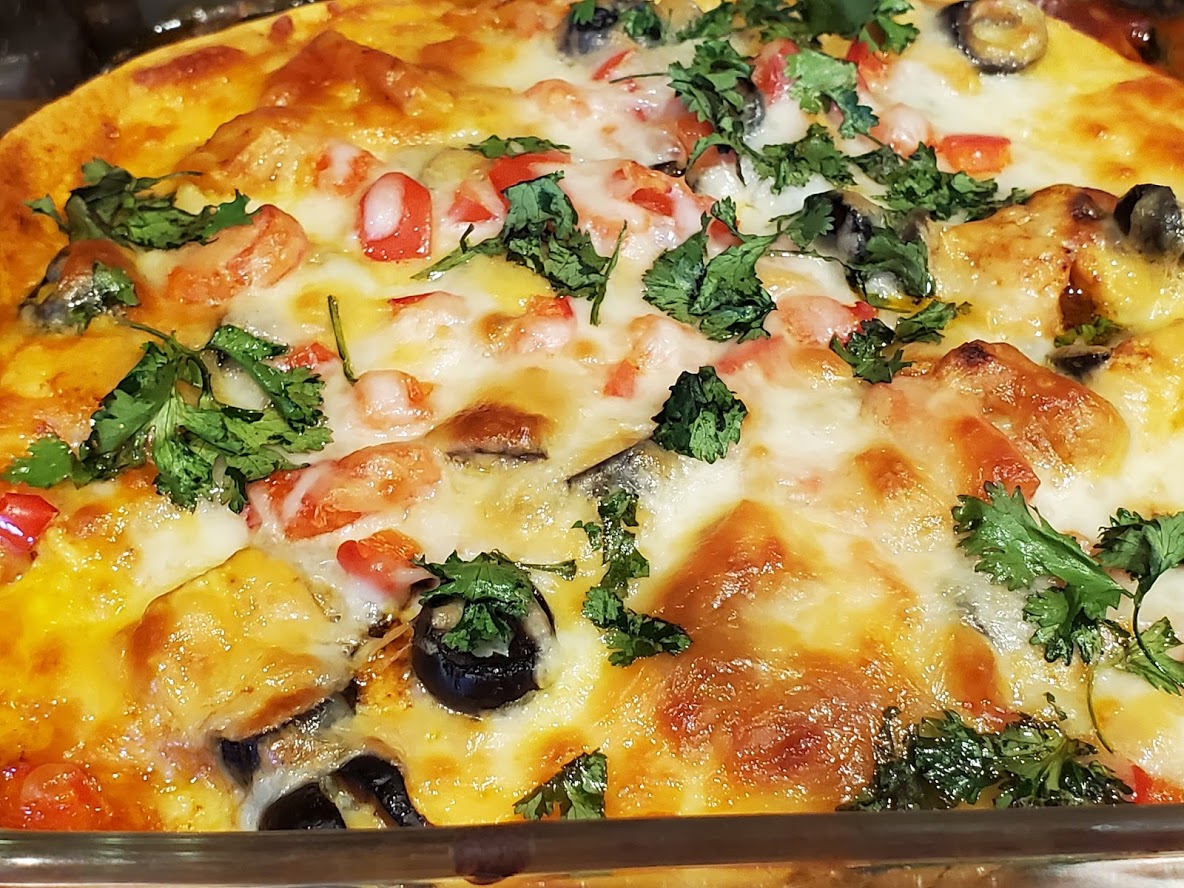
There are a couple of ways to make an “Enchilada Casserole”.
#1 – use up leftover enchiladas
#2 – just use tortillas and the other ingredients for enchiladas
If you do not have any leftover enchiladas the simplest way to make the casserole is #2. Either way you make it, it is going to taste the same. The last Enchilada Casserole I made was of the second variety. My husband thinks he doesn’t like Chicken whereas I love Chicken if it is cooked properly (that is, fried, or roasted with lots of garlic, etc.) My husband Ev loves Turkey whereas I think Turkey can be pretty tasteless except at Thanksgiving. Anyways, my Go To Poultry is Chicken whereas Ev’s is Turkey. In between we also like Cornish Hens and Ev loves Duck and Turkey, neither of which are my favorites.
To get back to the Enchilada Casserole, here we go. First of all you are going to need some Enchilada Sauce. You can either buy it canned (usually too spicy for my husband) or make it yourself. If you use canned sauce and it is too spicy, just tame it down with a little Tomato Sauce or Tomato Juice. You can also add a bit of sugar to it.
The photo in the picture was made via the second version. So, here goes. Usually I make my own Sauce but this time it was a jar of Enchilada Sauce purchased from Whole Foods. It turned out that this was going to be a little too spicy for my Husband, so I tamed it down with Tomato Juice.
#1 – Choose a baking dish that is going to be large enough to hold a whole tortilla. 12 x 12 or a 12″ round casserole should do it.
#2 – Cover the bottom of the Baking Dish with a small amount of Enchilada Sauce.
#3 – Pour about 1/4″ to 1/2″ of Enchilada Sauce into a 12″ Frying Pan. Heat it up until it becomes warm and then soften the Tortillas, one at a time in the Sauce. I usually do just then as needed in the assembly.
#4 – Place the softened Tortilla in the Baking Dish. Scatter some of your Protein (this can be diced Chicken, ground Beef or even Shrimp) on the Tortilla. Add some Enchilada Sauce, some shredded Cheese, diced Olives, minced Cilantro, sliced Green Onions, etc. (Whatever choice of ingredients that you like)
#5 – Add another softened Tortillas and proceed as in # 4. I usually make it to be about 3 or 4 layers and then put more shredded Cheese on top with sliced Olives, minced Cilantro, etc.
#6 -If you want your Casserole to be spicy add some chopped Jalapenos or the Pepper of your choice.
$7 – Bake in a 350 degree oven until the casserole is hot and the cheese on top is melted. This will take about 20 – 30 minutes depending on your oven.
Serve Hot with Crema (Sour Cream). You can add Mexican Rice and/or a Salad to go along with the Casserole.
This recipe should serve 2-4 people depending on appetites and other dishes served with it. i usually add a Salad to the meal. You could also serve it with Mexican Rice.
Enjoy!
Categories: Main Tags:
QUARANTINE CUISINE
If you are stuck in the house and have a bunch of leftovers either in the refrigerator, pantry or freezer, you may want to check out my ‘Culinary Makeovers’ Articles to help inspire you to create new dishes with your leftovers. Just go to the Search Box and type in Culinary Makeovers and you will be directed to a number of recipes that may give you ideas as to what to do with your leftovers.

Baked Buns
Categories: Main Tags:
New Year Lists – # 1 – Using Up Food in Freezer and Fridge – Pork Tenderloin
I never make New Years Resolutions because I am not prone to keeping them. However, I do make lists of things to do. I am more likely to follow through on my lists than on any resolutions I may make. You may ask, ‘What is the difference?’ Well, a Resolution needs to be kept and if you don’t keep it you don’t feel very good about yourself. However, if you make a list and half the items on the list get done, you will feel that you have accomplished something.
So, here is #1 on My List of Things To Do. Use up the Odds and Ends (Large and Small) of food that may be in my Refrigerator, Freezer or even in the cabinets. Having raised 5 Sons, I have found it hard to cook only for 2 people – even though it has been many years since my Sons have grown and left home. So, sometimes I have more than I need and need to use up what I have left. Since I am not a great fan of leftovers, I usually find ways to turn the leftovers into new dishes. (Sort of like the TV Show ‘Chopped’. However, I have been doing this way before Chopped became a show.
The first time I can remember that I started turning leftovers into new dishes was when I got my first blender – actually I still have it. I got that blender back in the days when they were still being made to last and last it has. I remember that I turned leftover gravy into soup. Now, fast-forward to this year – 2020. I have actually turned several items in the freezer into new dishes.
#1 – A Pork Tenderloin into an Asian Stir-Fry. Where I purchase Pork Loins they are sold in packages of two. I actually cooked both at the same time because a couple of my former students came over for a cooking session. We made Chinese Dumplings and Pork Bao. We had a variety of items so we did not use both Pork Loins so I put the leftover one in the freezer. (This was the weekend before Thanksgiving) Last week, I removed the Pork Loin from the freezer, cut it up into bite-sized pieces and stir fried it with Shitake Mushrooms, thinly sliced Carrots, diced Onions, Cabbage and minced Cilantro. The dish took very little seasoning as the Pork Tenderloin had previously been marinated in a Soy Based Marinade. This dish was served with Jasmine Rice (which is an aromatic soft grain rice grown in Thailand). So, this was a multi-cultural dish incorporating the tastes of Japan, China and Thailand. Very tasty, easy to make and used up the Pork Tenderloin and Vegetables still lingering in my refrigerator.
For a recipe for this Stir-Fry go to http://www.sylveeeskitchen.com/recipes/dinner/pork-tenderloin-stir-fry/
Just keep in mind that all the ingredients are interchangeable and you can use whatever you have in your refrigerator.

Stir Fry with Greens, Onions and Noodles.

Pork Tenderloin Stir Fry with Carrots, Bean Sprouts, and Mushrooms
Categories: Main Tags: