APPLE SEASON – HOMEMADE APPLE STRUDEL
Even though our normally very abundantly producing Apple Tree has had a smaller than normal crop, we still have enough Apples to more than meet our needs. Our needs are specifically baked goods to store in the freezer to be ready when an occasion arises, such as visiting family or friends or just the desire for baked goods loaded with Apples for a scrumptious breakfast. Our tree is a ‘Beverly Hills Apple’; one that was developed for the area we live in. No, not Beverly Hills but close enough to be within almost touching distance. (As the crow flies, that is)
The Apples produced by our tree are green with blushes of red stripes and are tart when picked early and much sweeter when allowed to remain on the tree until late August or early September. This year, there is no chance remaining on the tree to sweeten as they have decided to fall off before fully ripening. In order for us to have some Apples before the Rabbits get them all, I do have to pick them before they fall.
Already in the freezer is a batch of Apples, sugared with Cinnamon and thickener ready for our Thanksgiving Apple Pie. All I will have to do is to drain off the liquid (freezing makes the cell walls break down and cause them to liquefy) into a saucepan and cook it down to the desired thickness. This will prevent the pie crust from getting soggy. And of course, I will have to make the Pie Crust, roll it out and ease it into the pan. Add the Apples and top Crust, Bake and Voila there is the Apple Pie all ready to serve and eat.
Enough about Apple Pie. The last batch of Apples that I picked, we decided that Apple Strudel would be in order. If you are ambitious and want to spend several hours making your own Strudel Dough, that is fine, but if not, purchased Phyllo (sometimes spelled ‘filo’) works very well. If fresh Phyllo is available in your neighborhood (usually at a Middle Easter Market) that would definitely be superior. If not, frozen work well too. Just be sure and buy a good quality frozen dough and defrost it in your refrigerator overnight.
Phyllo Dough is very thin and fragile and requires careful handling. When your filling is ready and you are ready to wrap the fruit up in it do the following:
-
On your work surface or a large sheet pan, place a damp clean kitchen towel. On top of the damp towel, place a clean dry kitchen towel.
-
Carefully unwrap and unfold the Phyllo Dough and place on the dry towel.
-
Place another clean dry kitchen towel on top of the Dough and then place a clean, damp kitchen towel on top of the dry towel. (This procedure will help to keep the dough from drying out and tearing – if it does tear slightly, don’t worry. Just wrap another layer of dough around it)
To make your strudel, prepare the fruit. Apples are the common fruit for strudel but other types of fruit such as Apricots or Peaches may also be used. Since we do not use pesticides on our trees, our Apples usually have worms that are attracted to the fruit. If this is the case with your homegrown Apples, do not let that deter you. If the worms are there, the Apples are probably pretty good. Just be prepared to cut away the worms (probably dead) and any debris that may be inside.
Traditional Apple Strudel usually contains Walnuts and/or Raisins in addition to the Apples. While I do like Raisins but not Nuts, I usually do not put them in. Since we like the taste of the Apples so well, I usually also leave out the Raisins. Save them for something else! So, here is the procedure that I followed in making my Apple Strudel:
Select the Apples you are going to use and then wash and dry them. Even if you plan to peel them, I always wash them first, especially if they just came off the tree.
Next peel the Apples and then cut them into quarters. Remove the seeds and any blemish portions there may be (including worms), then rinse them again with cold water and dry them well withpaper towels.
After the Apples are peeled and quartered, slice each quarter into 3 to 4 pieces.
Sauté the Apples in melted Butter along with Sugar (I use Brown Sugar) and Cinnamon. Once the liquid has been released from the Apples, cover with a lid and cook for 10-15 minutes or until most of the liquid has been absorbed. Our Apples contain very little moisture so it only took about 5 minutes to cook out most of the liquid. Even though I make Apple Pie with raw Apples, Apples Strudel should always be made with cooked Apples. The reason for this is that the Strudel Dough is very thin and fragile and soggy apples will just make the Strudel soggy.
Place the cooked Apples on a non-reactive tray and allow to cool. Melt your Butter (unsalted Butted – at least 1/4 lb) and place it next to your prepared Phyllo Dough. You will need a flat surface to place the Dough(a large pastry board is perfect).
Have all your ingredients and equipment close by, once you are ready to assemble your Strudel.
- Carefully place two sheets of Phyllo Dough on your work surface and gently brush with the melted Butter.
- Add two more sheets of Phyllo and brush again. (Notice that there are slight tears in the dough – these will be covered up when you wrap the Apples in the Dough.
- Spread the filling along the length of the dough about 3 inches from the edge; leave at least 3” at either end free. (DO NOT OVER-STUFF THE DOUGH – YOU WILL PROBABLY HAVE ENOUGH APPLES FOR AT LEAST TWO STRUDEL. IN THE RECIPE I USED, I MADE 4 MINI-STRUDEL AND 1 FULL-SIZE ONE)
- Fold the 3” piece over the filling and then fold the whole thing over until all the dough is completely wrapped around the filling. Butter the dough as you fold. Fold the corners of the edges in and under the strudel.
- Carefully transfer to a parchment covered baking sheet.
- Bake in the middle of a 375 degree oven for 45 minutes or until the dough is baked through and crisp. It should be a dark golden brown.
Note: The complete recipe can be found under the recipe section of this blog /pies-pastry/apple-strudel/
Categories: Breakfast Ideas, Dessert Ideas, Fruit, Main Tags: Apples, baking, Brown Sugar, butter, Cinnamon, Dessert Ideas, Fruit, Phyllo Dough, Strudel
LET’S BAKE! – RAISIN SPICE BARS
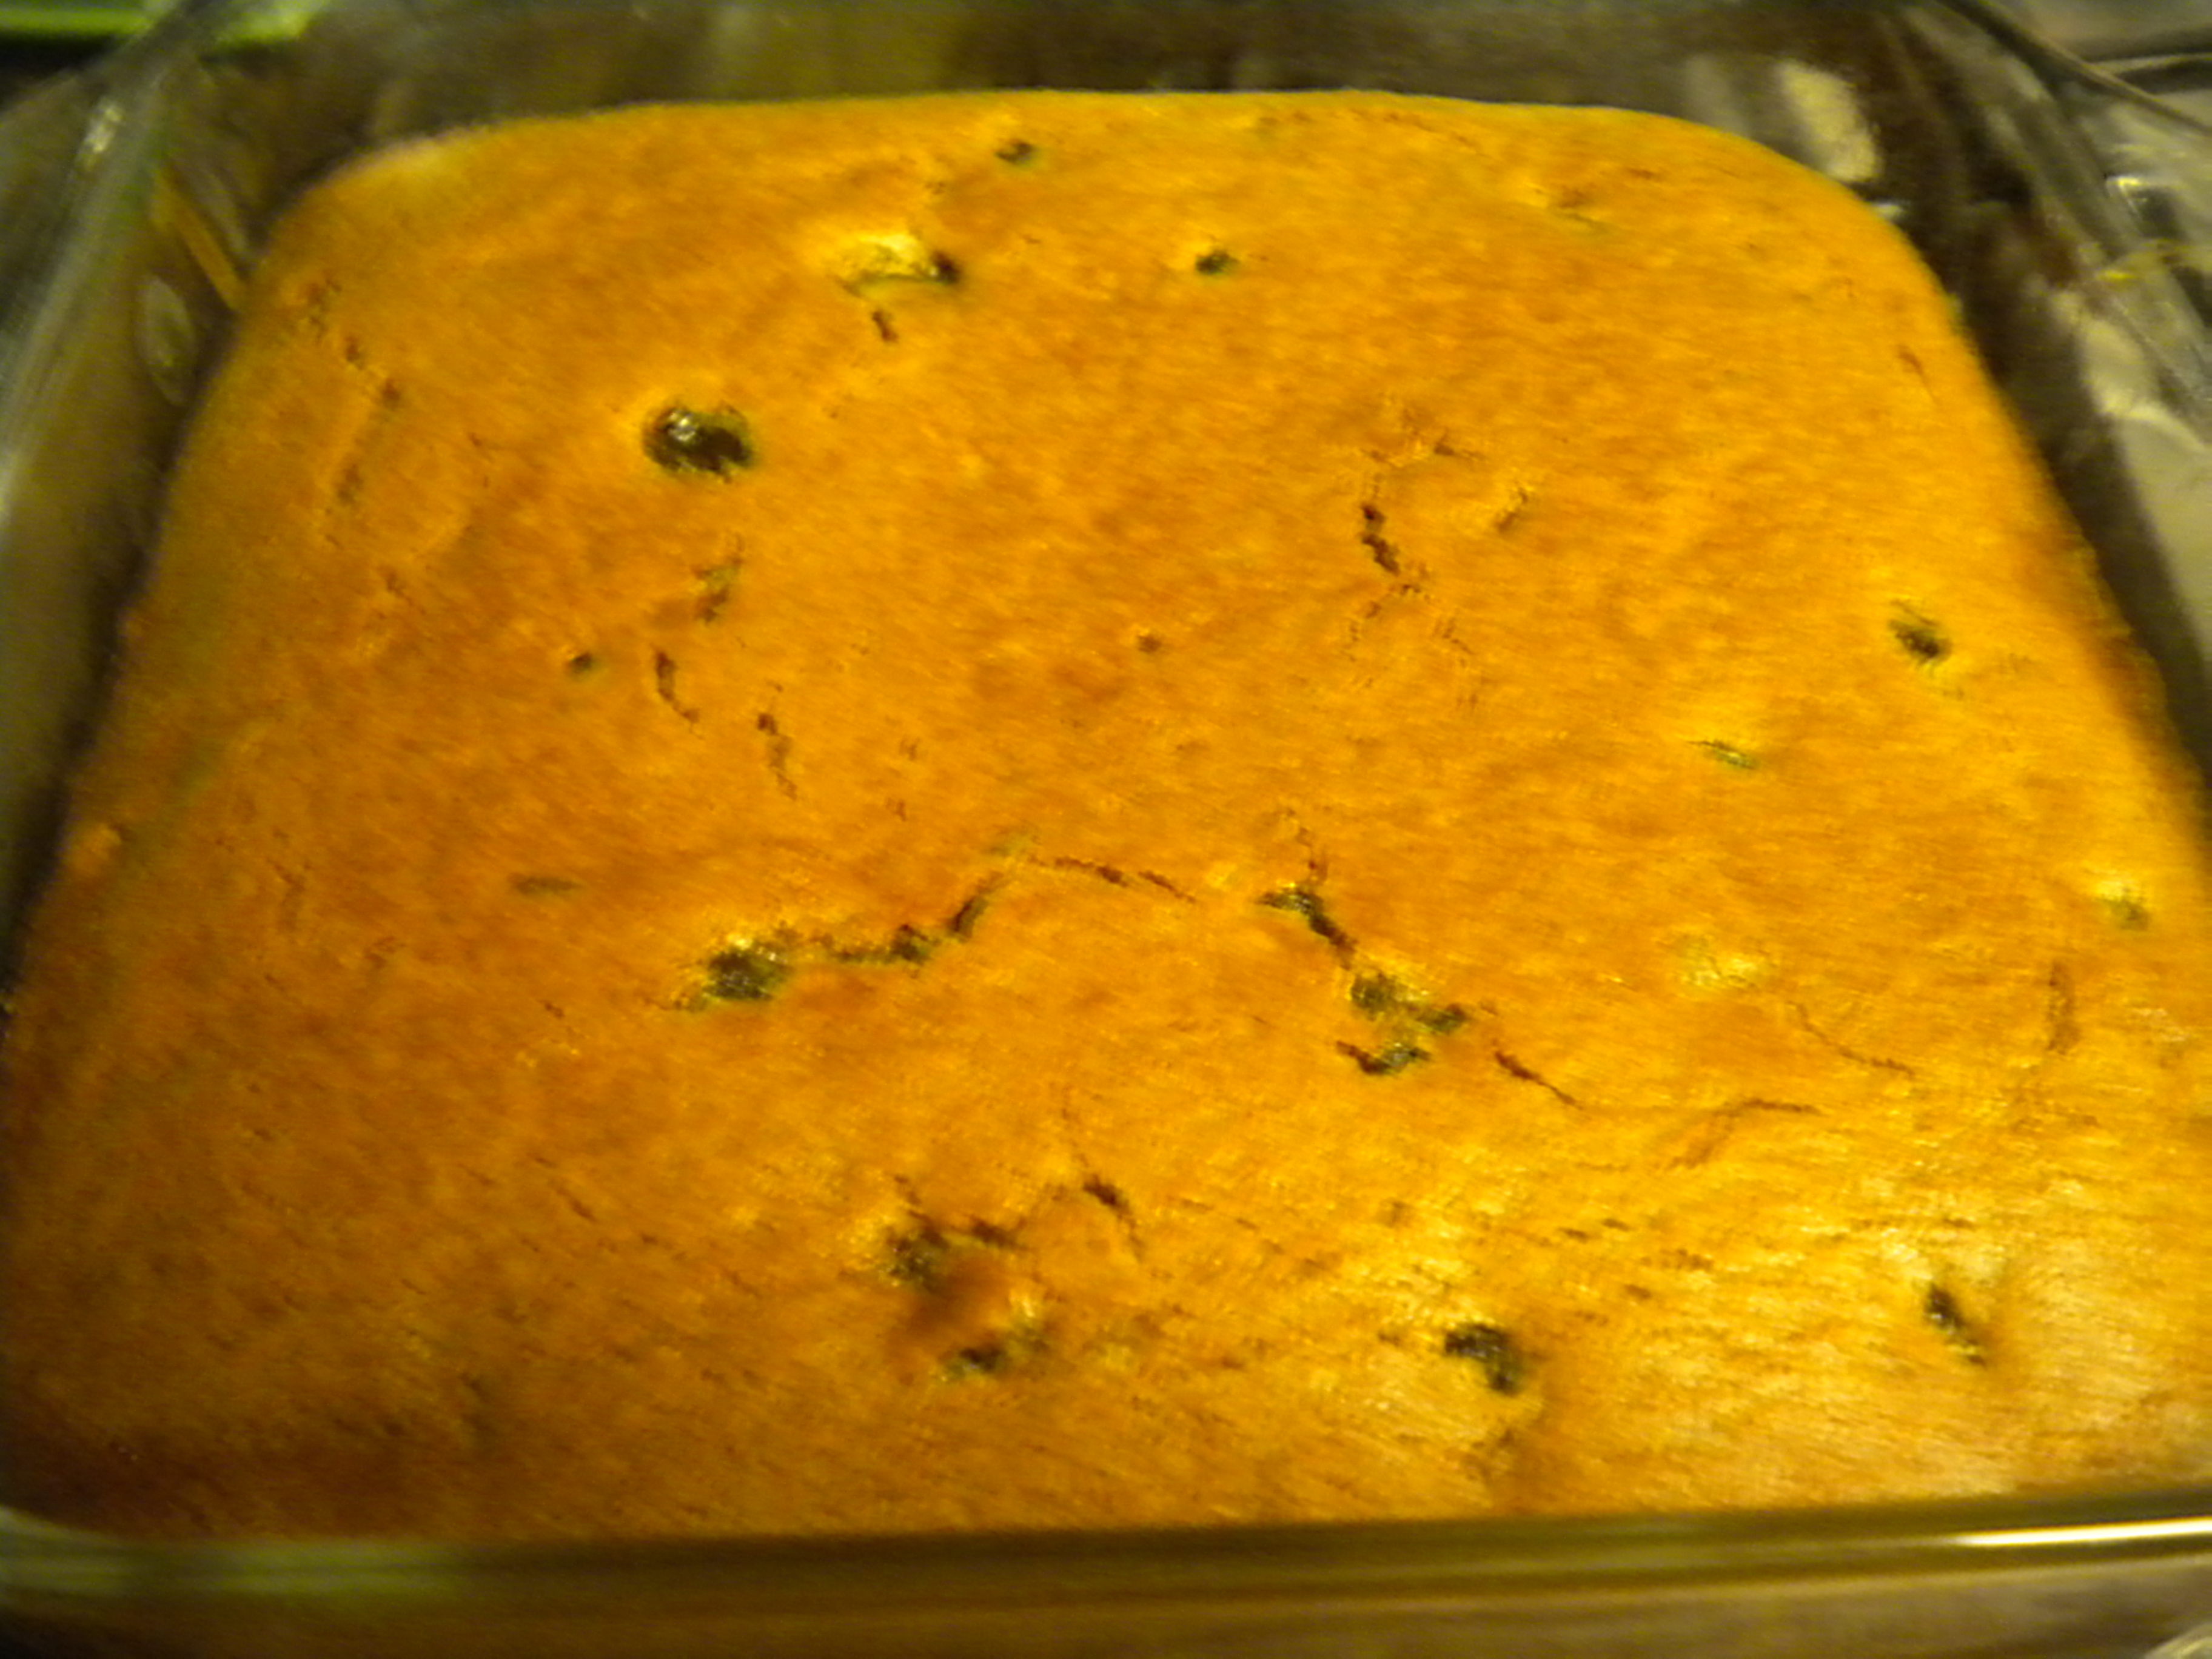
It’s still National Bake Week so what are you going to bake today? I made some Raisin Spice Bars which served as our Breakfast today. /raisin-and-spice-bars/ They are yummy and full of energy. Do you like Baked Goods with Molasses and Raisins? I do and these are especially good.
Before we go any further, do you know where Molasses comes from? If not, think about the different types of Sugar we have. There is: Granulated, Brown, Dark Brown, Powdered and then Turbinado which some manufacturer’s call Raw. Bear in mind that you cannot use Raw Sugar. It is full of bugs and what not.
So how does the Brown Sugar get its color? Molasses, that is what! There are many steps in the manufacture of Sugar and Granulated is the final one in the processing of sugar cane. Molasses is a natural product in sugar. So on the way to being Granulated, Brown and Dark Brown are one of the products. So Molasses is a sweetener.
Making these breakfast gems is a simple task, especially if you use your food processor or electric mixer. Start with softened Butter and Cream it with the Sugar. Either Light Brown or Granulated Sugar can be used, depending on how much Molasses taste you want in the finished product. Next add the Egg, Molasses and Milk and blend well.
Finally add the Raisins. For a moister and plumper raisin you can plump them by steeping in boiling water for 5 minutes. Be sure to drain well after plumping.
Turn the mixture into a greased pan and bake at 350 degrees for 20-25 minutes, depending on the oven. When a toothpick inserted near the middle comes out dry, then your Spice Bars are done. Cool on a wire rack. When completely cool, cut into bars.
If desired a Confectioners Sugar Glaze or a Cream Cheese Frosting can be used. /cream-cheese-frosting/
Again, this bar makes a very tasty and somewhat nutritioius breakfast. For an even healthie snack, substitute part of the cake flour with whole wheat flour.
Categories: Baking, Baking Tidbits, Main, National Food Days Tags: baking, Breakfast, Cinnamon, Cookie Recipes, Dessert Ideas, Fruit, Ginger, Molasses, Raisins
NATIONAL PEACH PIE DAY
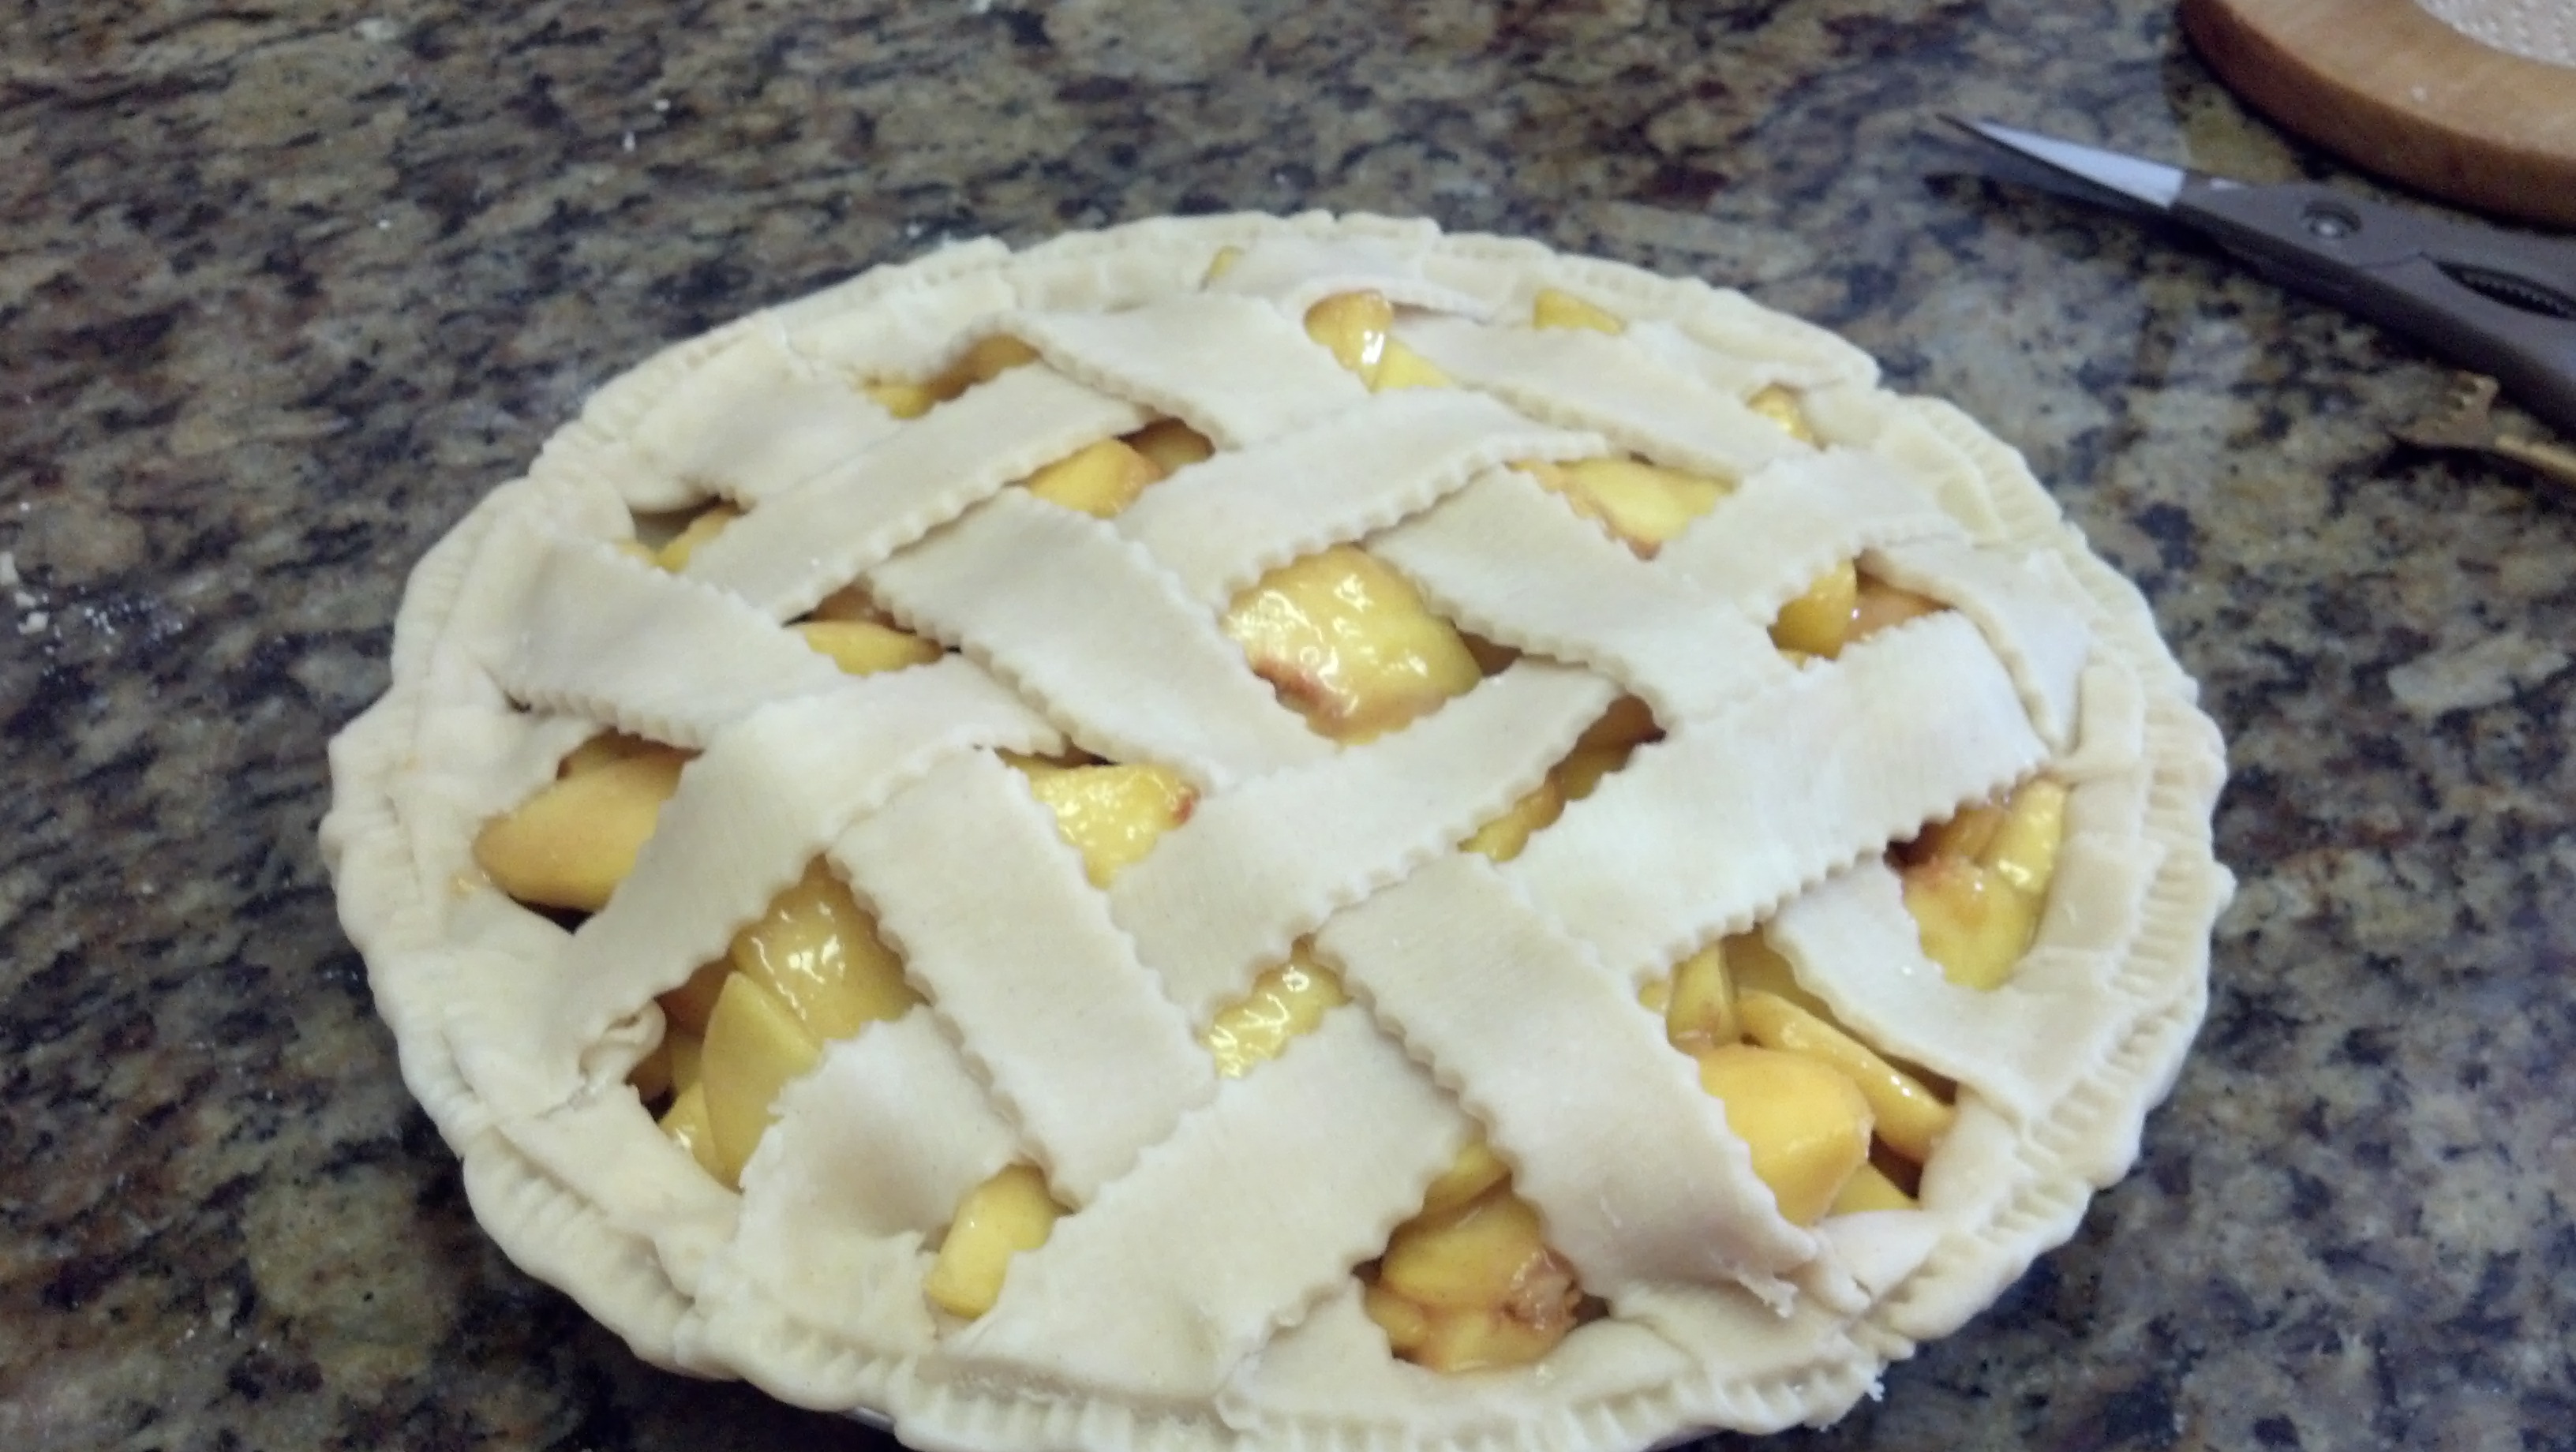
Friday, August 24, 2012 is National Peach Pie Day. You can either go out and purchase one or you can have the fun of making one or more, especially if you still have ripe peaches on your tree. If you have never made a Peach Pie, follow the recipe at peach-pie/ and make one for yourself and your family.
Peaches are a stone fruit native to China. The name implies that there is stone inside, but it is indeed a pit, a rather strong hefty pit. Peaches are related to Almonds and if you closely at the Peach Pit you will see a resemblance to an Almond. Because of this, adding Almond Extract to your Peach dishes, will enhance the flavor thereof.
There are many types of peaches to choose from, but some are better than others for pie making. The best type of peaches for making pies and other baked goods are the Freestone. The freestone peach meat separates much more easily from the pit than the Cling Variety. Whereas the Freestone Variety is better for baking, the Cling variety is better for eating out of hand in that they are sweeter than the Freestones. While you are following the recipe for Peach Pie, you can refer to the photos below for additional help.
EQUIPMENT NEEDED FOR MAKING A PEACH PIE
Mixing Bowls
Pastry Blender or your 2 table knives or your fingers
Measuring Spoons and Cups
Rolling Pin & Stockinette (The Stockinette is not mandatory but is very helpful)
Pie Pan
Vegetable Peeler & Paring Knife
Cutting Board
Colander
Saute Pan
Crimping Tool or Fork
INGREDIENTS NEEDED:
All-Purpose or Pastry Flour
Butter or Shortening
Salt
Ice Water
Egg for Egg Wash
Coarse Sugar for the top of the Pie
PROCEDURE:
- Make your Pie Crust and chill it while you are preparing the filling. basic-pie-crust/
- After making your dough, flatten it as much as you can and then wrap it in plastic wrap and chill.
- The next step is to peel the peaches. If the peaches are firm, you can peel them with a serrated vegetable peeler. If they are not firm, follow the directions below:
a. Bring a 2 quart pot of water to a boil.
b. With a small paring knife, make a crosswise slit in the top and bottom of each peach.
c. Have a bowl of ice water at hand.
d. Using a slotted spoon or spider, lower each peach (two or three at a time) into
the boiling water and allow to stay in the water for at least 1 minutes – this will depend
on the ripeness of the peach – the riper the peach, the less time it will take for the skin
to be released.
e. Use a slotted spoon to remove the peach from the boiling water and carefully place in
the ice water – the remove and use your paring knife to slip the skin off the peach. If
this is done properly, the skin should come right off. (Don’t forget – the amount of time in the boiling water will depend on the ripeness of the peach – this is something you will have to determine by yourself – if the peach becomes mushy you will know that the time in the water is too long – if it doesn’t want to come if then it is too short. Do one peach at a time until yo determine the correct amount of time they will need to remove the skine easily.
- Once all the Peaches have been peeled, split them in half, remove the pits and then slice them. It may be easier to quarter them first and then slice the quarters in half.

Peeled Peaches – these Peaches were firm enough to peel with a serrated peeler, thus avoiding the hot water bath.
- The next step is to put your sliced peaches into a large bowl and toss with the Flour, Cornstarch, Sugar, Spice mixture.
- If the peaches are very juicy let them sit awhile to drain and then put the drained liquid into a small saucepan and cook over medium/high heat until the liquid reduces by half. Return the reduced liquid to the peaches.
- Remove your Dough from the refrigerator and divide in half. Roll out the first half on a lightly floured board with a rolling pin covered with a stocikinette (See Illustration above) Rub Flour into the stockinette before rolling out your dough.
- When rolling out the Dough, only roll in one direction at a time, starting in the middle. Roll from the middle to the edge, and do this in all four directions.
- Once the Dough is large enough to fit into your pan, fold it in half, gently lift it up and place in the pan. Press down with your fingers to ease into the pan. Do not stretch or pull – it should just be eased in.
- Poke the bottom of the crust with a fork in several places to prevent it from breaking when baked.
- Place the prepared Peaches into the crust.
- Roll out the second piece of dough and fit onto the top of your peaches. If desired, you can make a lattice by cutting the dough into 1″ wide strips and weaving them over the Peaches.
The First Lattice Strip laid across the center. Lay the other ones down on either side equidistant from each other and the center stip.

Lattice Added & Crimped
The next step of course is to bake the pie. Unfortunately, I forgot to take picture of the baked pie. It was a Birthday Pie for my oldest son, and once everyone came over, I just forgot about taking more food pictures. For a photo of a baked pie with a complete top crust, see the peach-pie/ recipe.
Categories: Baking, Breakfast Ideas, Dessert Ideas, Main, National Food Days, Pastry Tags: baking, Cinnamon, Dessert Ideas, Fruit, Lattice Top, Peaches, Pie Crust, Pies
April 7th – National Coffee Cake Day
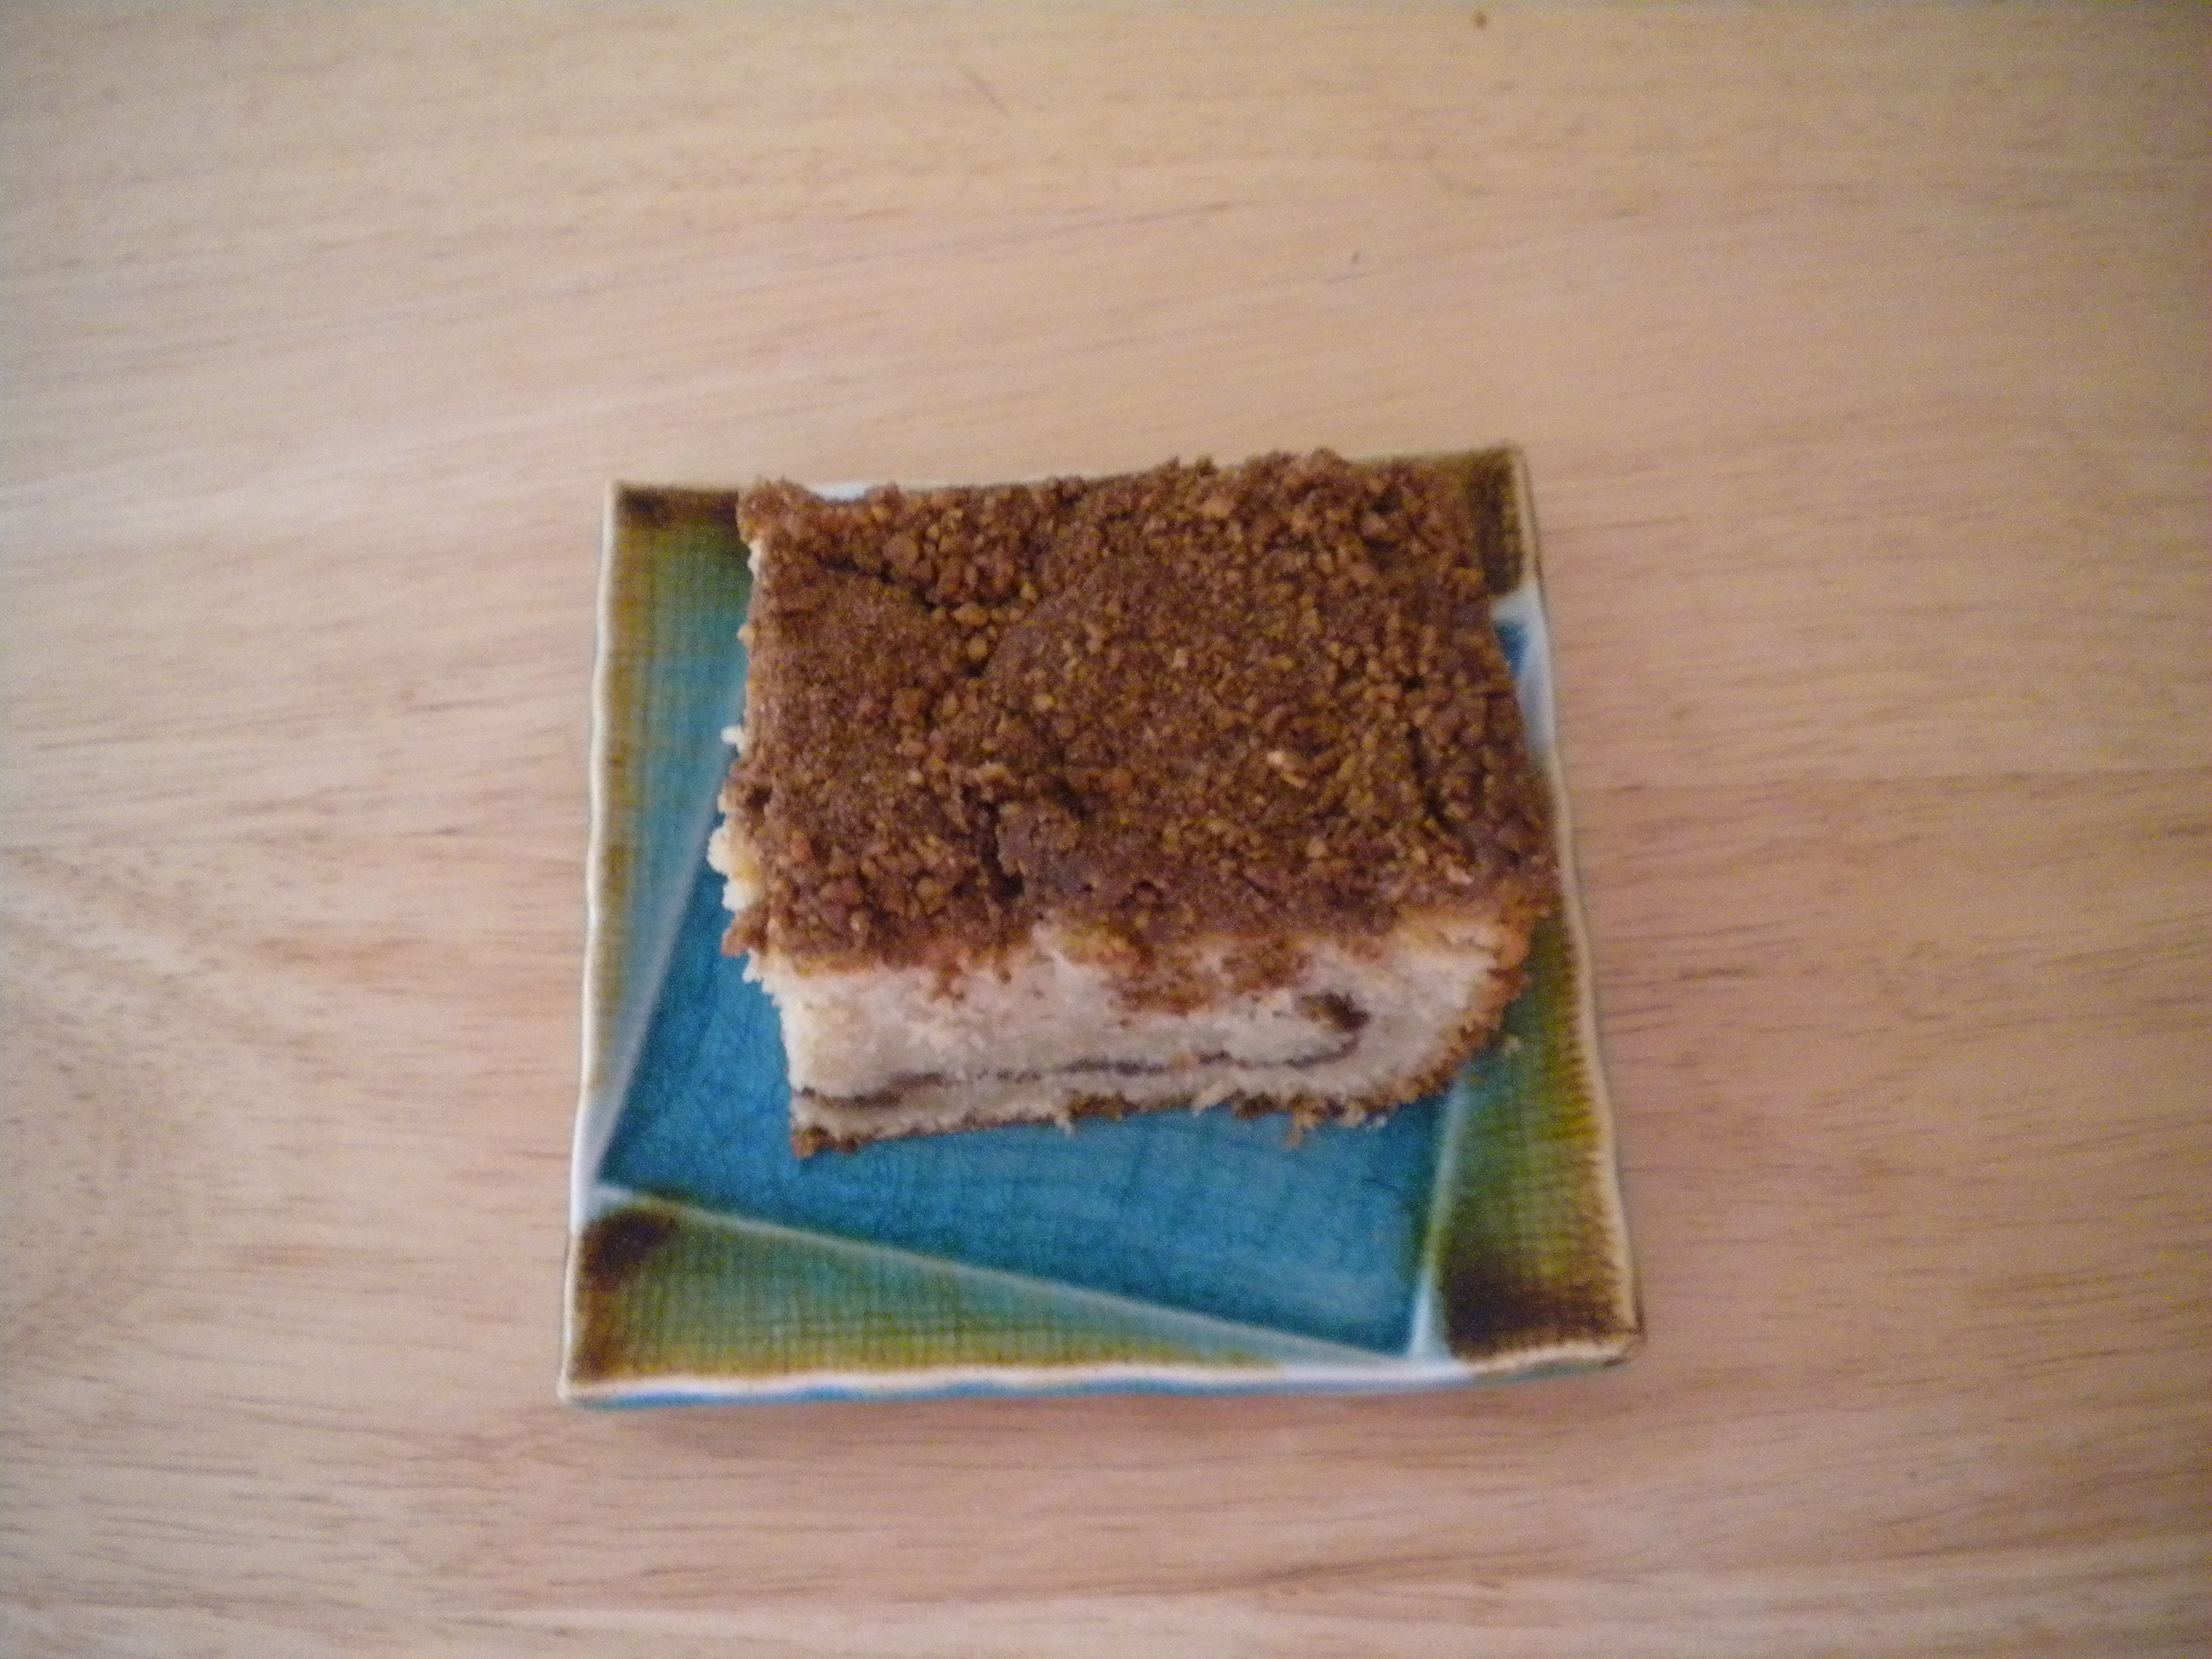
SHARING CULTURES THROUGH HOLIDAYS & FOOD
April Food Days
Saturday, April 7, 2012 is National Coffee Cake Day. The reason this cake is called Coffee Cake is not because there is coffee in it as an ingredient, but because it is meant to be eaten with a cup of coffee as the beverage. This is a good cake to have for breakfast because it contains eggs, sour cream and butter. The eggs and sour cream provide protein and the butter of course adds flavor as well as moisture to the cake. There are many versions of this baked delight and they are probably as numerous as the number of pastry chefs in this country.
Start with the basic recipe and then add your own fillings or fruity or nutty additions. The recipe below is for a basic cake with a nut/sugar topping. I belatedly remembered the Raspberry Sauce left over from our Waffle Breakfast this morning. It would have been a nice addition to go between the layers of the cake.
This cake does not have two layers in the traditional sense which would mean that there were two layers baked in separate pans. Just that half the batter is poured into the prepared pan and sprinkled with half the topping and then the remaining batter goes over the topping and the remaining topping goes over the second layer of batter. The raspberry would have been a nice flavor contrast.
Remember that if you decide to make this cake, that the ingredients can be varied. Buttermilk can be used in place of sour cream and in fact, I did not have quite a whole cup of sour cream so I added enough buttermilk to make up the difference. Buttermilk, like sour cream, adds a nice rich flavor to baked goods and also adds some moistness. I also substituted ¼ cup of the granulated sugar with ¼ cup of brown sugar. I love the flavor of brown sugar which can give a little caramel taste to baked goods. In addition to or in place of the nuts, shredded Coconut can be used for the toppings. Orange or lemon zest would also be a nice addition to the batter. You can even add dried cherries or cranberries to the batter also. Try your own variations with this recipe and please let me know how they turn out.
SOUR CREAM COFFEE CAKE
INGREDIENTS:
2 cups Flour
1 tsp. Baking Powder
½ tsp. Baking Soda
½ tsp. Salt
1 cup Butter
1 ¼ cups Sugar
2 Eggs
1 cup Sour Cream
1 tops. Vanilla
TOPPING
½ cup chopped Nuts
2 Tbsps. Sugar
1 Tbsp. Cinnamon
DIRECTIONS:
- Grease and flour the indicated a 9” square pan or a Bundt Pan; preheat oven to 350 degrees.
- Mix together the ingredients for the topping; set aside.
- Combine the Flour, Baking Powder, Soda and Salt.
- Cream the Butter and Sugar; beat in the Eggs and Vanilla.
- Add the Flour mixture, alternately with the Sour Cream.
- Pour half of the Batter into the prepared pan; sprinkle with half the Topping.
7. Spoon remaining Batter on top; sprinkle with the remaining Nut mixture.
8. Bake in preheated oven on middle shelf for 45-50 minutes or until a toothpick inserted in the middle comes out clean.
9. Cool on rack 20-30 minutes before removing from pan or serve directly from the pan.
Yield: 9 Servings
Categories: Baking, Breakfast Ideas, Cooking for Everyone, Main Tags: baking, Breakfast, butter, Cinnamon, Coffee Cake, Eggs, Nuts, Sour Cream, Sugar