Dessert Ideas

CULINARY MAKEOVER #22 – FROM BROWNIES TO FUDGE BROWNIES


 Old Brownies – dried out


For those of you who have been reading my ‘Makeover’ Articles, you probably know by now that I love to recreate new dishes from old leftover (yet viable) ones.  This addiction started when I purchased my first Blender many years ago.  The Blender of course, then advanced to the Food Processor which has been a ‘must have’ in my kitchen almost ever since it hit the U.S. market.

Our household now consists of only two people and our appetites aren’t what they used to be and even if they were, we would be pounds overweight if we consumed everything that I baked (let alone cook) and since I hate to throw away good food (especially when i created it), I have the fun of turning these dishes into new ones.

This weeks was turning my Husband’s Brownies into new Fudge Brownies.  Ev is supposed to watch his sugar content but he still loves his chocolate and has to have his fix every night after dinner (even if it is smaller than what he had been used to in previous years.)  Sometime I manage to remember to divide the batter in half and freeze one and bake the other one.  Of course, this takes smaller pans to do so and it isn’t always feasible.

So I took the leftover Brownies which were dried out but still good and cut them up into small pieces which I then put into the Food Processor with the Chopping Blade.  I pulsed the Brownies pieces until they were broken up into much smaller pieces.  I then turned the Processor on full speed and chopped up the small pieces to resemble a coarse flour or meal.  Next step was to measure the resulting Chocolate Crumb.

The ingredients including the Chocolate Crumb are listed below:

2 cups Brownie Crumbs

1 cup All-Purpose Flour

1/4 cup Cocoa Powder

1/4 cup Sugar

2 Eggs

1 cup Sour Cream (1/2 cup Butter can be used instead)

1 cup Chocolate Chips

1 cup Marshmallows (quartered)


DIRECTIONS ARE AS FOLLOWS:

1.  Return the Chocolate Crumb to the Food Processor.


 Measured Crumbs in Processor


2.  Add the Flower, Cocoa Powder and the Sugar.


Remade Batter 


3.  Pulse, just to combine the ingredients.

4.  Add the Eggs and Sour Cream (or melted or softened Butter) and Pulse, just until the   

     ingredients are combined.

5.  Stir in the Chocolate Chips.

6.  Butter or Spray a 9 x9″ baking dish;  add the quartered Marshmallows to the bottom of the       dish.


Cut Up Marshmallows


7.  Spread the Batter evenly over the Marshmallows.

8.  Bake in a preheat (350 degree) oven for 25-30 minutes or until a cake tester comes out             clean.

9.  The Brownies may be served warm or cooled.  And they are delicious served with Vanilla           Ice Cream.

  Remade Fudge Brownies

Digg This
Reddit This
Stumble Now!
Buzz This
Vote on DZone
Share on Facebook
Bookmark this on Delicious
Kick It on DotNetKicks.com
Shout it
Share on LinkedIn
Bookmark this on Technorati
Post on Twitter
Google Buzz (aka. Google Reader)

Be the first to comment - What do you think?
Posted by sylveee - 2020/07/19 at 4:40 PM

Categories: Cales, Cookies, Cooking for Kids, Culinary Makeovers, Dessert Ideas, Family Fun, Leftovers, Main, Quarantine Cuisine   Tags: , , , , , , ,

OVER THE TOP HALLOWEEN SPOOKY BROWNIES


Here is a recipe that is fun to make and delicious to eat and is good for any time of the year – especially for all Chocolate Lovers.  This is a multi-layered Brownie that is composed of a layer of Chocolate Chip Cookie Dough, a layer of Oreos, a layer of Fudge Brownies and interspersed with Caramel Corn and Mini-Marshmallows.  When I made this recipe I used Oreo Thins but soon found out that the White ‘Stuff’ Icing in the middle wasn’t thick enough to show up in the ‘Over the Top Brownies’ when they were cut so we switched to Double Stuff Brownies.


Here is what you will need to make this delectable Chocolate Treat:

1 batch of Chocolate Chip Cookie Dough

16 Double Stuff Oreos

1 Batch of Fudge Brownies

Caramel Corn*

Mini-Marshmallows*


DIRECTIONS:


  1. Make your Chocolate Chip Cookie Dough and spread on the bottom of a greased  9 x 9 x 2 Inch Baking Pan.  (Deeper is fine too)


Chocolate-Chip-Cookie Dough-in-Pan


2.  Layer the Oreos evenly over the Chocolate Chip Cookie Dough.

Oreos Added


3.  Scatter some Candy Corn over the Cookies.  (optional)


Candy Corn on top of Oreos


4.  Next make the Fudge Brownie Batter and spread over the Oreos.


Brownie layer with                  Marshmallows on top


5.  The photo above shows the Mini-Marshmallows scattered over the Brownie Batter.  Before I baked it I had a change of heart and mixed the Marshmallows into the Brownie mixture so they wouldn’t burn.  My student who made this same recipe with me on Saturday decided to put the Candy Corn and the Marshmallows on top during the last 5 minutes of baking.  While this gives a nice browned Marshmallow finish, she did not scatter the marshmallows over the whole dish.  Doing so would have given the whole thing a much nicer appearance.


Mayas Version

Cut Brownies with Oreo Thins


Digg This
Reddit This
Stumble Now!
Buzz This
Vote on DZone
Share on Facebook
Bookmark this on Delicious
Kick It on DotNetKicks.com
Shout it
Share on LinkedIn
Bookmark this on Technorati
Post on Twitter
Google Buzz (aka. Google Reader)

Be the first to comment - What do you think?
Posted by Admin Test - 2019/10/28 at 10:06 PM

Categories: Baking, Cookies, Cooking for Kids, Dessert Ideas, Family Fun, Halloween, Main, Private Cooking Lessons   Tags:

Sunday Baking Project – Week #10 – Outrageous Pretzel Bars Reinvented

It seems that I have skipped Week 9 – will maybe get back to it sometime.  And this week I am taking the recipe a bit further.  The Outrageous Pretzel Bars are really that!  They consist of a Brown Sugar Cake (Brownie-like) and are topped with a Chocolate Fudge made with Sweetened Condensed Milk and Chocolate Chips.  More Chocolate Chips are put on top along with crushed Pretzels.  And the recipe is huge – they were cut into 24 Bars but maybe should have been cut into 36.  The bars are very chocolaty and filling and one cannot really eat much at a time.  That being said, my Husband loved the Bars!  He is an avid Chocolate Lover whereas I am not.  But they were good, especially the next day after they had time to dry out a little.

I took one-third to my Mahjong Group, froze one-third for one of my sons and we tried to eat the other third.  Since my husband is very reserved as to how much he eats and I am only an occasional chocolate consumer, we did have some left over.  After a week, the leftovers were thoroughly dried out and of course impossible to eat, but being the improvisor that I am, I just couldn’t throw them away.

My Food Reinvention skills came about when my Sons were small and I got my first Blender.  I started using leftovers to make other things.  The first was gravy that I turned into soup and so on.  I have a really yard time throwing food out so the Outrageous Pretzel Bars were the perfect thing to turn into something else.


         Outrageous Pretzel Bars

I broke up the leftover bars and put them into my Food Processor and chopped them up into as fine a crumb as I could.  Then I added about 1/3 cup of melted Butter and 1/4 cup Granulated Sugar.  (One could just use a Graham Cracker Crust Recipe for this Chocolate Bar Crust)  I did use it as a guide but the Butter called for was too much so I only used about 1/3 as stated above.


Next I pressed the Crumb Mixture into the bottom of my 9″ Springform Pan and baked it for about 5 minutes.  You could actually make the pie without baking the crust but the oven was already on for something else, so I did bake it.  The problem with baking is that it releases some of the butter and then you have to blot it off.


         Crumb Mixture in Pan


Next I made the Bavarian Creme.  I started out by making a Vanilla Soft Custard which is the base for all Bavarian Cremes.  Next I incorporated a cup of Whipped Creme into the Custard.  Recipe will be found in the recipe section of this blog.


Once the Creme chilled sufficiently I poured it into the Crust and then chilled the whole thing.  When it was ready to serve I took off the sides of the Springform and placed the whole thing, (bottom of pan included) on a serving plate and topped with Chocolate Curls.  Next I cut it into moderate portions.  The Bavarian Creme was actually much less filling than the original Pretzel Bars themselves.

      Bavarian Creme in Shell


         Chocolate Curls Added


                Single Portion

Digg This
Reddit This
Stumble Now!
Buzz This
Vote on DZone
Share on Facebook
Bookmark this on Delicious
Kick It on DotNetKicks.com
Shout it
Share on LinkedIn
Bookmark this on Technorati
Post on Twitter
Google Buzz (aka. Google Reader)

Be the first to comment - What do you think?
Posted by sylveee - 2018/07/11 at 4:51 PM

Categories: Baking, Dairy, Dessert Ideas, Eggs, Leftovers, Main, Pastry, Sunday Baking Project   Tags: , , , ,

SUNDAY BAKING PROJECT #6 – CHERRY CLAFOUTIS

June is Cherry Season in California and they are plentiful indeed!  All the Markets are featuring them and they are readily available at your local Farmer’s Market where you know they have recently been picked – no shipping, no mishandling – just great fresh Cherries.  Both Bing and Ranier are available but for today’s recipe we are using Bing.  Bing provide much more color and flavor and are perfect for baking.

If you are lucky enough to be close to Cherry Orchards (we used to go to Cherry Valley in Beaumont) to pick Cherries when I was growing up and I won’t tell you what the price was then – you would flip as you compare it to what we are paying today.  When my sons were young we went to Leona Valley which is North of the Conjeo – prices were still good then as compared to today.  One of the great things about taking your children to pick Cherries is that (at least when we did it) the owners said you could eat what you want as you were picking them.  Don’t worry – it didn’t hurt the farmers as you can only eat so many as you are picking.

To make the Cherry Clafoutis, you have to pit the Cherries.  When I was growing my Mother and I used to use a darning needle to push the pits out of the Cherries.  You can imagine how long that took.  Today you can buy Cherry Pitters to help you do the job.  I have one that pits the Cherries one at a time and one that does it in multiples.  The one that does it in multiples is from Germany and does a great job, but you do have to sort through the pitted Cherries to make sure that all the pits were removed.  it is easy for one or two to get through the chute without having their pits removed.  There are multiple Cherry Pitters available at Amazon – enough to confuse you about which one to buy.


Hand Cherry Pitter


Multiple Cherry Pitter


The recipe for the Cherry Clafoutis is available at ‘Bake from Scratch’.  Just click on the previous ‘Cherry Clafoutis’ and you will get there.

I used to teach this recipe to my International Food Classes – there are a few differences between the one I used and this one.  I think that I prefer this one more because I love Cream and this is what this one uses.  My old recipe used Milk and this one uses Cream.  In addition, my old recipe just had you putting the Cherries on the bottom of the pan and this one has you baking a thin layer of the Custard before adding the Cherries.  This makes it much easier to serve and get those luscious cherries on each serving.

One you get the Cherries pitted, it is quick and easy to make – the Clafoutis is best served warm but it can also be served cold.  We like it with Whipped Cream but Ice Cream is good too or you can just serve it as is.

When you read the recipe you will be amazed that originally the pits were left in the Cherries – you can imagine what eating it must have been like!  The reason that the pits were left was for the flavor but today the flavor of the pits is replaced with Almond Flavoring.  The reason for this is that Almonds, Peaches and Cherries all have similar flavor characteristics.  Just compare a Peach Pit with an Almond and you will see the similarity.  I know a Cherry Pit does not look like an Almond or a Peach but the flavor profile is very similar.


BELOW ARE PHOTOS OF THE PREPARATION PROCESS:


              Pitted Cherries


           Making the Batter

          First layer of Batter

            Sugared Cherries

      Cherries in Baking Dish

 Baked Clafoutis

           Inside View of  Clafoutis 


          Powdered Sugar on Top                                                                                                                                                                                                                MEMBERS PHOTOS

Cynthia Allen

          Eileen Delcore Bennet

 Jeanne Ackerman

       Terrie Cooper

         CM Wolkon

    Elizabeth Barnhart Mockapetris

Digg This
Reddit This
Stumble Now!
Buzz This
Vote on DZone
Share on Facebook
Bookmark this on Delicious
Kick It on DotNetKicks.com
Shout it
Share on LinkedIn
Bookmark this on Technorati
Post on Twitter
Google Buzz (aka. Google Reader)

Be the first to comment - What do you think?
Posted by sylveee - 2018/06/10 at 4:06 PM

Categories: Baking, Baking Tidbits, Dessert Ideas, Farm Markets, Main, Sunday Baking Project   Tags: , , ,

ANGEL FOOD CAKE – – CHOCOLATE

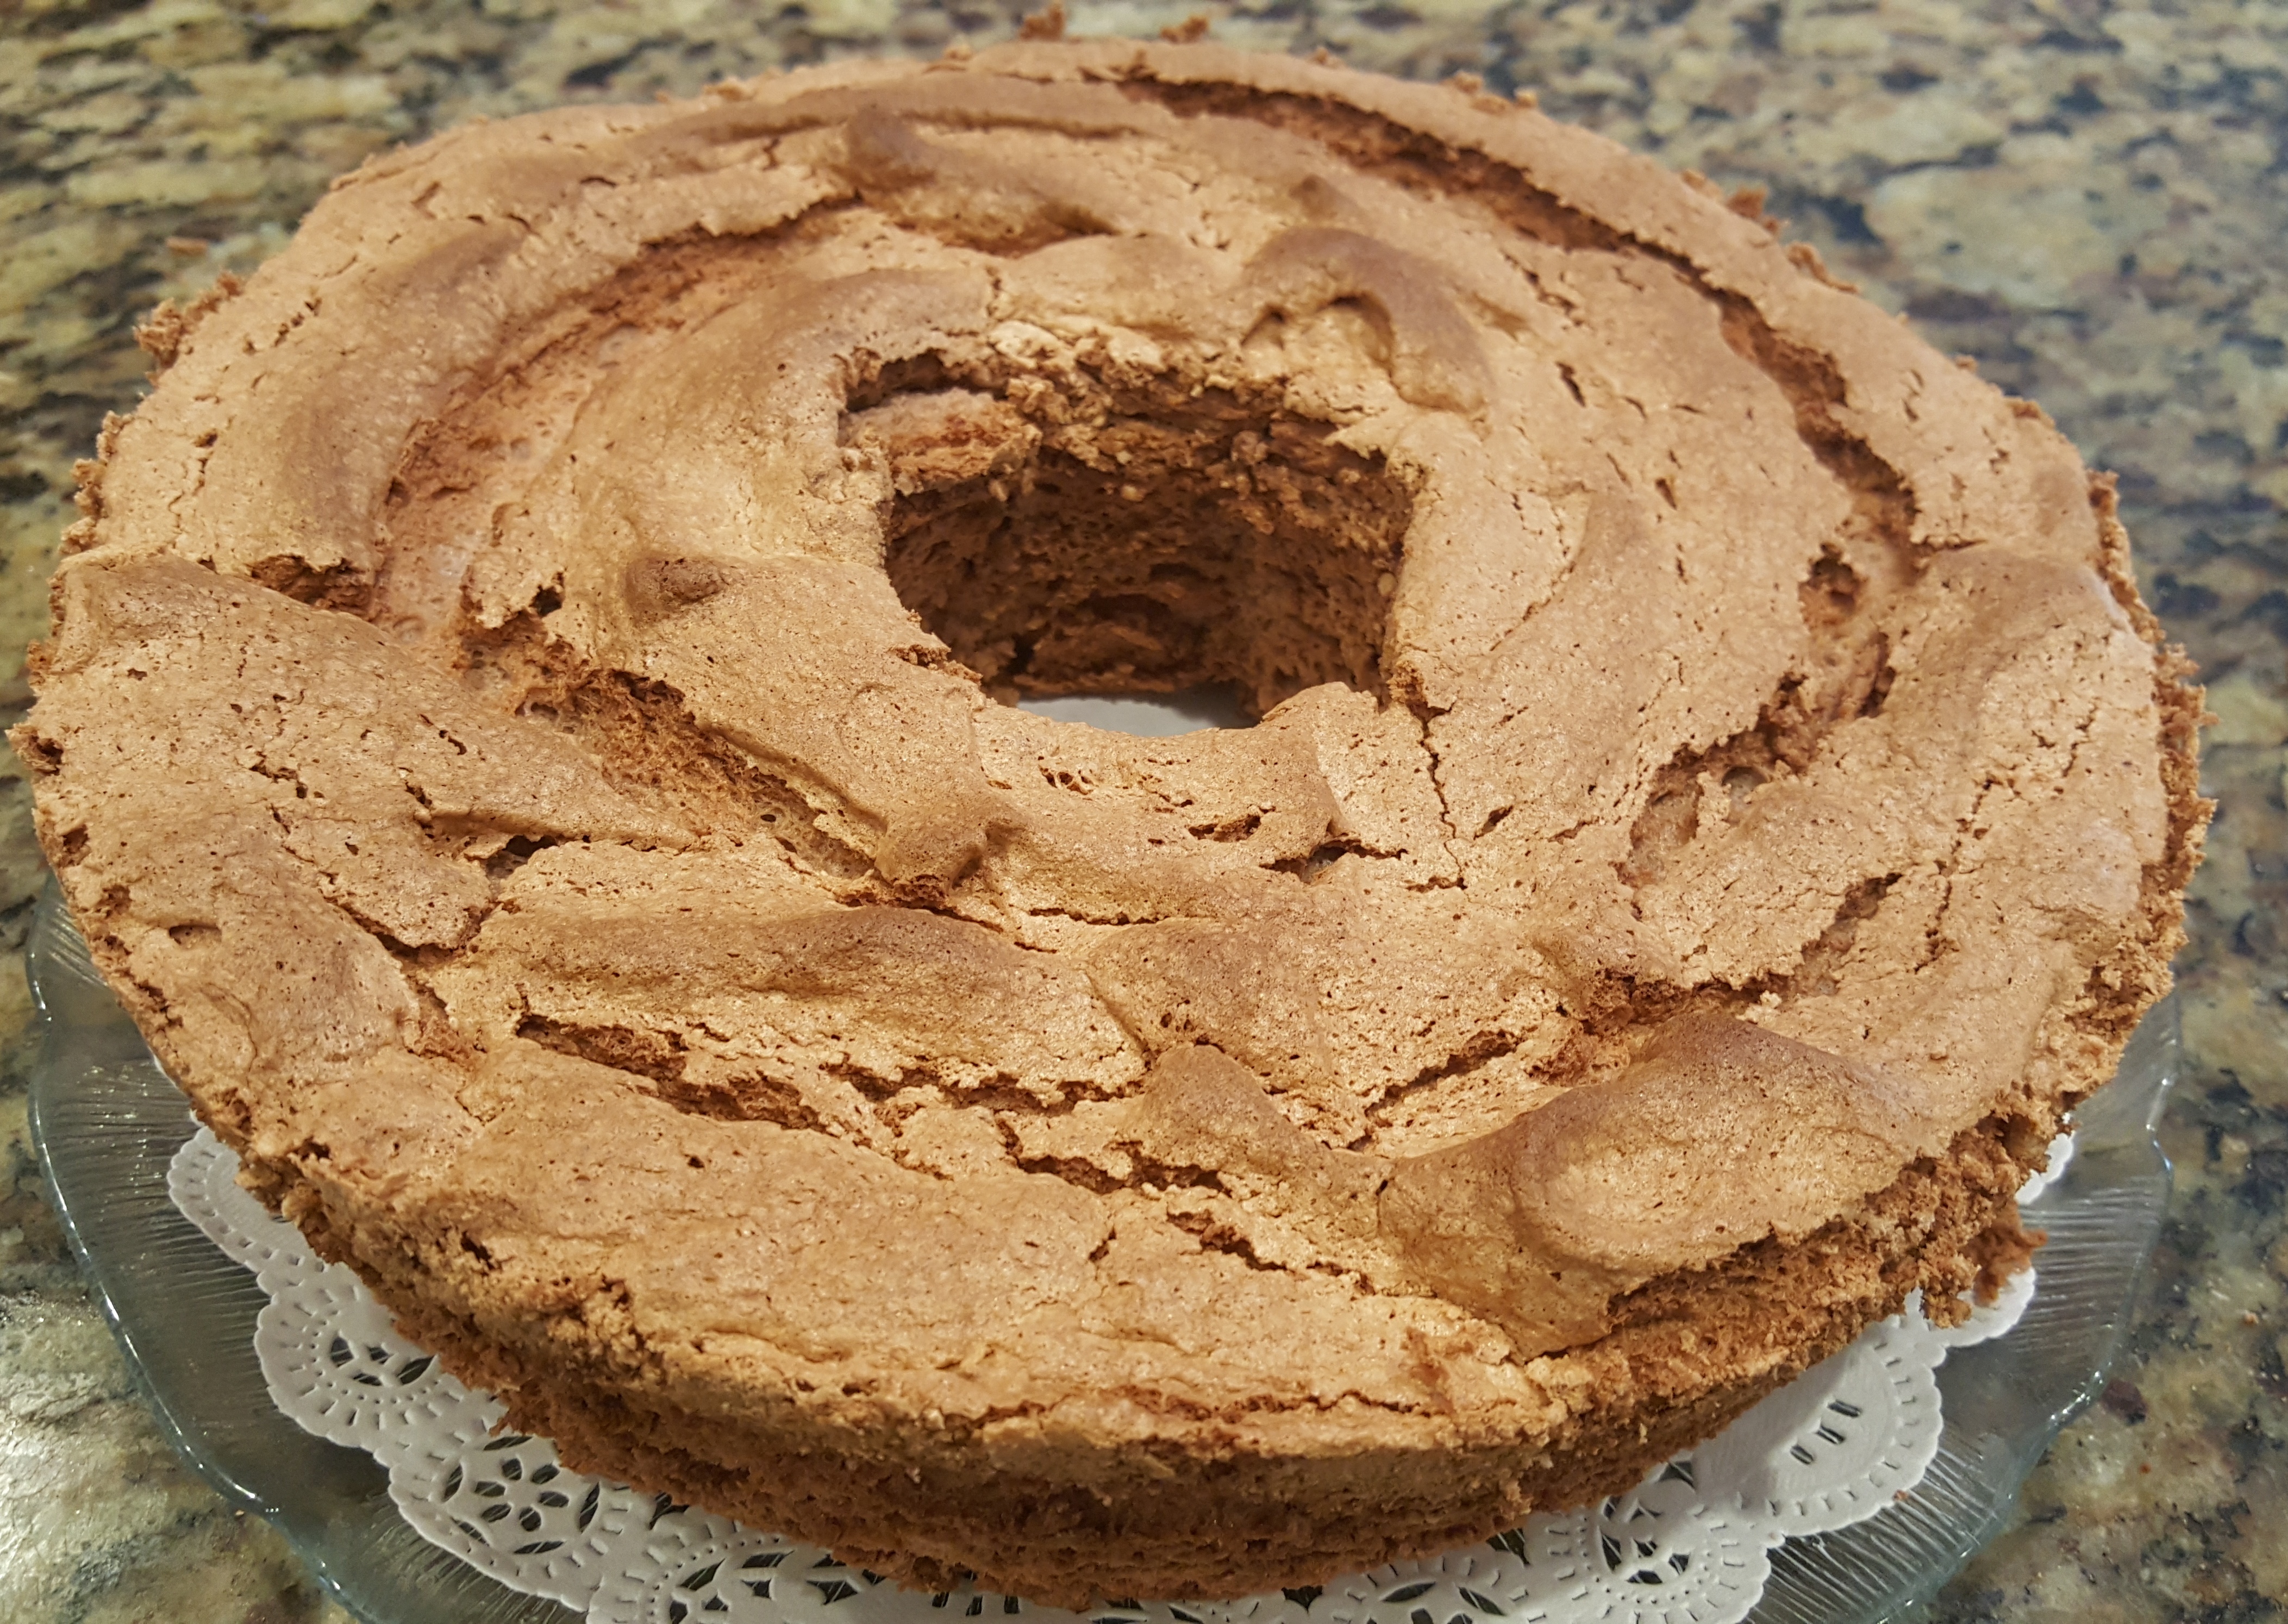
One of my favorite type of Cakes is Angel Food – specifically because I like Sponge Cakes and White Cakes and this one encompasses both.  My Husband loves Chocolate so in making the Chocolate Angel Food Cake we both get what we like.  Now the Chocolate Version of Angel Food Cake may not be ‘Chocolaty’ enough for the real Chocolate Lover but there are Add-Ons that can be used – for instance:

Chocolate Frosting

Chocolate Whipped Cream (or Ganache)

Make a trough by cutting out a portion of the cake from the top and filling it with Chocolate Ice Cream.  And so on and so on.  For the Recipe for Angel Food Cake and the variations thereof please go to the Recipe.

For making Angel Food Cake you will need a tube pan at least 9″ in diameter.  A Standing Mixer or a Portable Mixer.  The very first Angel Food I made was when I was 16 – I decided to make an Angel Food Cake for my Mother for Mother’s Day.  All we had was a hand Egg Beater, the old fashioned kind. All it had was teeth – no gears like the later models had.   It took me so long to beat the eggs that I ended up with a blister on my finger.  Well, it was worth it though.  (If I had known at the time about a Whisk that would probably have been a better choice but all we had was the Egg Beater.

A Rubber or Silicone Spatula will come in handy for folding the flour mixture into the beaten Egg Whites.

In addition a straight-edged spatula is good for loosening the sides of the cake from the pan.


In preparing the pan for the cake batter there is a variation from the norm in that the pan does not get greased or even lined with paper.  This is a ‘Sponge Cake’ and the cake sides need something to cling to as the cake rises.  If the pan is greased, the cake batter tends to slip down and you will end up with a heavy inedible cake.


The Cake calls for 1 cup Egg Whites (approx. 12 Whites from large eggs)  For a larger cake, use 1 1/2 cups of Egg Whites.  The pan that I used, could have held an 18 White Batter but then that would be too much cake for just the two of us.

If you do increase the number of Whites then of course you have to increase the rest of the ingredients accordingly.  1 cup of flour, 1/2 cup of Cocoa, 2 1/4 cups of Sugar, etc.

Before starting to make the cake separate the Whites from the Yolks (while the eggs are cold – it is much easier to do when the eggs are cold) and then let the whites warm up to room temperature – about 1 hour.


Make sure your mixer bowl is super clean – any traces of oil or other particles will keep the whites from beating up properly.

Once all the ingredients are measured and ready to go set your oven rack at the lowest position and preheat the oven to 375 degrees.

Place the Whites in the clean mixing bowl and then beat at high speed until they become foamy.  Add the Cream of Tartar, Salt and Vanilla and continue mixing until the Whites form soft peaks.  (If they are beaten too long, the cake will be too dry).  Once soft peaks are formed slowly add the Sugar while the mixer is going and continue to beat until the Whites will hold their shape when the beater is lifted.  If you are using a Standing Mixer this will not take very long.  An electric hand mixer will take a longer amount of time.


             Beaten Egg Whites


Once the Whites reach the desired consistency, (see photo above) remove from the mixer and with a rubber spatula fold in about 1/4 of the Flour/Cocoa mixture to ‘temper’ the Whites.  Then gently fold in the remaining dry ingredients.


  1st portion of dry Ingredients  


Place in the tube pan being sure that the batter is evenly distributed throughout the pan.


              Batter in Pan


Bake at the lowest position in the preheat (375 Degree) Oven for 45 minutes or until the top is dry and cracked.


             Lower Third of the Oven


Turn the pan upside down until completely cool.  If your pan does not have legs on it, place if over the neck of a wine or water or soda bottle.  Allow to cool completely.  Once the cake is cooled, loosen the sides with a straight-edged spatula and place on a serving plate.


     Cooling Upside Down


                   Loosening the Cake


To slice the cake use a serrated knife (bread knife) or a sponge cake cutting device.  Serve plain or with Ice Cream and fresh sliced and sugared Berries, Whipped Cream and Chocolate Sauce


                                  Plated Cake


              Slice Choc. Angel Food Cake


Digg This
Reddit This
Stumble Now!
Buzz This
Vote on DZone
Share on Facebook
Bookmark this on Delicious
Kick It on DotNetKicks.com
Shout it
Share on LinkedIn
Bookmark this on Technorati
Post on Twitter
Google Buzz (aka. Google Reader)

Be the first to comment - What do you think?
Posted by sylveee - 2018/05/22 at 10:22 PM

Categories: Cales, Dessert Ideas, Main   Tags: , , ,

SUNDAY BAKING PROJECT #3 – VERY BERRY TORTE


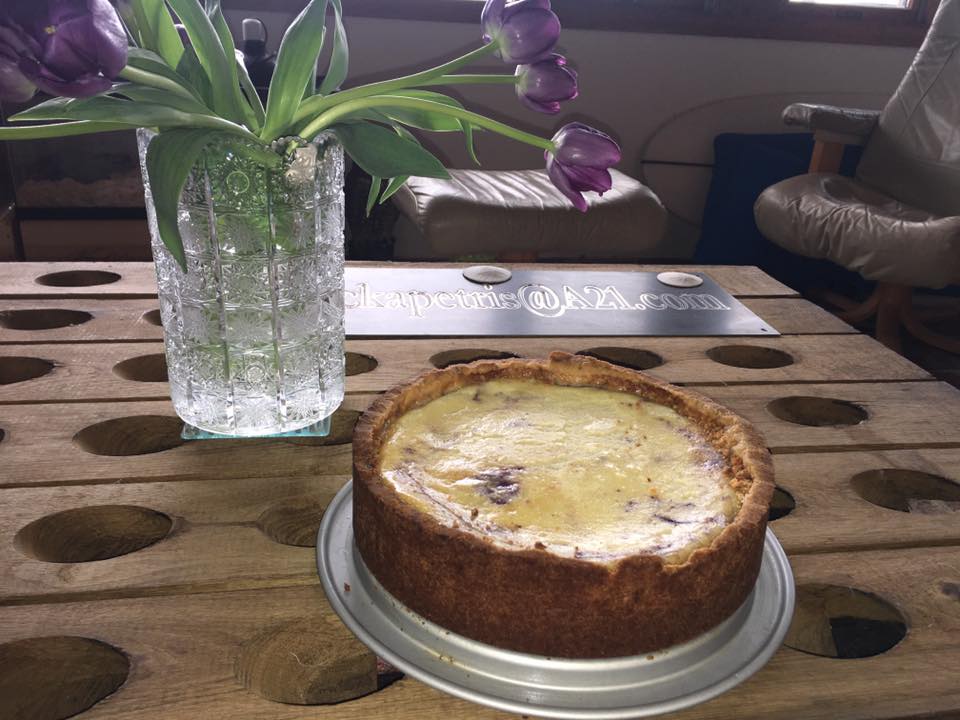
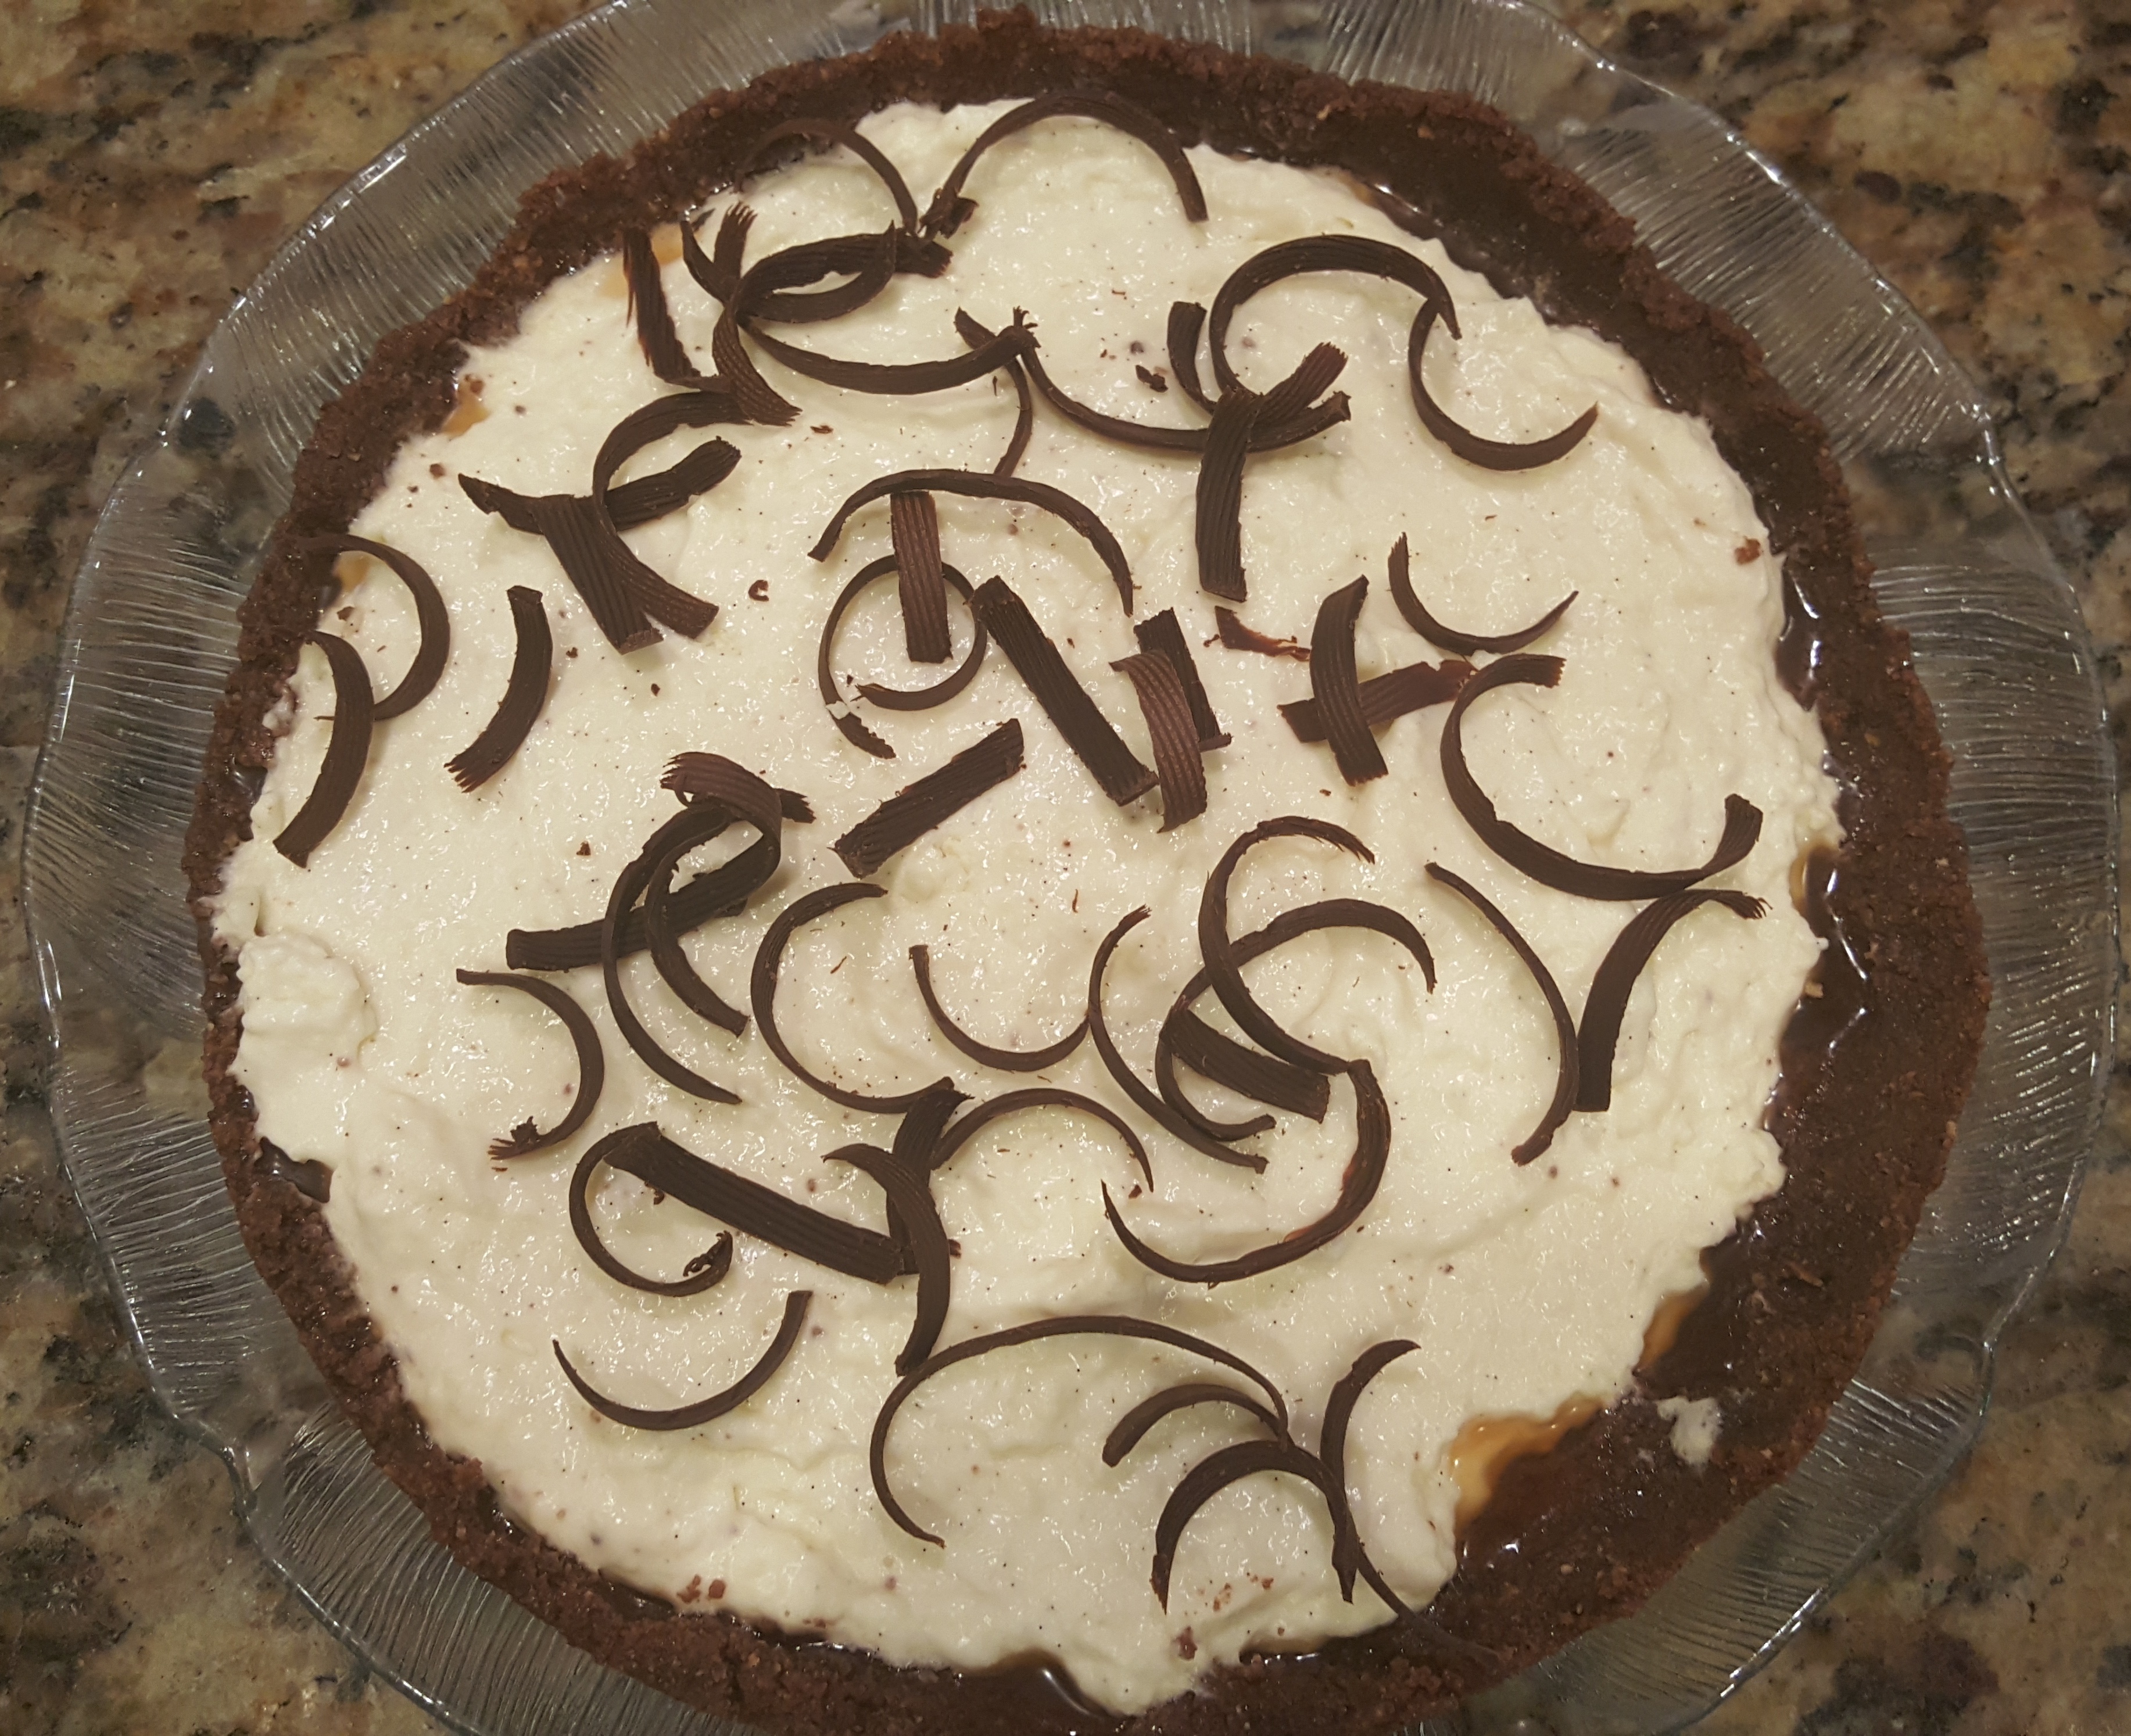
A Very Berry Torte was the selection for Week Three of our Sunday Baking Project.  The recipe was selected from the book – Baking from My Home to Yours by Dorie Greenspan.  

The Torte consisted of a Cookie Crust which differs from the traditional Graham Cracker Crust in that you actually make it from a Sugar Cookie Dough.  Jam goes on the bottom and the Cheese Cake Filling goes over the top.  It is made in a Spring Form pan which allows you to remove the cake without destroying it – this is especially good when the crust is quite fragile due to the ingredients it is made with.  A Spring Form Pan has sides that lock on to the bottom and by use of a spring lock can be removed once the baked product is finished.  If you don’t have a Springform Pan you can purchase one at your local Culinary Store or on line at Amazon.com.

The Filling was also a little different than the traditional Cheesecake in that in addition to Cream Cheese it also had Cottage Cheese in the Filling.  The Cottage Cheese helped to give the filling a little more texture than normal which turned out quite well.

The preparation of the Torte begins with the Crust which is pretty similar to a traditional Sugar Cookie Dough and it certainly behaves like one in that it is not super easy to work with.  To roll the Dough out with as little trouble as possible it is best to refrigerate it first.  I did this by flattening the dough into a circle between two pieces of waxed paper.  When you do roll it out it is best to roll it between the sheets of waxed paper so it doesn’t break up.  You can also press the dough into the Springform pan although I don’t think you can get as even a crust as you would like with this method.

After the Dough is rolled out it is then refrigerated for 30 minutes before baking.  To bake the Crust it is best to use a ‘Blind Filling’- a sheet of buttered Aluminum Foil placed on the Dough with Pie Weights.  The Weights can be purchased or you can use dried beans.  The beans can be stored in an airtight container and used again many times as of course the weights can.  The Weights come in various forms – some are metal, others are ceramic.  They all work in pretty much the same way and whatever you buy would be up to you.

Pie Weights on Foil in Crust


The recipe said to bake the crust for 30 minutes before removing the weights, but I found that to be a little too long.  Try it yourself with different times – every oven is a little different so what I tell you may not work in your oven.  I would start out with the suggested time and then adjust it from there if you plan to make the torte again.

After the foil and Weights are removed the crust is returned to the oven for about 5 more minutes to brown the surface.  I personally thought the crust was over-done and would definitely try it with less time or maybe not pre-bake at all.  If I do bake the Torte without prebaking the Crust I will come back here and post the results.

The Jam is spread over the baked crust – to my taste, 1/3 cup of Jam was not enough to cover the bottom of the crust – next time I would use at least half cup or maybe even more.  It is supposed a Berry Tart and you do want to be able to taste it.


1/3 cup thick Berry Jam

  Jam Spread on Crust


 Cherry Preserves


To make the Filling the the Cottage Cheese and Cream Cheese are first blended together.  Then the Sugar, Salt and Spices are blended and then the Eggs are beaten in.  This can all be done in the Food Processor or by hand in a large bowl with a whisk.  I think the Food Processor (if you have one) is the preferred method.  Much faster and the ingredients will be beaten more thoroughly than if you do it by hand.


9 oz. Brick Cream Cheese

 Filling Poured In

9 oz. Small Curd Cottage Cheese

3/4 C. Sugar

1/4 tsp. Salt

Pinch Ground Cinnamon

Pinch freshly Ground Nutmeg


2 Eggs


The Torte should bake for about 60 minutes or until the filling no longer jiggles when the pan is moved.  Additional cooking will take place after the heat is shut off and the pan is taken out of the oven.  In the older methods of making Cheesecake the instructions say to leave it in the oven (after it has been turned off).  I haven’t checked my old recipes but I think the actual baking time would be less.  i have the bad habit of over-baking my cheesecakes so if I looked up the old method it would probably be better for me to do it that way.


  Baked Torte


In the Baked Torte photo you can see the clasp that holds the circular sides onto the bottom of the pan.  When the Torte is baked and cooled the clasp is opened and should slide right off.  Oftentimes you may have to use a straight-edge spatula to completely separate the cake from the pan.


All in all, this Berry Torte Cheesecake was very good – it tasted delicious even if my version didn’t come out looking beautiful.  We had it for Breakfast – after all it does contain Eggs, Cheese and Fruit – items that we often incorporate into our Breakfasts.  Of course we didn’t eat the whole thing at once, so it was also eaten for Dessert at another meal.


In the photos below are the plated cake and a slice topped with Whipped Cream.


MEMBERS PROJECT RESULTS


 Elizabeth Barnhart Mockapetris


             Jean Ackerman


       Terrie Cooper

           Elizabeth Delcore Bennet

Digg This
Reddit This
Stumble Now!
Buzz This
Vote on DZone
Share on Facebook
Bookmark this on Delicious
Kick It on DotNetKicks.com
Shout it
Share on LinkedIn
Bookmark this on Technorati
Post on Twitter
Google Buzz (aka. Google Reader)

Be the first to comment - What do you think?
Posted by sylveee - 2018/05/18 at 4:51 PM

Categories: Baking, Baking Tidbits, Cakes, Cales, Cheese, Dairy, Dessert Ideas, Main, Pastry, Sunday Baking Project   Tags: , , , ,

SUNDAY BAKING PROJECT #2 – LEMON CHIFFON CAKE

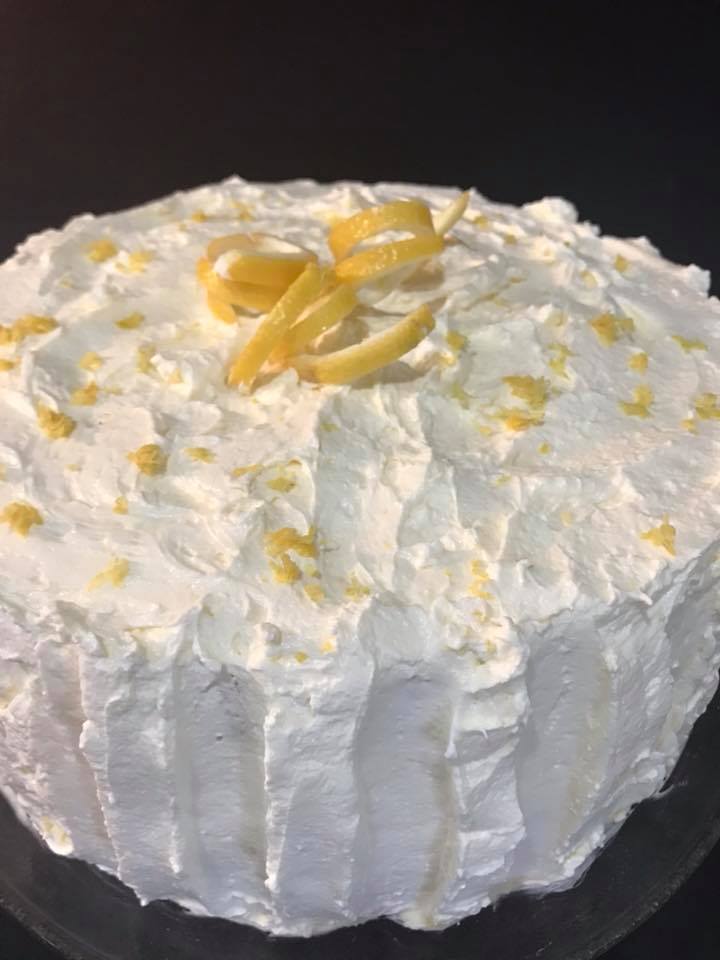
This Past Sunday,May 7th was the second week of our Sunday Baking Project.  The selection this week was Lemon Chiffon Cake.  It was supposed to be a nice contrast to the ‘Decadent Chocolate Cream Pie’ of last week.  Indeed, it was a nice flavor contrast to the Pie but it was decadent in its own right.  The Cake was light and flavorful and the curd between the layers was very nice and Lemony, but it wasn’t mouth puckering as lemon can sometimes be.  I think maybe, it could have been just a tad more tart – in other words- a little less sugar.  Will try it that way sometime.  The Italian Buttercream Frosting was indeed the decadent portion of this cake as it was quite Buttery and I loved it!

The Recipe chosen was ‘Lemon-Love Chiffon Layer Cake from the Fearless Baker Cookbook by Erin Jeanne McDowell’.  If I didn’t mention this last week, the purpose of the club is to try new recipes which none of us has ever made – not specific to the item but specific to the published recipe.  In other words, I am sure that most of us have made Lemon Cake before, but not this specific recipe.  There were some things that were done differently than the traditional methods – therefore it makes it a new recipe for all of us.


Before going through the procedure for making the cake please take a look at the photos which will show how the final project is interpreted through different eyes.


           Jeanne-Ackerman

      Terrie Cooper  


         Cara Croxton


          Anna Redd


                Sylvia Rieman


Thank You Terrie for allowing me to use your photo for the feature image and I have to apologize to Eileen Delcore Bennet and CM Wolkon but I was unable to upload your photos.


MAKING THE CAKE:   This recipe actually took several steps to make and gave us the opportunity to hone different skills.


Before even beginning to prepare the Cake, Curd and Frosting, it is best to  Juice and Zest all the Lemons and Lemon Product that you will need.  The best Lemons to use for Lemon Desserts are Meyer Lemons if they are available.  Right now in Spring, they are readily available, at least in the So. Calif. Farmer’s Markets.  The difference between Meyer and Eureka is that Meyer are less tart and better for baked products.  Eureka are great for cooking and for drinks like lemonade.

You can Zest the Lemons with a fine grater but it is best to have an actual zesting implement.


      Eureka and Meyer Lemons

In this photo the Meyer Lemons are the ones with the orange hue and the Eureka are the ones front and more yellow.


             Lemon Zest


       Juicing the Lemons


The first Preparation was for the Lemon Curd which I chose to make the day before.  It needed to cool for at least 2 hours so making it a day ahead gives you plenty of time to let it chill. The instructions for this Curd are a little off the norm in that all the ingredients are mixed together and then cooked to the desired thickness.  Normally, the Egg Yolks are beaten first, then tempered and then cooked to the proper thickness.  Using the traditional method gives you a shorter cooking time but definitely more utensils to clean.  Even though the clean-up takes a little longer I do prefer the traditional method.   In the photo below, the Curd is covered with plastic  wrap which you want to cover the curd with to prevent a crust from forming.  The plastic wrap should actually be touching the curd.


Whisking the Curd


       Straining the Lemon Curd

Preparing the Curd for Refrigeration


The second Step was to make the Cake.  Making the Cake,  in itself was multi-faceted.  It involved:

  1. Separating the Yolks from the Whites.


Separated Egg Whites


2.  Sifting together the Dry Ingredients

  Sifted Flour, Baking Powder & Salt


3.  Whisking together the Wet Ingredients (other than Eggs)


Whisking the Milk and Oil Mixture


4.  Beating the Yolks for the Cake Batter – once the Yolks were beaten to almost the desired thickness,              the Liquid ingredients were added and beating resumed for one more minutes.  Next the Dry                    Ingredients were added in four separate increments.


Whisking the Yolks


5.  Beating the Whites to add to the almost finished Batter.


 Whipping the Egg Whites


6.  Next the Whites were folded into the Batter and then the Batter was divided between two greased and floured Pans.  I recommend lining the greased pans with parchment paper to allow for easier cake removal.

Combining the Whites with the Batter


7.  The Cakes were baked and cooled and then brushed with the Lemon Syrup.


              Baked Layer

        Sliced and Plated Layer


Ring of Frosting


8.  Making the Lemon Syrup involved only combining the Lemon Juice with the Sugar and bringing to a boil so that the Sugar is completely dissolved.  This takes only minutes.


9.  Once split in half there are 4 separate layers.  Each one should be brushed with the Lemon Syrup before assembly.


The Fourth Step was to make the Frosting – this involved Beating Egg Whites Again and making a Sugar Syrup and bringing it to the Soft Ball Stage (240 degrees F.)


Making the Sugar Syrup for the Frosting


Making Italian Buttercream


 Curd Spread Spread on Cake


              Frosted Cake


So All in All, there were a lot of skills involved.  Of course it is easier for an accomplished baker to do these things but it is also a good recipe for a novice to learn these skills.  All in all, the Cake was delicious in every part of it.  I do love Lemon and especially Lemon Curd but do also love the Italian Meringue that covered the cake.


Digg This
Reddit This
Stumble Now!
Buzz This
Vote on DZone
Share on Facebook
Bookmark this on Delicious
Kick It on DotNetKicks.com
Shout it
Share on LinkedIn
Bookmark this on Technorati
Post on Twitter
Google Buzz (aka. Google Reader)

Be the first to comment - What do you think?
Posted by sylveee - 2018/05/12 at 12:09 PM

Categories: Baking, Baking Tidbits, Cakes, Cales, Dessert Ideas, Main   Tags: , , ,

Sunday Baking Project

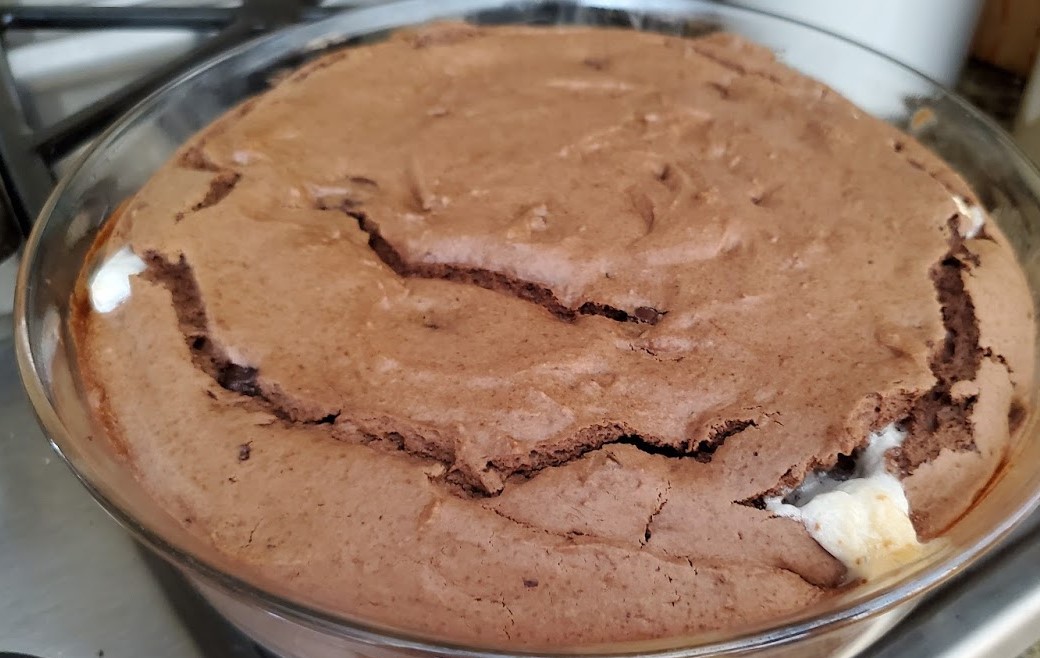
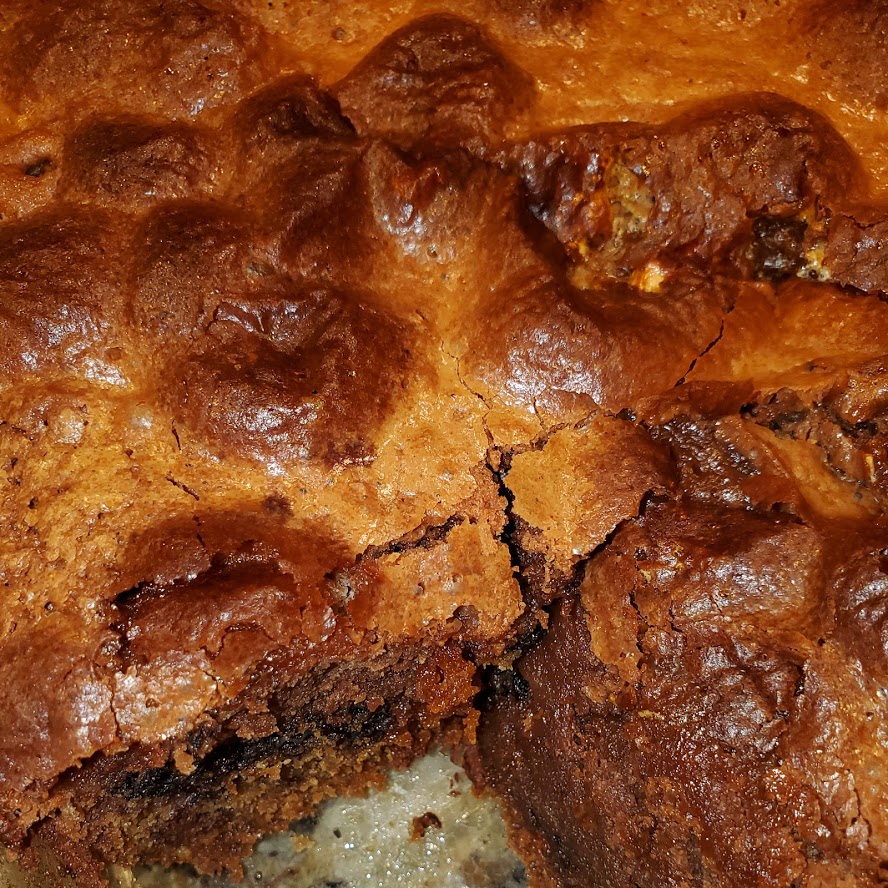
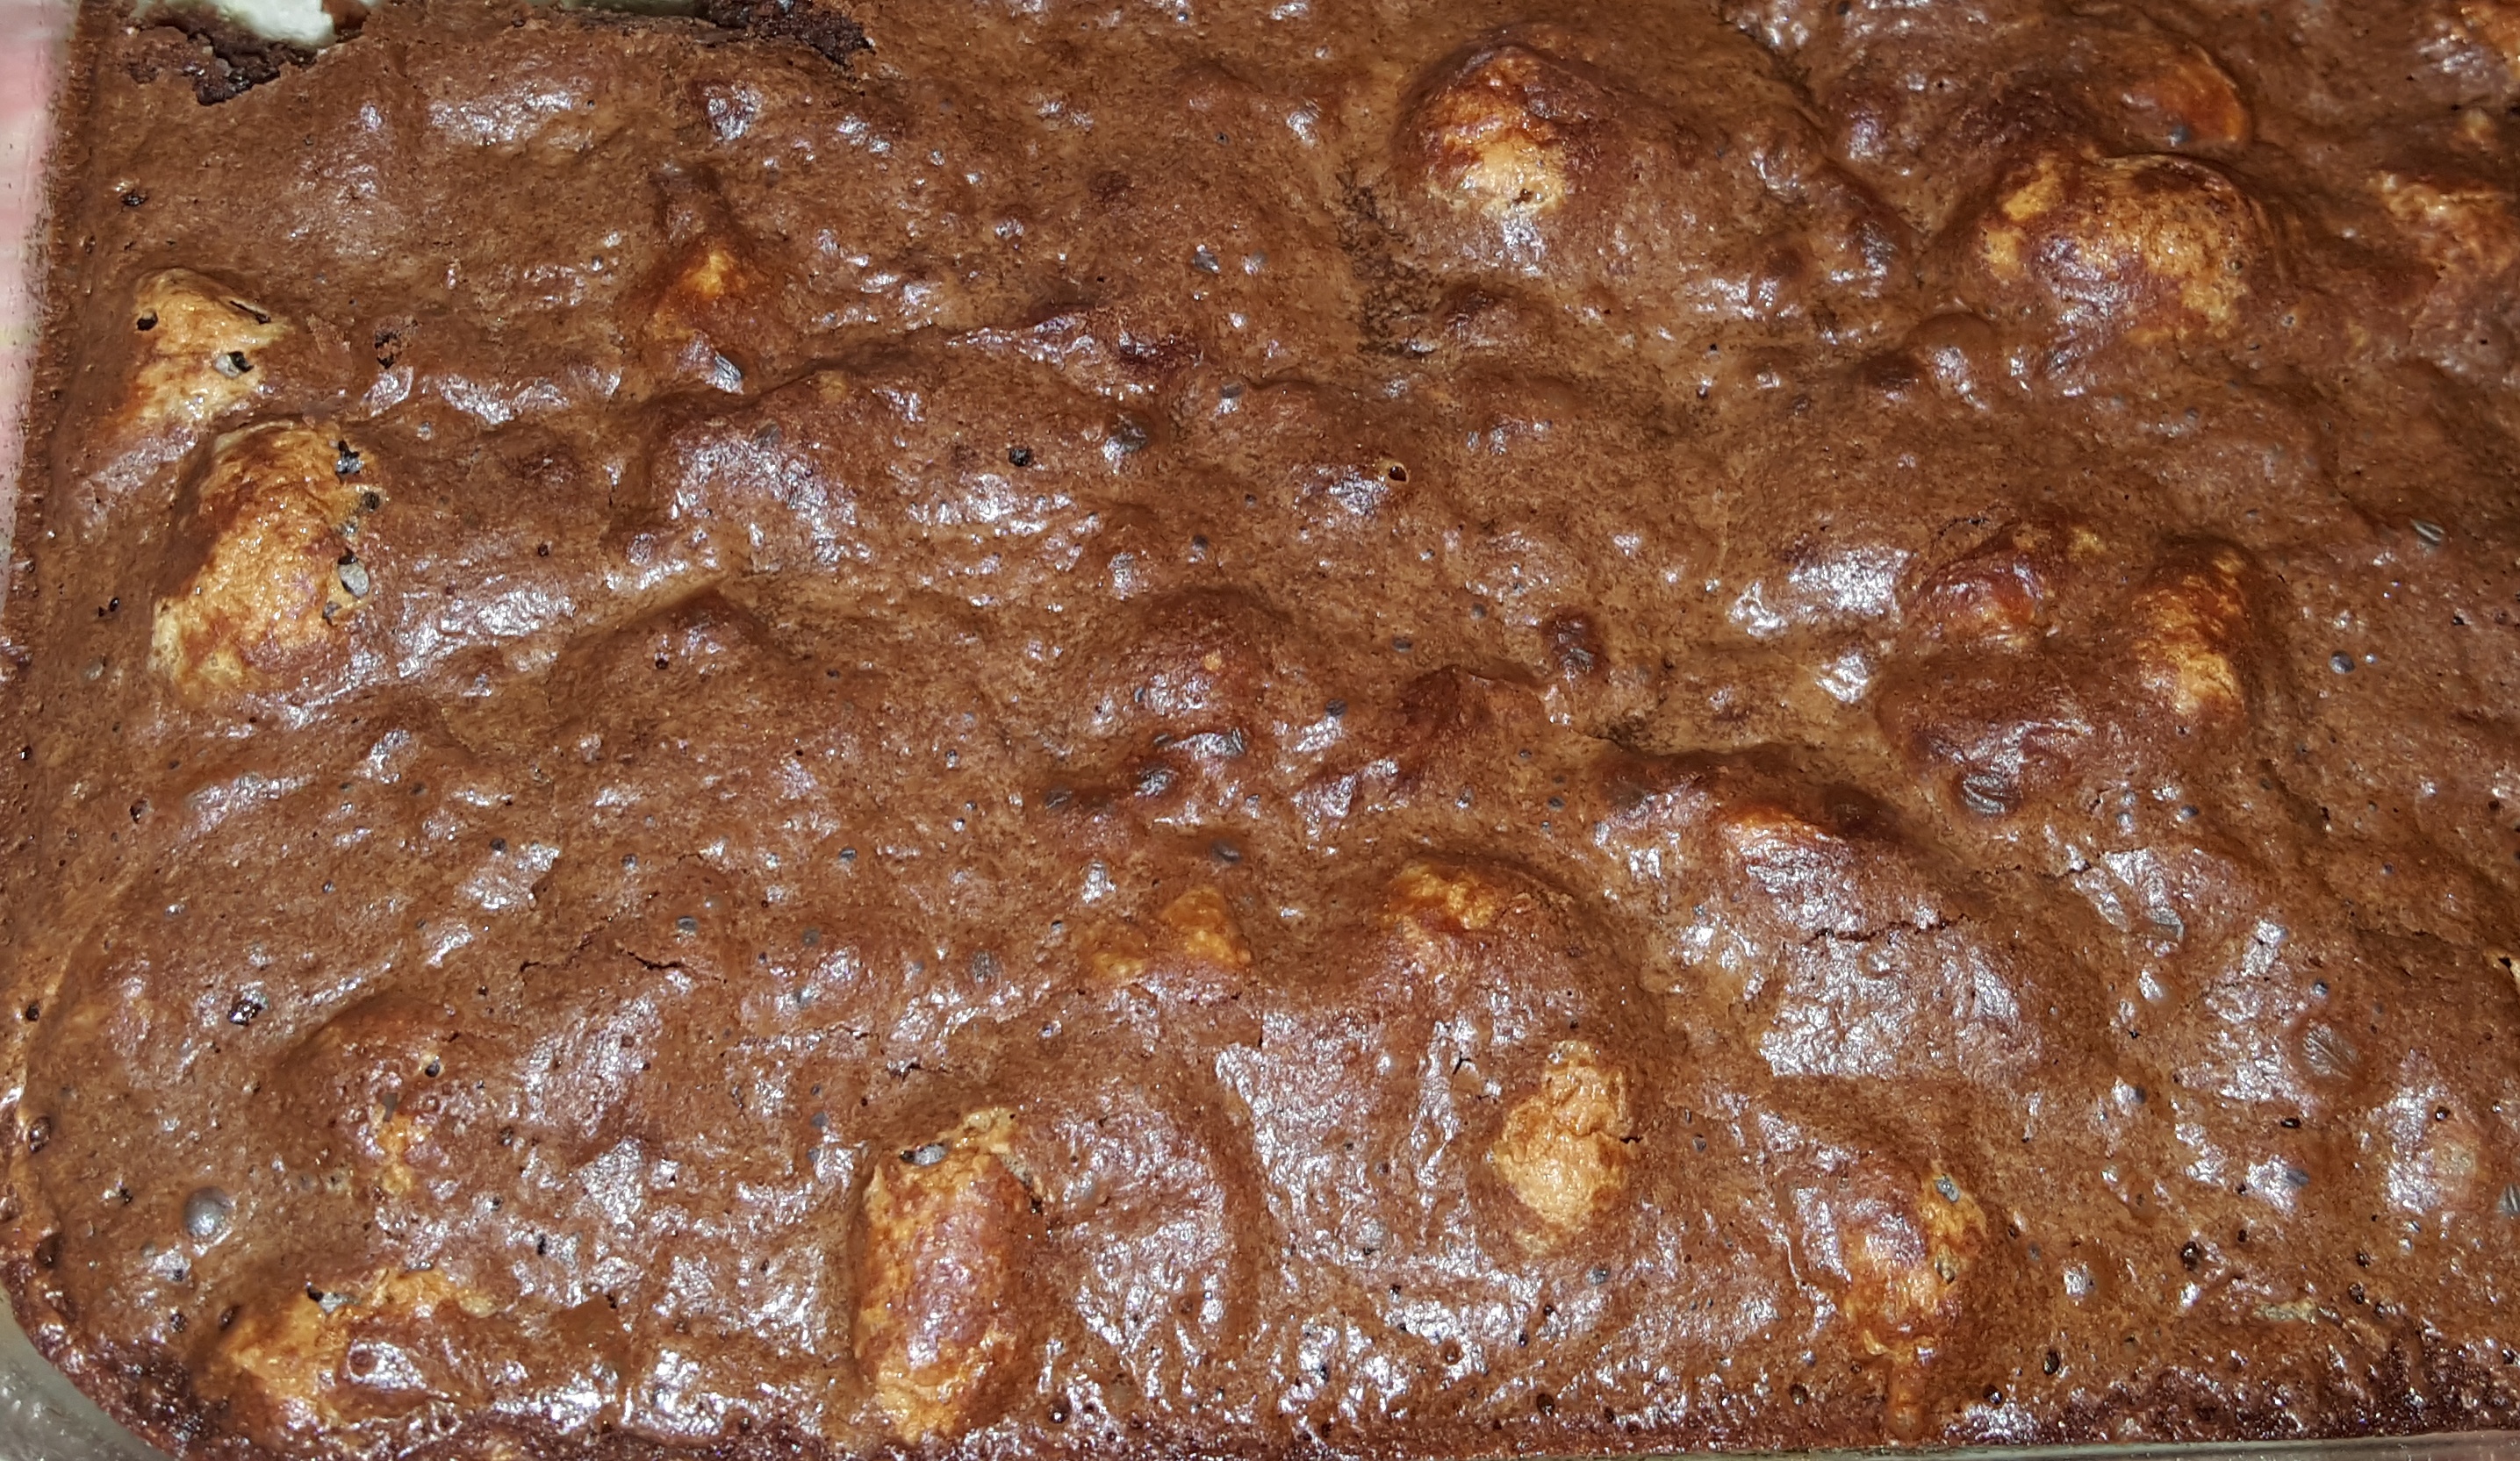
A Group of Culinary Friends and myself (sparked by a suggestion from Terrie Cooper and Eileen DelCore Bennet (who created the Sunday Baking Project Page) have formed a group,  the object of which is to try out new recipes.

This week, the first one,  the recipe was chosen by Terrie.  We all made a Chocolate Cream Pie from the book ‘Flour’ by Joann Chang.  We were supposed to make the recipe exactly as called for in the recipe but knowing this dessert was going to be dessert at a Luncheon I had for my Grandson and Wife and Nephew and Fiance, I didn’t want to take any chances in it failing and having to do it over or making something else.

The only deviation I did was to bake the Crust with Foil and Pie Weights for the first half of the baking period and it is a good thing I did because some of the other people in the Group had shrinkage of their crusts.  I also put Raspberries on top instead of shaved Chocolate because I didn’t have any Milk Chocolate and Dark Chocolate would have been too bitter.  Next week I will do the recipe exactly as called for.


The Pie Shell was a Pate Sucre and the filling was a Chocolate Cream (really Cream as it was made with Cream and Half and Half and Chocolate that had at least a 62% Cocoa content.  Mine was 67.  The filling was creamy and delicious and I am not a great fan of Chocolate Desserts.  The book is available at https://www.amazon.com/-Bostons-Bakery/dp/081186944X


The Group is called the’Sunday Baking Project’ but since we each make the product in our own kitchens we don’t necessarily have to make it on Sunday but we do post it on Sunday.


It is fun to do and we all end up with a great baked product and get input from each other as to what we like or don’t like about the recipe and ways to change it if we want.


The Procedure to make the Pie was as follows:

  1.  Make the Crust – Pate Sucre with:  1-cups All-Purpose Flour,  1/2 tsp. Salt, ¼ cup Sugar,   1/2 cup  soft Butter and  1 Egg Yolk.This Crust made in a Standing Mixer with the Paddle Beater and is actually a Cookie Dough and therefore is made like cookies with the Butter and Sugar being creamed together before the Flour, Salt and Egg Yolk are added.  It is a very rich Dough and needs to be chilled before rolling out.  Once you do start rolling, it does warm up very quickly so the rolling out process needs to be quick.  After the Dough is fitted into a 9 or 10″ Pie Pan, it is then chilled again for at least 30 minutes before baking.  I baked it with foil and pie weights even though the directions did not say to do that.  Some of the participants who followed the recipe exactly had shrinkage so I think using the foil and weights is a good idea.
  2. After the Pie Shell is baked, some of the dark Chocolate is placed on the crust and then returned to the oven for the chocolate to melt.  Once the chocolate is melted then you spread over the pie crust.  This seals the crust from the filling and prevents it from getting soggy.  I used a Silicon Pastry Brush to spread but a small spatula can also be used.


                                        Chocolate Sealed Crust


  1. Once the filling is made it is put though a strainer and then poured directly into the baked and sealed crust.  Refrigeration for 8 hours before serving is called for.  The Pie is topped with Whipped Cream and shaved Chocolate.  The complete recipe and directions can be found in the book for whoever is interested in purchasing it.

 Filled Pie Crust

Digg This
Reddit This
Stumble Now!
Buzz This
Vote on DZone
Share on Facebook
Bookmark this on Delicious
Kick It on DotNetKicks.com
Shout it
Share on LinkedIn
Bookmark this on Technorati
Post on Twitter
Google Buzz (aka. Google Reader)

Be the first to comment - What do you think?
Posted by sylveee - 2018/04/30 at 1:55 PM

Categories: Baking, Cooking for Everyone, Dessert Ideas, Main, Pastry   Tags: , , , , ,

CULINARY MAKEOVERS – # 19 – Chocolate Pizzelle Brownies

I love crispy wafer-like cookies and I get them when I make Pizzelles.  Pizzelles are a wafer-like cookie or pastry if you will, made in a flat decorative iron.  They are Italian in origin but are very similar to the Norwegian Krumkake which is also made in a flat decorative iron, though as thin as the Pizzelle is, the Krumkake is even thinner.

The recipe that I have for the Pizzelle is quite large and makes a large quantity.  The reason for the large quantity is that the cookie is so thin that it only take a tablespoon or less for each one – and they are at least 6″ in diameter.  This time that I made them, I made them Chocolate so that both myself and my husband would be able to enjoy the treat.  Ev loves Chocolate and I love anything thin so the Chocolate Pizzelle were perfect. Because the recipe makes such a huge quantity, I only made a half recipe.  (Next time I will make a third recipe)  Since the recipe calls for 6 eggs, dividing it half was pretty simple.  Dividing into thirds will also be simple, but if I make it any smaller, it wouldn’t be worth the trouble to do it.

In addition to loving thin crispy cookies, I also love Marshmallows and if you have ever had homemade Marshmallows, you would never ever eat a commercially manufactured one again.  To most people it would seem that Marshmallows are difficult make, but the opposite is true.  The main ingredients in Marshmallows are Egg Whites (only 2), Sugar and Gelatin.  You can get at least 16 2″square Marshmallows out of one recipe.

Since I like Pizzelle and love Marshmallows, I also made some Chocolate Pizzelle/Marshmallow Treats which were like little sandwiches with Marshmallow in the middle and Chocolate Pizzelle on the outside.  But since we are only a household of two and we don’t have company every week you eventually either get tired of eating the treats that were made or they get stale.  The Pizzelle were still edible after one week but they were getting a little soft and we were ready for something else.

As I said previous;y, Ev, my husband loves Chocolate and I make him a Chocolate Treat every week. Sometimes it is Chocolate Chip Cookies, sometimes it is Brownies and this time it was Pizzelle but as I said, after a week we were getting somewhat tired of the Pizzelle and even the Marshmallows so I decided to reinvent them or create a new treat, thereby coming up with Culinary Makeover #19 which was Chocolate Pizzelle/Marshmallow Brownies.

To make the Brownies, I first pulverized the remaining Pizzelle in the Food Processor and then transferred them to a Dry Measuring Cup (1 cup size)


Pizzelle in Processor

Broken-up Pizzelle in Food Processor Workbowl

Pizzelle Crumbs

                                               Pizzelle Crumbs


Next, I broke up the Pizzelle/Marshmallow Sandwiches and chopped them up.


Pulverizng Marshmallows

                                         Pulverizng Marshmallows


To make the Brownies I used my ‘Go-To’ Brownie recipe for Fudge Brownies.  The only difference was that I had 1 cup of pulverized Brownies.  The 1 cup of Pulverized Brownies replaced one cup of the Flour in the recipe.  So we had 1 cup of Pulverized Brownies and 1/4 cup of All-Purpose Flour.  I also reduced the Sugar to less than 1 cup.


Pizzelle Crumbs and Flour

                                              Pizzelle Crumbs and Flour


After making the Brownie Batter, I folded in the chopped up Marshmallows and baked them as usual.


Folding in Marshmallows

                                       Folding in Marshmallows


The result was a delicious, moist Brownie that had a cake-like texture but was very good and enjoyed by both my husband and myself.

Baked Brownies

                                         Baked Brownies


You can use any kind of stale cookies to make the Brownies – doesn’t have to be Pizzelle and other leftover baked goods can be utilized in the same manner.  Try it yourself and experiment to create totally new delights.  This treat is also good with Ice Cream!

Digg This
Reddit This
Stumble Now!
Buzz This
Vote on DZone
Share on Facebook
Bookmark this on Delicious
Kick It on DotNetKicks.com
Shout it
Share on LinkedIn
Bookmark this on Technorati
Post on Twitter
Google Buzz (aka. Google Reader)

Be the first to comment - What do you think?
Posted by Admin Test - 2016/08/30 at 4:40 PM

Categories: Baking, Baking Tidbits, Cookies, Cooking for Kids, Culinary Makeovers, Dessert Ideas, Leftovers, Main   Tags: , , , , , ,

NATIONAL WAFFLE DAY TREATS

Today is ‘National Waffle Day’.  Here are some Waffle Treats for you to make for your friends and/or family.


Sweet Potato Waffles – a great way to use leftover Sweet Potatoes or just to use your Sweet Potatoes.  Good for Breakfast and or Dinner instead of Potatoes.


Sweet Potato Waffle

                                   Sweet Potato Waffle with Apples


Gingerbread Waffles – this is definitely a ‘makeover’ using leftover Gingerbread pieces.  This may not be appropriate for ‘National Waffle Day’ in August but keep it mind for your Winter Breakfasts or Desserts!

Gingerbread Waffles

 Gingerbread Waffles


Hong Kong Waffles – a favorite of mine – fun to make and fun to eat.  These Waffles are sold as ‘Street Food’ in Hong Kong but can easily be made with your Belgian Waffle Iron.


Hong Kong Egg Waffles

             Hong Kong Egg Waffles


 A Hong Kong Waffle spread with Peanut Butter and Sugar

A Hong Kong Waffle spread with    Peanut Butter and Sugar


More Waffles – just an overview of the types of Waffle Irons and recipes available today!


Try one or more of these today or for your weekend Brunch, Lunch or Supper

Berry Heart Waffle


5 of Hearts Waffle Iron

5 of Hearts Waffle Iron  

Digg This
Reddit This
Stumble Now!
Buzz This
Vote on DZone
Share on Facebook
Bookmark this on Delicious
Kick It on DotNetKicks.com
Shout it
Share on LinkedIn
Bookmark this on Technorati
Post on Twitter
Google Buzz (aka. Google Reader)

Be the first to comment - What do you think?
Posted by Admin Test - 2016/08/05 at 10:35 AM

Categories: Cooking for Everyone, Cooking for Kids, Dessert Ideas, Family Fun, Holiday Meals, Leftovers, Main, National Food Days   Tags: , , , , , ,

Next Page »