WHAT TO DO WITH THOSE EXCESS APPLES #2
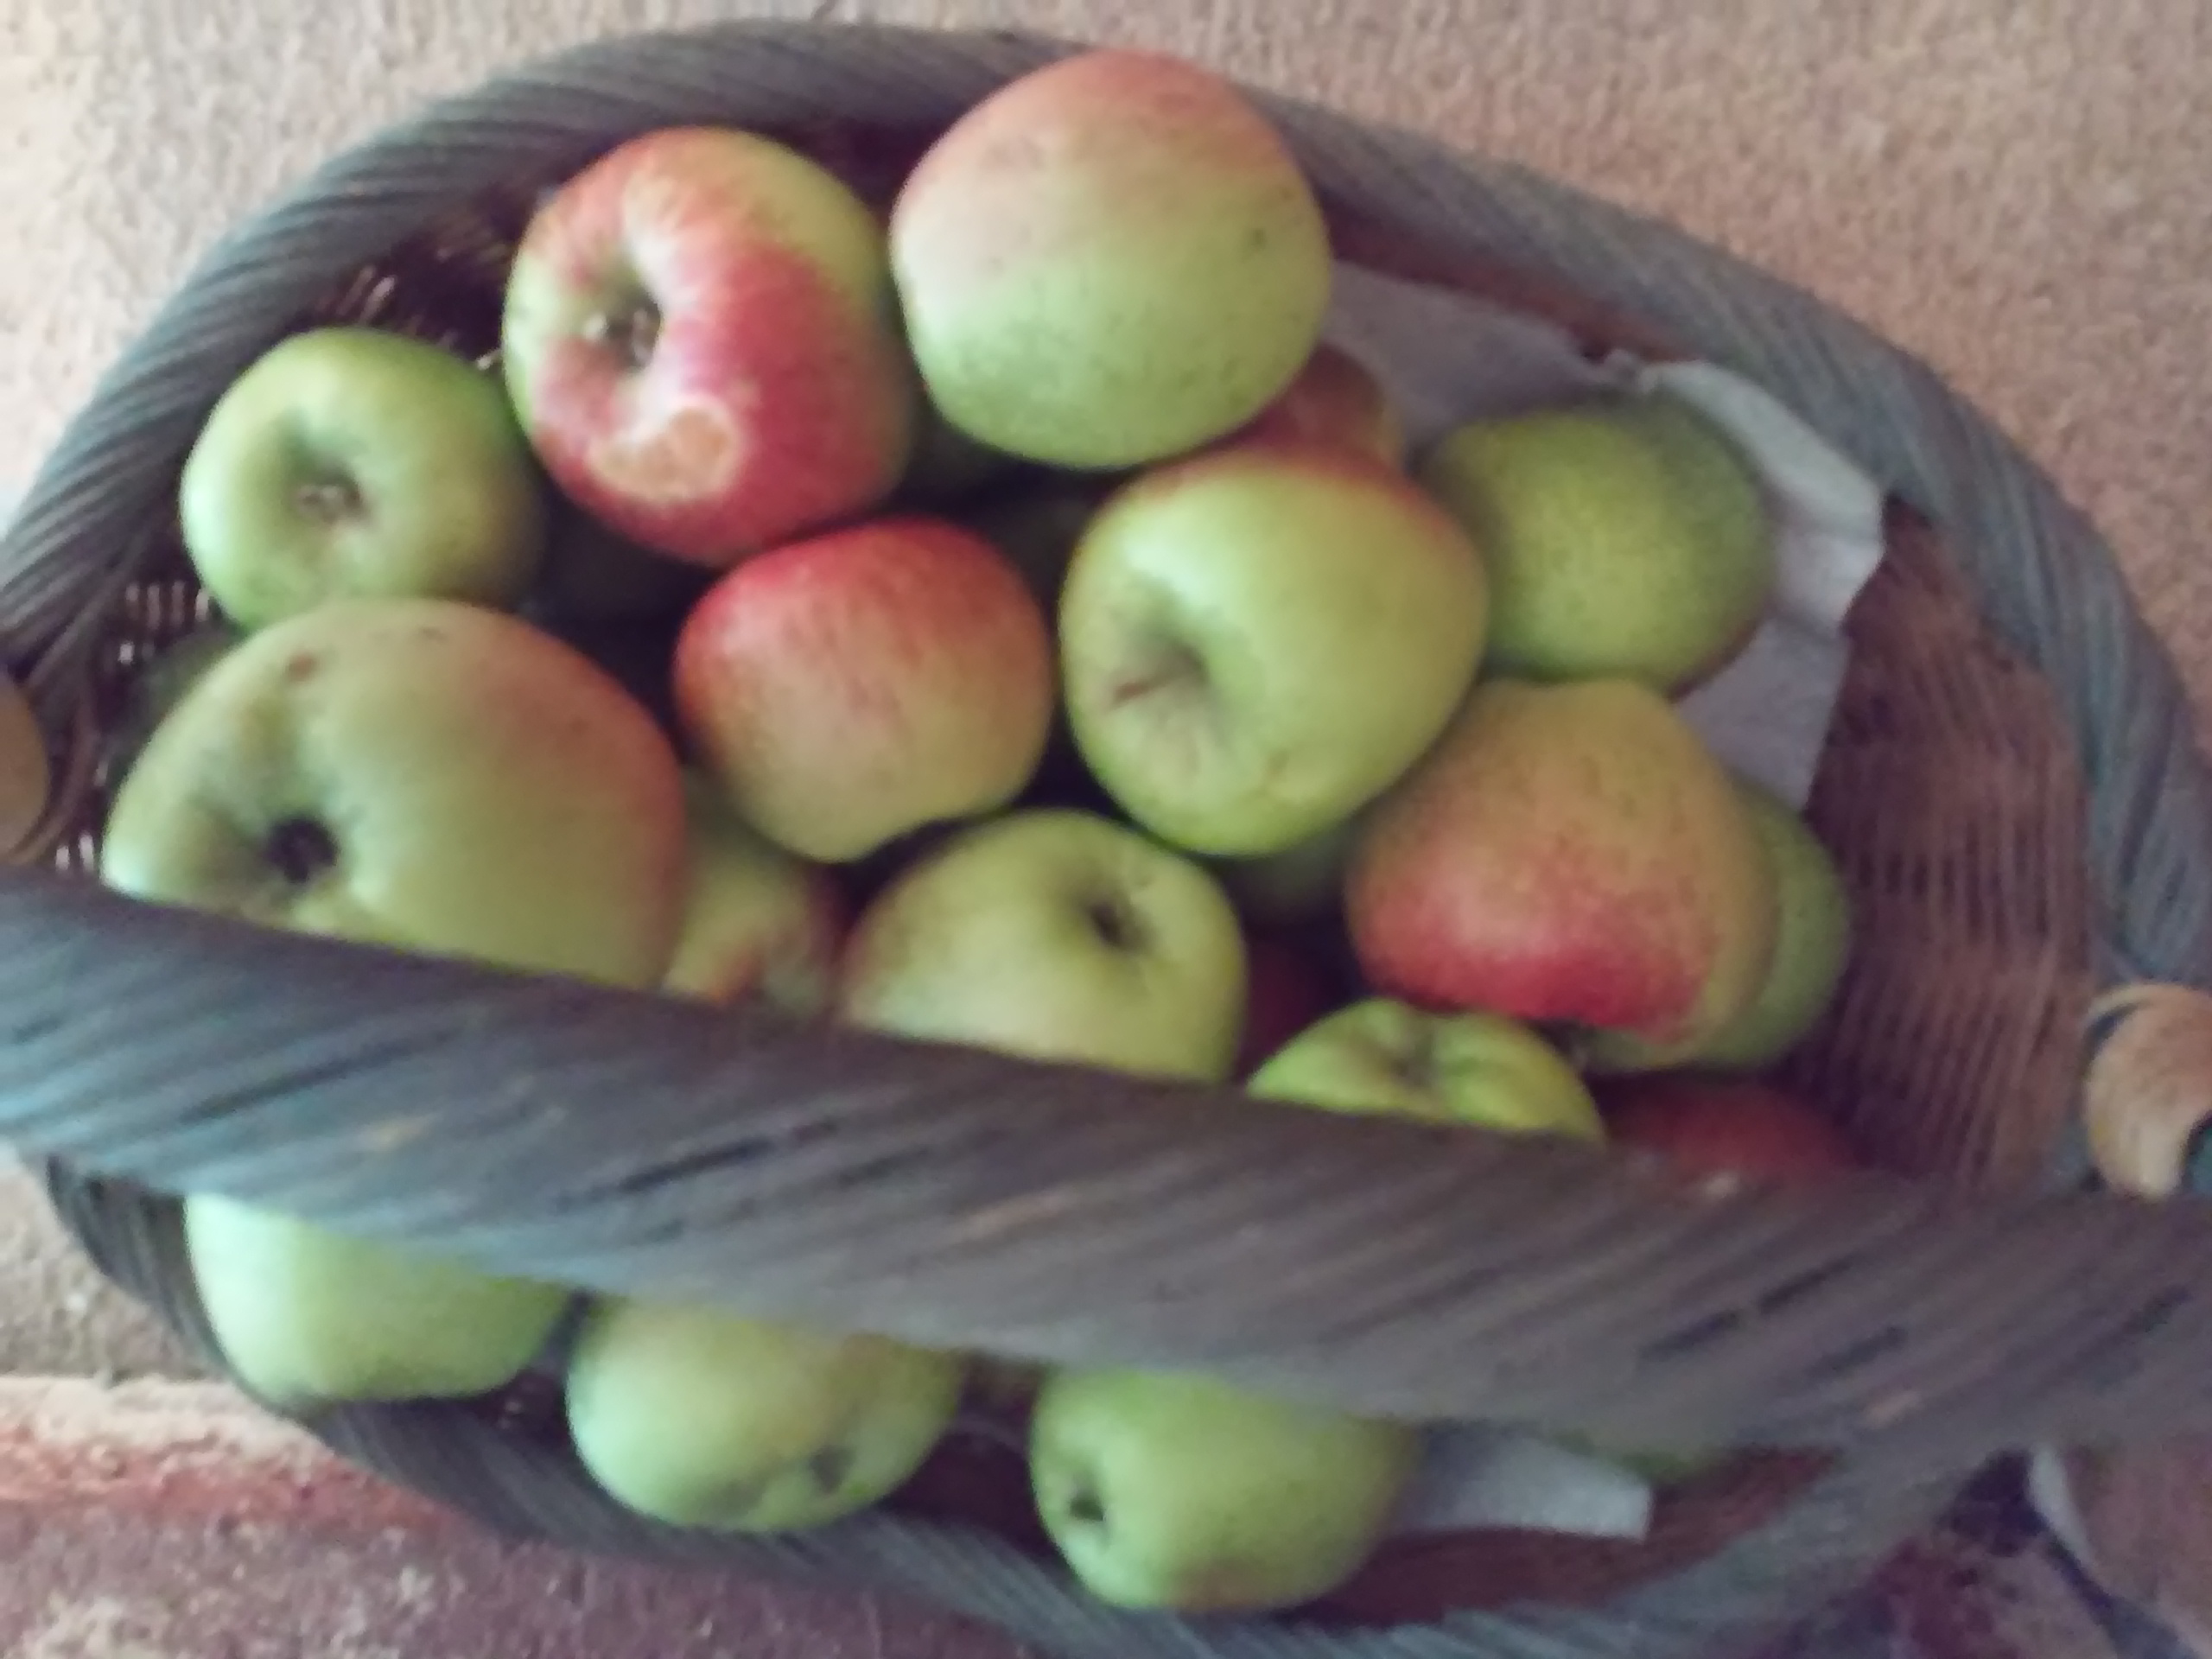
Apple Bread & Muffins: Use the Apple Bread Recipe to make Muffins as well as Bread
Pies: Apple Pies can be made as a Double Crust Pie or as a French Apple Tart
Apple Sauce: the Apple Sauce pictured is not a true Apple Sauce. The Apples have been juliened, not pureed. This gives more texture and flavor. This version of Apple Sauce is good as a condiment with Ice Cream, Cereal or on top of cake. To make the Sauce, peel and seed the Apples and then cut into Juiien strips. If you have a food processor, use the 6 x 6 Julienne Blade to cut them. Place Julienne Apples in a saucepan that is large enough to hold them along with Brown Sugar (minimum amount), some Water or Apple Juice and cook until the Apples give up their moisture and the resulting mixture is of the viscosity that you want. If you do a large quantity pack into sterilized canning jars and seal with caps and rings. Place in a kettle and cover with water to at least 1″ over the tops of the jars and bring to a boil. Boil for 5 minutes. Carefully remove from the pot and turn upside down on a clean dish towel. Turning the jars upside down will insure that the lids will seal. If you use a pot with a rack inside that can be lifted out, this will be the safest way to remove the jars from the hot water. Let stand upside down until cool. Turn right side up and tighten the lids. Store in a cool dry place. Apple Sauce is great with Pork, Poultry and Seafood dishes.
Tarts: An easy way to make delicious, beautiful tarts is to have on hand some Puff Pastry Sheets. Peel and slice your Apples and then place on Puff Pastry that has been cut into a circle or square, whichever you prefer. Place the prepared Puff Pastry on a baking sheet – if you have Silpat, use that or just put the pastry on the ungreased baking sheet.
Layer the Apples on the Puff Pastry, being sure to leave about 1″ uncovered all the way around.
Sprinkle a little Sugar and Cinnamon on top of the Apples. Bake at 400 degrees for 20-25 minutes or until the edges have puffed up to form a rim and are a nice dark golden brown.
Remove from the oven and brush the Apples with Jelly that has been heated to melt it down to make it brushable.
Once the Jelly has set up, your tarts are ready to serve.
Use your Apples for eating, baking or cooking. Have fun and enjoy!
Categories: Baking, Bread, Cooking for Kids, Family Fun, Food as Gifts, Fruit, Holiday Ideas, Main, Pastry Tags: Apples, baking, Bread, Dessert Ideas, Fruit
VALENTINE POPS TO MAKE WITH YOUR CHILDREN
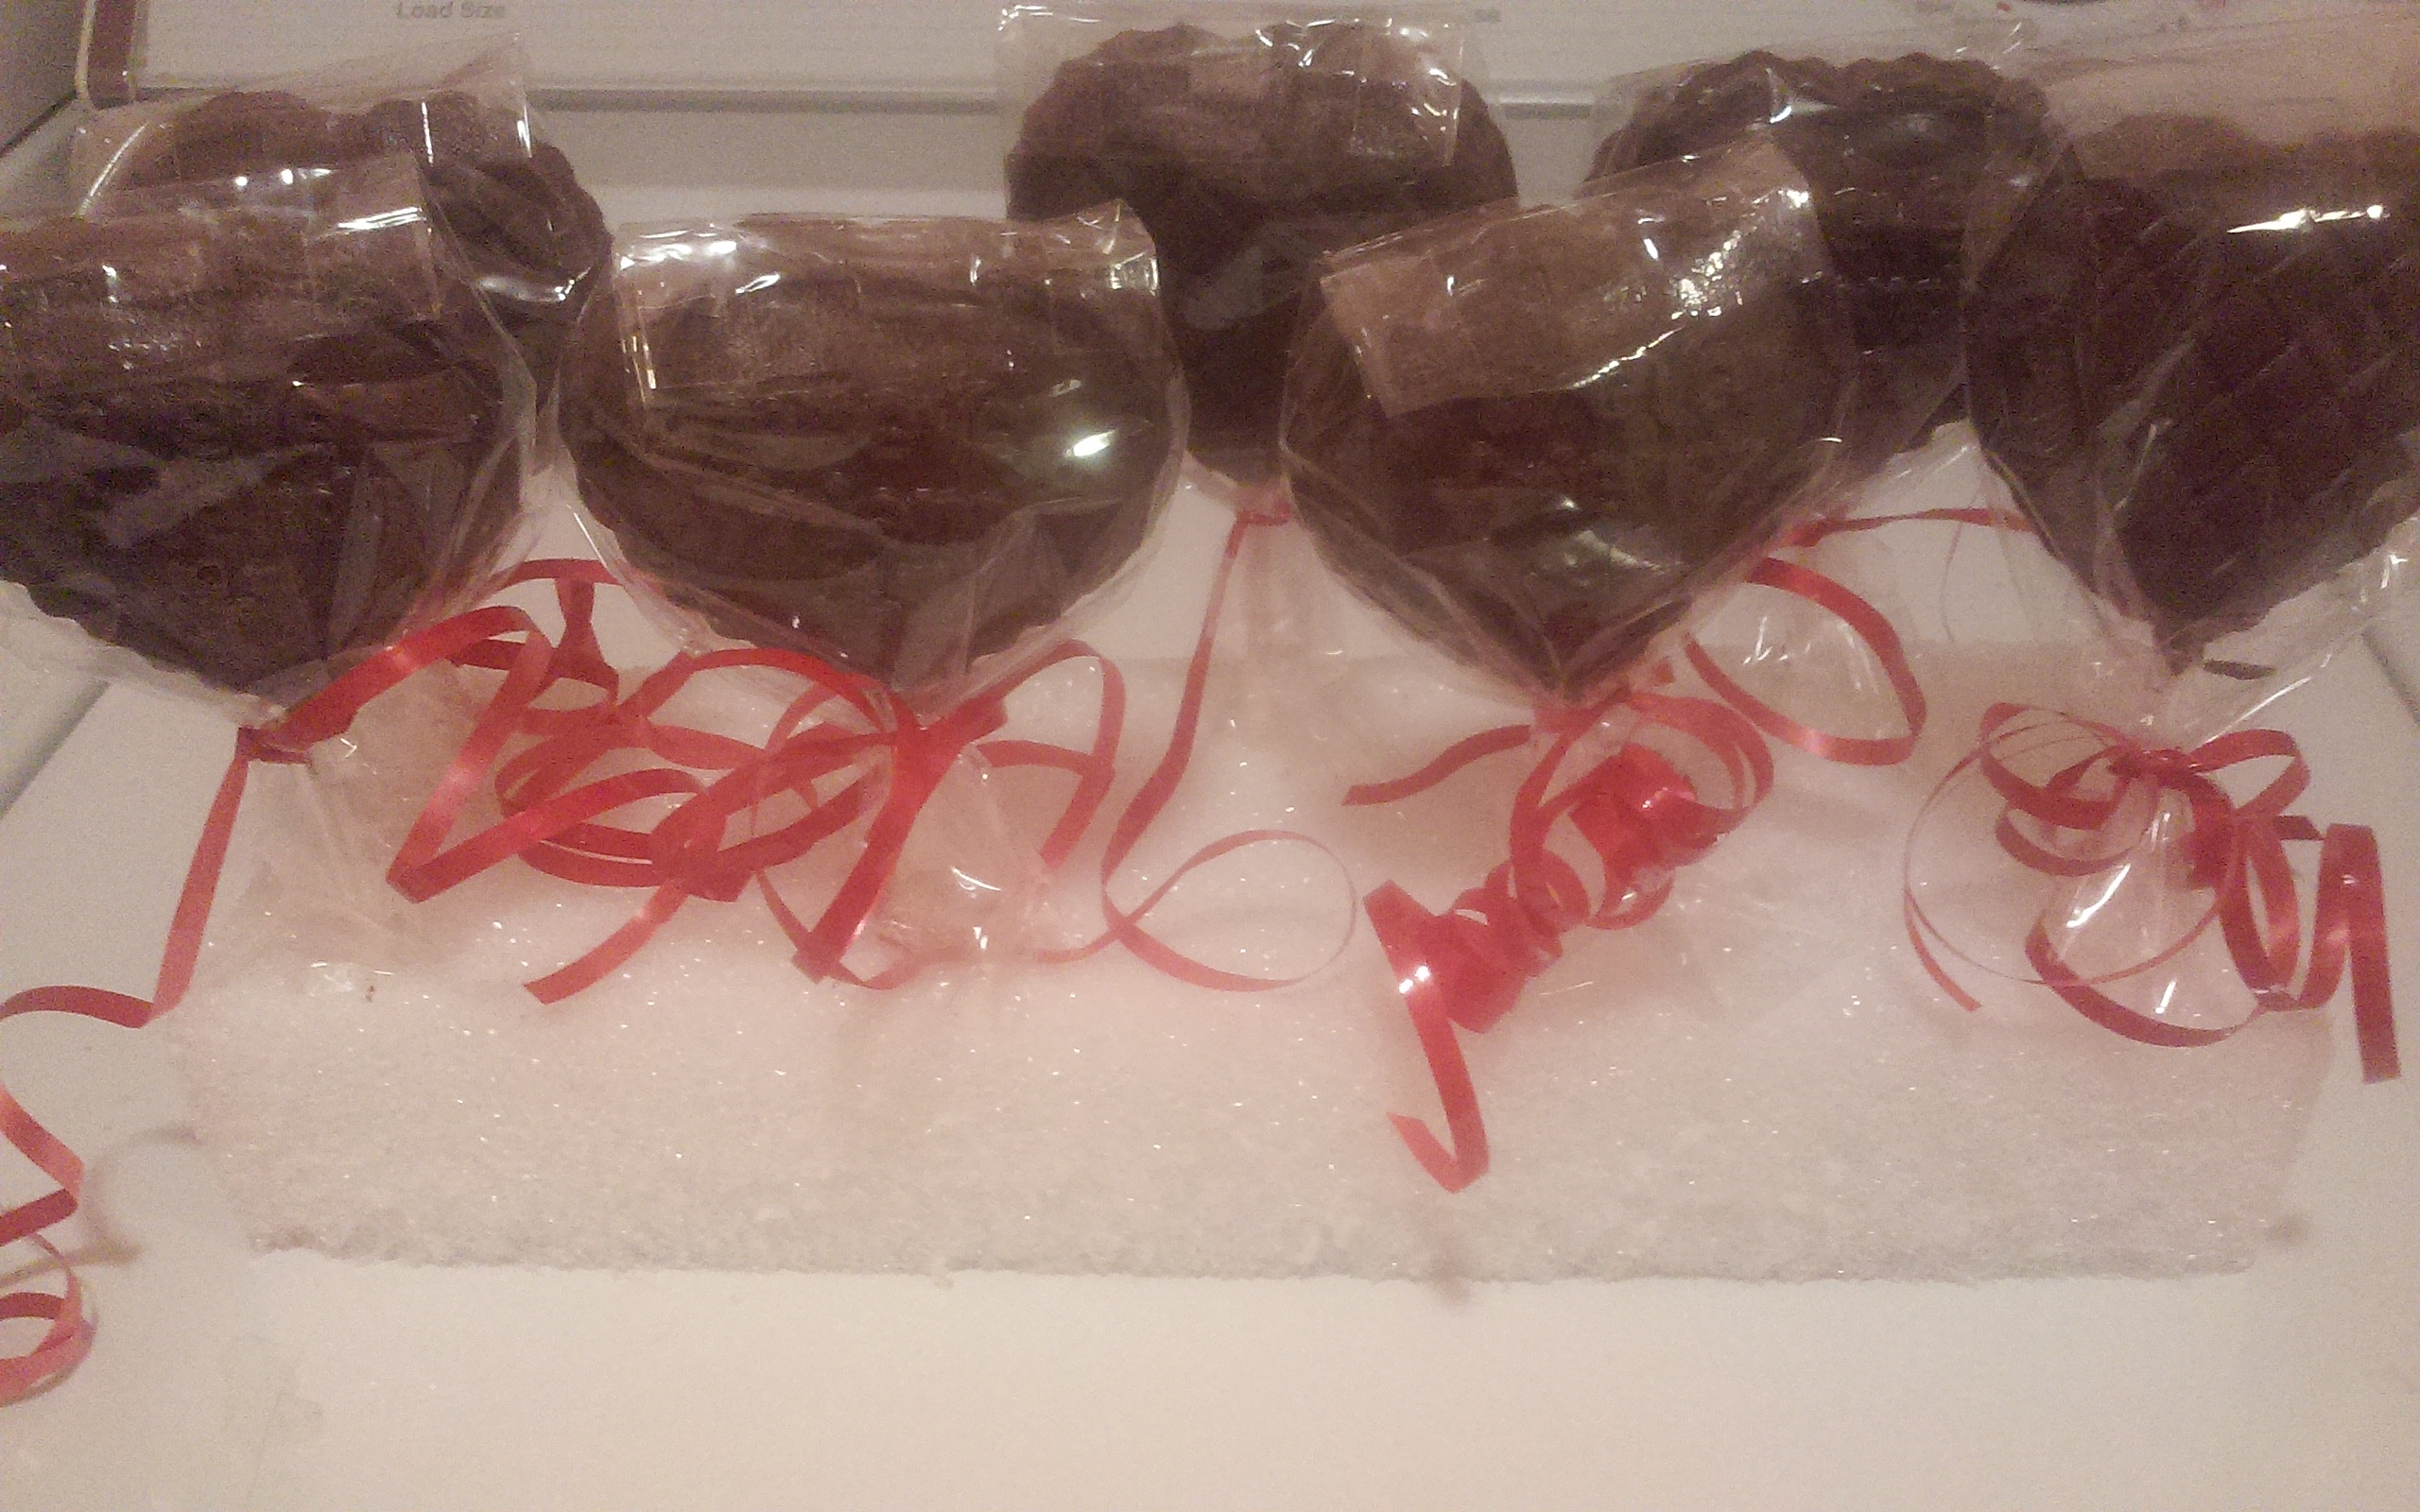
Valentine’s Day is fast approaching and the weather is wintry – rainy, snowy or windy! What better way to spend an indoor afternoon or morning making Valentine Lollipops with your Children. Children very often make paper Valentine’s to give to their friends, but Chocolate ones are even better. They taste good and Chocolate is good for you!
What you will need to make these treats is:
Candy (Heart-shaped Lollipop Molds) – available at your local Cake Decorating Store or Craft Shop such as Michael’s or JoAnn’s.
Pre-tempered Chocolates (Wilton’s)
A sheet of waxed paper or a flat pan to put the molds on.
A melting pot or double boiler If you don’t have either you can make a double boiler by placing a heatproof bowl over a pot of simmering water.
To make the Pops first set up your molds. Make sure they are clean and dry. Water and chocolate do not mix and your pops will not set up properly. The best thing to do is to wash and dry them 24 hours before you are going to use them. When you are finished with them, wash (DO NOT USE SOAP) just hot tap water and dry and then after 24 hours place them in a sealed plastic bag so that the next you need them they will be ready to go.
Place the molds on the waxed paper or sheet pan. Place the sticks in the molds (make sure that at least one inch of the stick is in the candy portion ) If you are using a Melting Pot place the Candy (the melting pots will hold a 12 oz. bag of candy) in the Melting Pot and set it to MELT. Once the Candy has thoroughly melted turn the setting down to WARM.
Once the Candy has melted you can then spoon it into the molds. Be sure and completely cover the Lollipop Sticks. DO NOT fill the mold to the top. Once they are about 3/4 full, stop and tap the molds to get rid of the Air Bubbles. If there is still space left in the mold slowly add additional candy until the mold is full.
Allow at least an hour for the candy to set at room temperature or about 20-30 minutes in the refrigerator or 15-20 in the freezer.
Once the Candy has set up turn the molds over onto a sheet of waxed or parchment paper and gently press on the backs to un-mold. If they are not going to be eaten right away place into bags (lollipop bags can be purchased at Cake Decorating Stores, Party Stores or Craft Stores). Tie with red curling ribbon. These lollipops are a great replacement for Valentines.
For heat loving Valentine recipients you can add a little bit of Chili Flakes (Old Boney Mountain Grotto Dust) available at http://www.oldboneymountainhotsaucecorp.com/
GINGERBREAD HOUSE WORKSHOP
The December Holidays are coming up very fast and what better way to help celebrate them than to build a Gingerbread House. It really help to have a little expertise, someone who has built many over the years and has overcome all the pitfalls that hinder the novice. I have been teaching people (Adults and Parent/Child Teams) how to make Gingerbread Houses for the last 26 years. This year I am going to be teaching my Gingerbread House at the Academy of Culinary Education in Woodland Hills. You will learn how to make the Dough, how to make house templates and how to cut out the house parts from the dough in an efficient manner.
After the House parts are baked and after lunch and a short demo, each team or participant will build and then decorate their house according to their own specifications. Not only will the class be fun and enjoyable, but you will learn skills that you will be able to use throughout your lifetime.
Come to our Gingerbread House Class at the Academy of Culinary Education in Woodland Hills.on December 6th – this is an all-day class starting at 10:30 and ending at 5 with a lunch break in-between.
For photos of Gingerbread houses please go to https://www.flickr.com/photos/sylveeeskitchen/sets/
The class is open to singles or pairs – parent/child or spouses or partners or an older sibling with a younger one.
To sign up for the class go to http://www.academyofculinaryeducation.com/singleclasses.html
Categories: Food as Gifts, Holiday Ideas, Main Tags: baking, Children's Cooking, Classes, gingerbread, Gingerbread House Class, Holidays
NATIONAL FRUIT CAKE MONTH
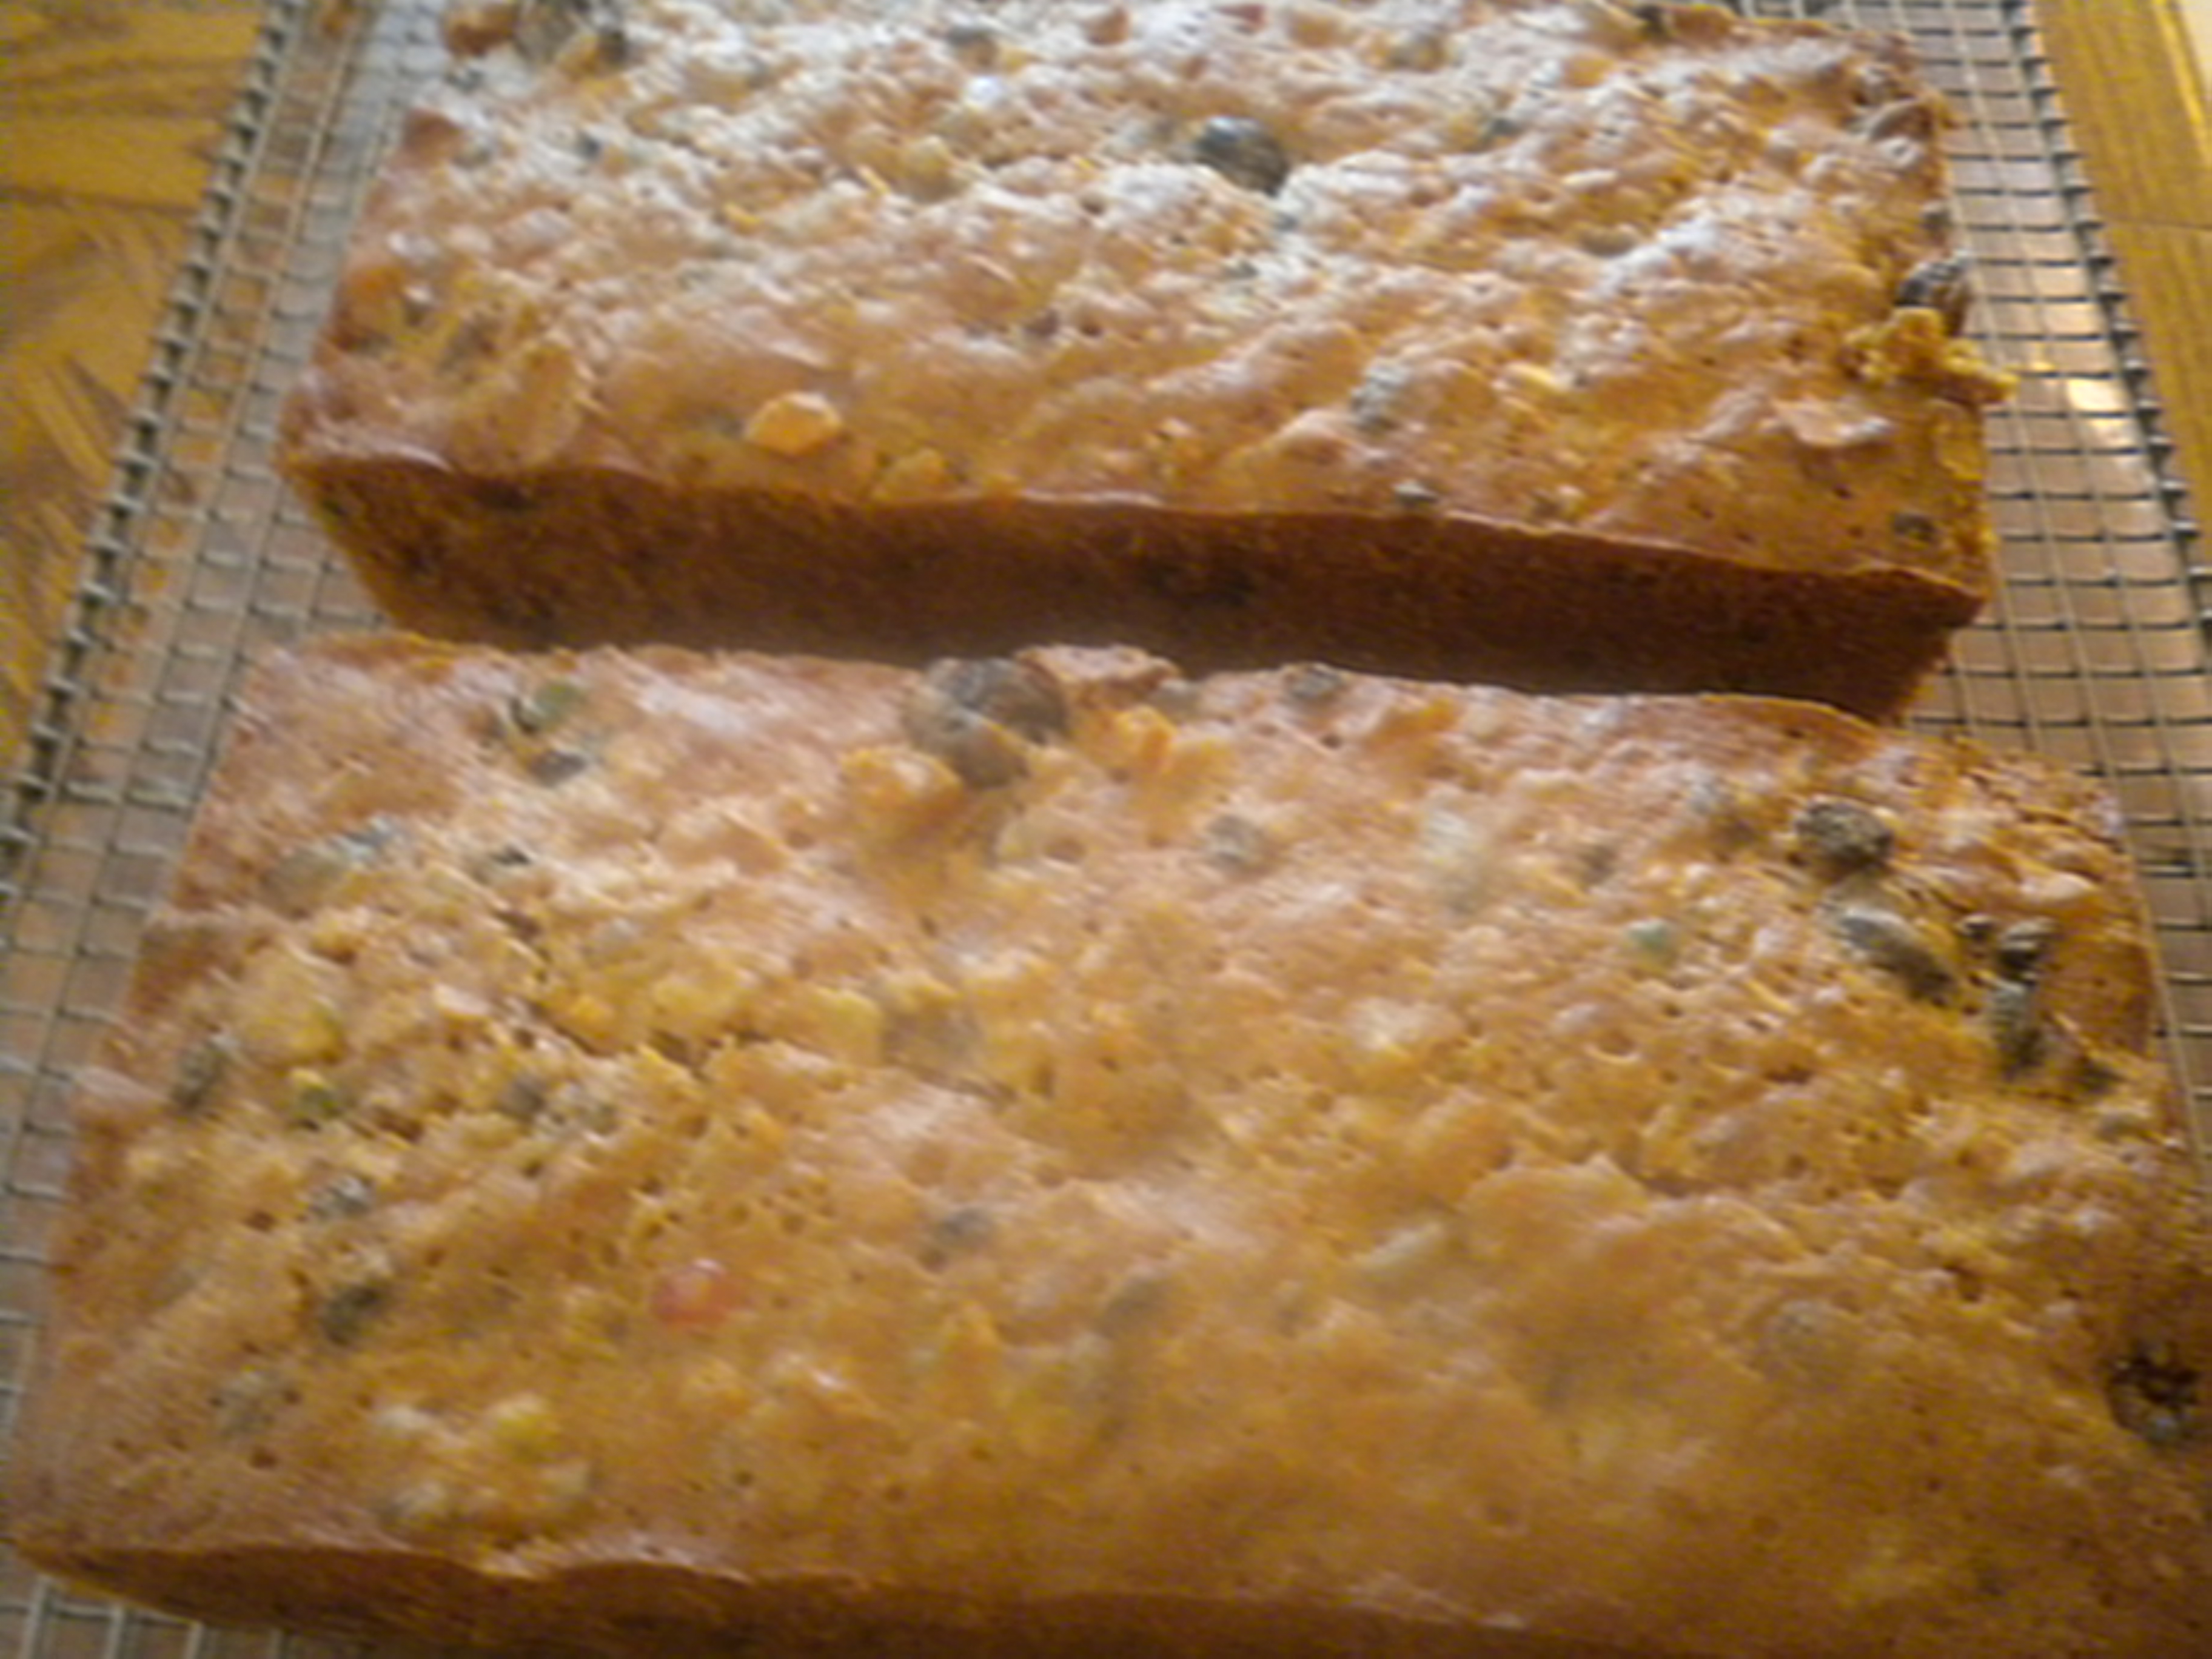
December is National Fruit Cake Month and I am going to start if off by soaking my fruit for our Annual Fruitcake, something my husband loves. All the years of my Childhood and into Adulthood, my Mother made Fruitcakes every single year. She made enough so that my Father could take some to his Co-Workers and we still had more than enough for our consumption. I have actually never been a great fan of Fruitcake, but like Pumpkin Pie for Thanksgiving, I still make Fruitcake and I still do eat it. So here goes. My Fruit Cake Making Saga!
Day One – Sunday December 1st – gather together all the Fruit that I am going to use and cut up what needs cutting – place them all together in a large bowl and pour some Wine over them. Brandy is the usual Liqueur to use but I have Marsala Wine and think I will use that. Strike that – went to the Beverage Store and purchased Gran Marnier – Brandy but Orange flavored and not too strong. For Non-Alcoholic Fruit Cake, try using Orange Juice or Sparkling Apple Cider. Both work quite well! I added just enough Gran Marnier to moisten the Fruit and then covered the Bowl and let it sit overnight.
Day 2 – I prepared the Batter and baked the Cakes.
Make sure the Fruit is in a LARGE BOWL so that you have enough room to incorporate the Batter into the Fruit. Before preparing the Batter, prepare the pans. Cut parchment paper or waxed paper to fit the bottoms of the pans. Spray the bottoms of the pans with a Vegetable Spray and then insert the prepared paper.
Next prepare the Batter and add it to the Fruit.
Once all the Batter is evenly mixed with the Fruit and the Fruit is evenly distributed throughout the Batter fill the pans about 3/4 full. As you can see from the Photo I used loaf pans. One 10″ TUBE PAN can be used instead.
Bake in a slow oven for approximately 1 1/2 hours or until a toothpick inserted in the middle comes out clean.
Cool on wire racks; be sure the cakes are completely cool before removing from the pan. Turn the pans over and the cakes should come right out. If the don’t, gently loosen with a straight-edged spatula and then try again.
Wrap the Cakes tightly in plastic wrap and allow to age for several days or weeks before serving. If liquer on the cakes is desired, place the each cake on a large piece of cheesecloth placed on plastic wrap. Lightly douse with Gran Marnier, Brandy or Rum. Wrap tightly with the Cheesecloth and then the plastic wrap. Finally wrap the whole thing in Aluminum Foil.
If desired, more Liquer can occasionally be added through the Cheesecloth. JUST REMEMBER, THE MORE YOU ADD, THE STRONGER TASTING THE CAKES WILL BE. HOWEVER, THE LIQUER DOES KEEP THE CAKE MOIST AND ALLOW IT TO LAST AND TASTE GOOD THROUGH THE HOLIDAYS.
For the complete recipe go to /holiday-fruit-cake/
Categories: Baking, Dessert Ideas, Food as Gifts, Holiday Ideas, Main Tags: baking, Candy Fruit, Dessert Ideas, Dried Fruit, family dinner, Fruit, Fruit Cake, Gourmet Foods, holiday recipes, National Food Days
BUCKEYE CANDY BALLS
Today is ‘National Candy Day’. Howa about trying this tasty treat called ‘Buckeye Candy’. This recipe was developed to resemble the fruit of the Buckeye tree which is indigenous to the State of Ohio. I was just there recently but forgot to look for the Buckeye tree. The recipe below is a tasty treat and is related to ‘Rice Krispy Squares’ – there are just more tasty ingredients in them.
Buckeye Balls are great to eat and make nice gifts too. Try them for an extra treat for Thanksgiving!
INGREDIENTS: EQUIPMENT:
1/4 cup unsalted Butter Large Saucepan
5 cups Marshmallows Wooden Spoon
1cup Peanut Butter Chips Waxed Paper
1 cup Mini-Chocolate Chips Candy Bags or Plate
4 cups Rice Krispies®
Liquid Margarine or Soft Butter
DIRECTIONS:
- Melt the Butter in the Saucepan over low heat.
- Add the Marshmallows and stir constantly with the wooden spoon until the Marshmallows are completely melted; stir in the Peanut Butter and Chocolate Chips.
- Remove from the heat and add the Rice Krispies®; mix until the Krispies are completely coated with the melted Marshmallow mixture.
- Spread the Liquid Margarine or Soft Butter on your hands and then shape the Candy into Balls about the size of Ping Pong Balls.
- Place the shaped Candy onto a sheet of waxed paper or a glass plate. When cooled, place in a plastic bag or covered plate for storage or just serve and eat right away!!
Yield: About 20 Pieces
Categories: Dessert Ideas, Food as Gifts, Holiday Ideas, National Food Days Tags: Candy, Chocolate, Dessert Ideas, Food Gifts, kids cooking, Marshmallows, National Food Days, Peanut Butter, Rice Krispies, Treats
NATIONAL WHITE CHOCOLATE DAY
Sunday, September 23 is ‘National White Chocolate Day’. Even though there are probably many, many Chocolate Lovers in this country and around the World, White Chocolate is probably not considered to even be in the Chocolate Category.
Even though White Chocolate is made from ingredients derived from Chocolate, it cannot actually be considered ‘Chocolate’. It is a combination of Cocoa Butter, Milk Solids, Milk Fat and Sugar. What White Chocolate is missing as compared to ‘real’ Chocolate are the Cocoa solids which are separated out during the processing of the Cocoa Bean. In Dark and Milk Chocolates the Milk Solids are recombined with the other ingredients. Therefore, ‘White Chocolate’ is lighter in color (actually a creamy ivory color) and has a much milder taste than Chocolate. If you are a real Chocolate Lover, you probably won’t like White Chocolate but for those of us who prefer the lighter and milder taste, White Chocolate is the perfect thing.
White Chocolate is used in baking and candy making and in creamy desserts. Some of my favorite items made with White Chocolate are:
White Chocolate Cheesecake with a Raspberry Sauce.
White Chocolate Chip Cookies
Blondie Brownies
White Chocolate Covered Strawberries white-chocolate-covered-strawberries/
White Chocolate Buttercream Frosting white-chocolate-butter-cream-frosting/
White Chocolate Rice Krispy Candies white-chocolate-rice-krispy-candies/
White Chocolate Cheesecake makes an elegant dessert, especially with the Berry Sauce served with it. White Chocolate Chip Cookies are a nice variation on Chocolate Chip Cookies as are the Blondie Brownies.
White Chocolate Covered Strawberries are delicious, especially in the Spring when Strawberries are at their best. It is also nice to dip the Strawberries in dark Chocolate on one side and the White Chocolate on the other side or to just stripe the dipped berries with the opposing color. Whichever way you do it, the Berries will be delicious.
White Chocolate Buttercream frosting provides a nice contrast to a Dark Chocolate Cake.
And White Chocolate Rice Krispy Squares takes everyone’s favorite treat one step ahead.
Categories: Baking, Cooking for Everyone, Dessert Ideas, Food as Gifts, Main, National Food Days Tags: Blondies, Cheesecake, Chocolate, Cookies, Dark Chocolate, Desserts, Strawberries, White Chocolate
‘National Truffle Day’
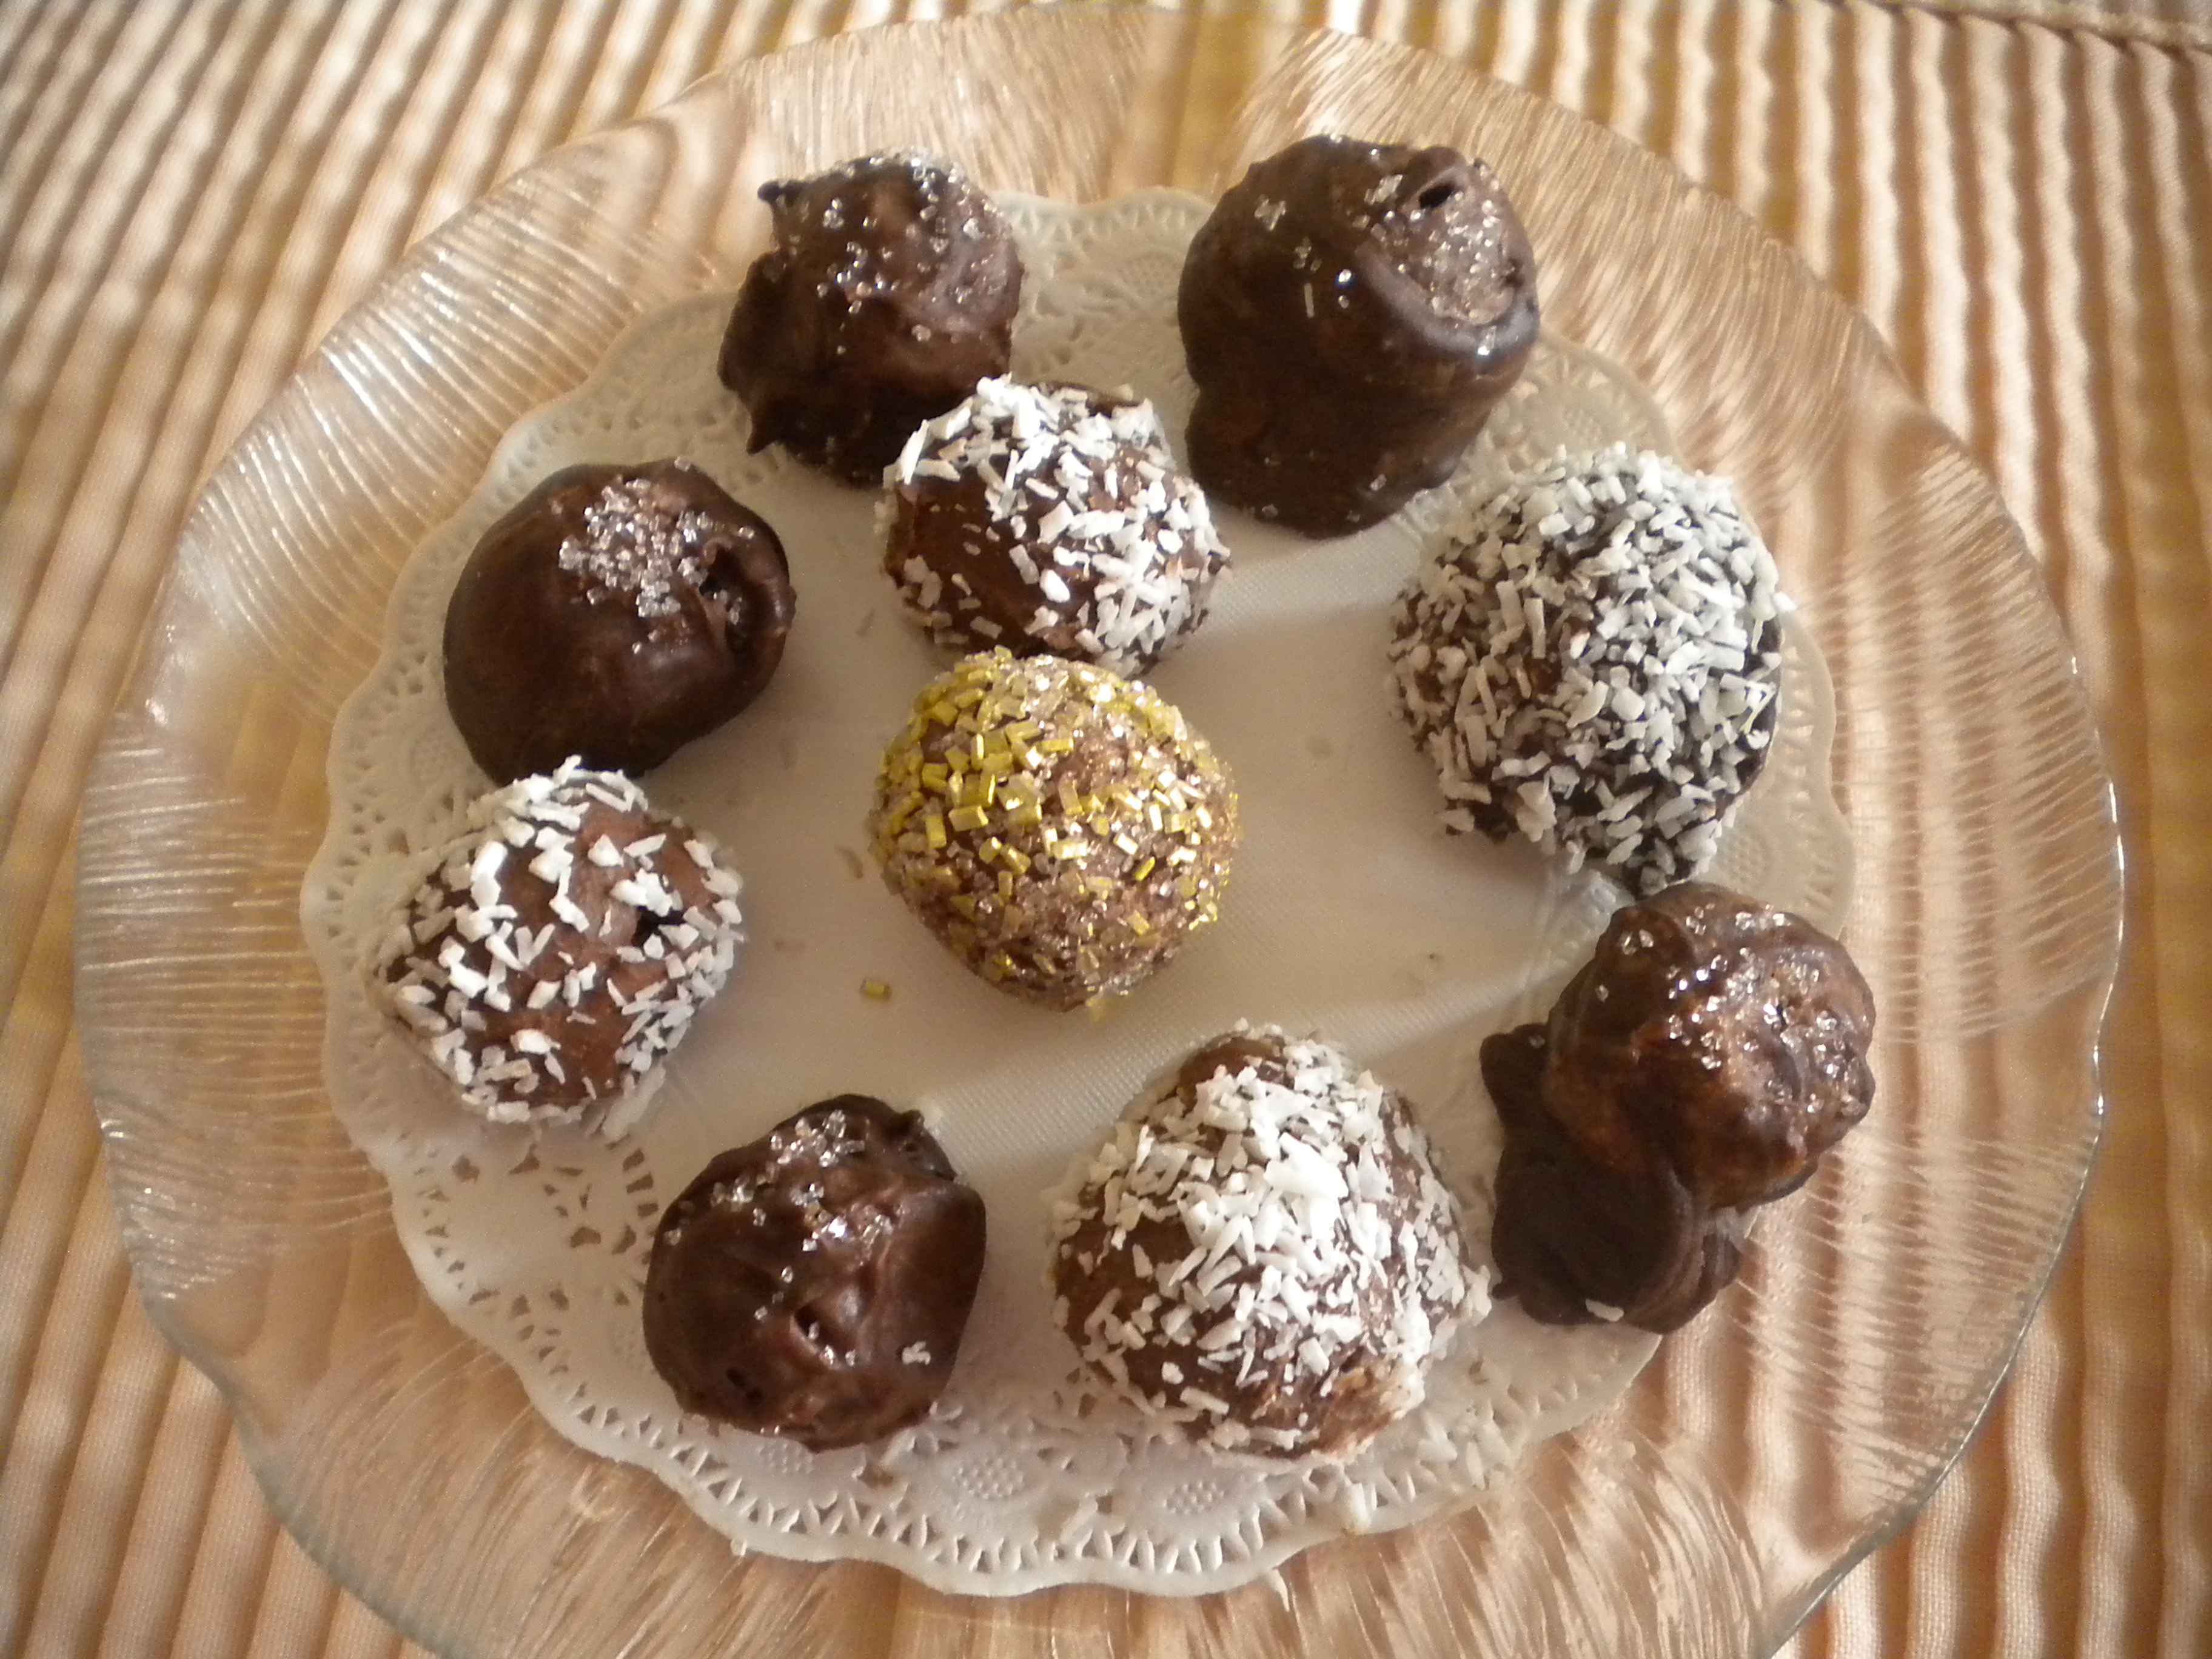
NATIONAL FOOD DAYS
May 2nd – ‘National Truffle Day’
Since Wednesday, May 2nd is ‘National Truffle Day’ I decided to make the centers for some Truffles which I will serve to my Mah Jong Group on Wednesday. For the Truffles, I had a small piece of Milk Chocolate and a pound piece of White Chocolate. For the Centers of the truffles, I used a couple of Ganache Recipes that I had that were intended for cakes.
White Chocolate Ganache – this recipe was originally intended for a cake, so the resulting mixture was just a little too soft in that it was supposed to be spread on the cake. I used half the original recipe as follows:
150 grams White Chocolate, chopped – (I actually shredded it with my shredding blade; chopping would have been simpler)
90 grams of Heavy Cream
2 tsps. Vanilla Extract
45 grams unsalted Butter, softened
The above ingredients were combined in my food processor and run until everything was well-combined. The mixture was then chilled. Of course, it became too cold and I had to microwave it for about 30 seconds and then whipped it up with a hand whisk.
The ideal way would have been to:
1. Heat the Cream with the chopped Chocolate and Butter.
2. Pour into a shallow dish and chill thoroughly and then whip it up in the food processor along with the Vanilla Extract.
Because the resulting mixture was too soft to scoop and roll into balls I ended up adding about 3/8 cup of unsweetened Cocoa and mixing it in. The result was a mixture that I could scoop, roll and dip into melted chocolate.
I placed the scooped portions of the Ganache onto a baking sheet that was covered in powdered sugar. When I finished scooping, I placed the balls of chocolate Ganache in the freezer until the next day when I dipped them in melted chocolate. The lighter colored truffles are the Milk Chocolate ones while the darker ones are the White Chocolate fortified with Cocoa.
I melted Wilton Melt ‘n Molds to coat the Truffles with. Using this kind of chocolate saves a lot of time and trouble, because if you use the same chocolate that was used for the centers, you have to take the time to temper it. Unless you are experienced with tempering, it can be a bit of a problem. While I was dipping the Truffles, the melting chocolate seemed to be getting a little too thick so I added just a bit of heavy cream to the melted chocolate. I figured there was enough butterfat in the cream to keep the chocolate from siezing up. Wrong! Don’t do it! If you want to thin out your chocolate use a little bit of vegetable or shortening chips designed especially for this purpose. (These can be purchased at a cake decorating store)
There is actually plastic wrap in the bowl so that I would be able to get the chocolate out. I had to remove the siezed up chocolate from my warmer. Once it completely solidified, I just put the whole thing in a plastic bag and put it aside for a later use.
For variety and also for those people who want a little less candy or chocolate, I dipped some into shredded unsweetened Coconut that was finely cut. I also rolled some of the chocolate dipped truffles in the Coconut as well.
The first batch that I dipped I placed on a rack; they were difficult to get off once the chocolate hardnened, so I switched to waxed paper. The coated truffles released easily from the waxed paper.
Since I wasn’t going to use the Truffles for a couple of days, I placed them in a plastic box with a doily on the bottom and refrigerated them. To serve I will place on a pretty plate with gold doilies.
Having sampled a couple of these Truffles, I know that they are truly delicioius and if you are a chocolate lover, they are a dream.
Of course you can get your truffles without nearly as much fuss by going down to your local Godiva or Sees Candy Store and purchasing some. But think of the fun you are missing!
Categories: Dessert Ideas, Food as Gifts, Holiday Ideas, Main, National Food Days Tags: Candy, Chocolate, Chocolate Coating, Coconut, Gold Sanding Sugar, Milk Chocolate, Truffles, White Chocolate
MY CULINARY DIARY – MAKING CROISSANTS
Week of 4/08/12
My significant achievement this week was to make Croissants. On Tuesday, I went to a friend’s for lunch and asked what I could bring. She said that anything that went with a Shrimp Salad would be good, so I thought bread or rolls would be ideal. With that in mind, I decided to make Croissants. I hadn’t made them in a long time and this would be a good excuse. Croissants are not hard to make – they are just time consuming. Luncheon was going to be on Tuesday, so I figured that I would need to be able to bake the Croissants by Monday evening as the proofing time for them would be several hours and if I waited until the morning, I might not have enough time as I had an 11:30 appointment before going to lunch at Mary’s.
We were scheduled to go to a BBQ lunch at Jenny & John’s (Ev’s Grandaughter & Grandson In-Law) Sunday afternoon so I set to work to make the Croissant Dough in the morning. The Dough is a yeast dough and uses 2 cups Bread Flour and 1 cup of All-Purpose Flour. Unlike a normal yeast dough, the yeast is dissolved in a cup of cold milk. (Normally you don’t want to use cold milk without first scalding it, because the enzymes in milk prevent the yeast from working to it’s full capacity)
Next you combine the Flours, Sugar and Salt and then work in ¼ lb. of Butter. This can be done with your fingers, a pastry blender or a food processor. In any case the butter should be cut up into several small pieces (8 works best) to facilitate working it in. I preferred to do it with my food processor as it cuts it in very evenly and distributes the butter throughout the flour.
Next, the Flour mixture is added to the Yeast/Milk Mixture. The two mixtures are then stirred to combine and then kneaded until you have a smooth dough. It takes about 7-8 minutes in a Standing Mixer fitted with the Dough Hook and about 10-12 minutes if you are kneading by hand. After the Dough is kneaded, it is shaped into a ball, scored on time with an X cut going across the whole top of the ball and then wrapped tightly in plastic wrap and refrigerated for at least 5 hours.
By the way, Croissant Dough as Danish Dough, is a Laminated Dough and is a pleasure to work with. This Dough comes out really well and feels really nice to the touch. It is not sticky or dry!
Once the chilling time is over and you are ready to roll in the Butter Block, make the Block. The Butter Block consists of ¾ lb. of Butter and it is easiest to make if you use Butter that comes in 4 pieces per pound. Cut each of the 3 Sticks in half down the middle to make 6 pieces no thicker than 1inch. Place the 6 pieces of butter on a piece of parchment paper that has been dusted with Flour and then dust the top of the butter with flour and cover with another piece of parchment. Take your rolling pin and tap the butter over the parchment to soften it. Once it has softened sufficiently (not melted!) shape it into a 6 inch square.
The next step is to roll out the dough and encase the butter in it. Once that has been accomplished, and you have turned it, you then wrap it and refrigerate it for 30 minutes and roll and turn again. This step must be repeated a total of 3 times. After the 3rd time the dough should be refrigerated for several hours but not more than 24.
When you are ready to roll out the dough you roll it into a 12 x 18 rectangle and cut the rectangle in half horizontally. You then mark it every 5 inches on top and bottom with a sharp knife.
You then cut diagonal lines from left to right, using the marks as a guide. Next you cut more horizontal lines from right to left. This leaves with triangular pieces of dough which then cut rolled up from the point to the wide end to form a Crescent Shape. This recipe was supposed to make 14 large Croissants and 4 Minis but somehow I got about 18 large Croissants and several minis. I made the large Croissants just normal Croissants without filling. I used Almond Paste and Strawberry Jam (homemade) to fill the smaller and odd-shaped Croissants.
The rolled Croissants filled up two parchment covered baking sheets which I then covered with Plastic Wrap which was lightly sprayed with a Vegetable Oil Spray. I placed them in my oven (not turned on) to proof. The dough was still cold so they took about 3 hours to proof. Unlike most yeast doughs, do not wait for the Croissants to double in bulk, because this will not happen. (Remember the cold milk affects the action of the Yeast) When they are completely proofed, the Croissants will feel light but will not have doubled in bulk.
Next you brush them with an Egg Wash (1 whole Egg + 1 Yolk). The additional Yolk helps the Croissants to brown well. Preheat your oven and place one pan on the middle shelf and bake for 12 minutes. After twelve minutes the pan was rotated back to front and the heat reduced, then the Croissants were baked for approximately another 20 minutes or until they were nicely browned. Repeated the process with the second pan.
In the end we had a nice batch of Croissants, six of which I packed and brought to Mary’s house for lunch on Tuesday. Another 6 or so were packed and frozen for later use. We still had ample Croissants to eat at home and we did have them for breakfast at least 2 days in a row and there were still some leftover to snack on.
Croissants are fun to make and it is really exciting to see how the laminated dough puffs up when baking. Don’t forget, Croissants as other puff pastries, need a HOT oven for the puffing action to take place! For the full recipe just type in Croissant Recipe in your browser and many will come up.
Categories: Baking, Bread, Breakfast Ideas, Cooking for Everyone, Food as Gifts, Main Tags: Almond Paste, baking, butter, Croisants, Egg Wash, Gift Giving, Gourmet Foods, Laminated Dough, Strawberry Jam
National Caramel Day
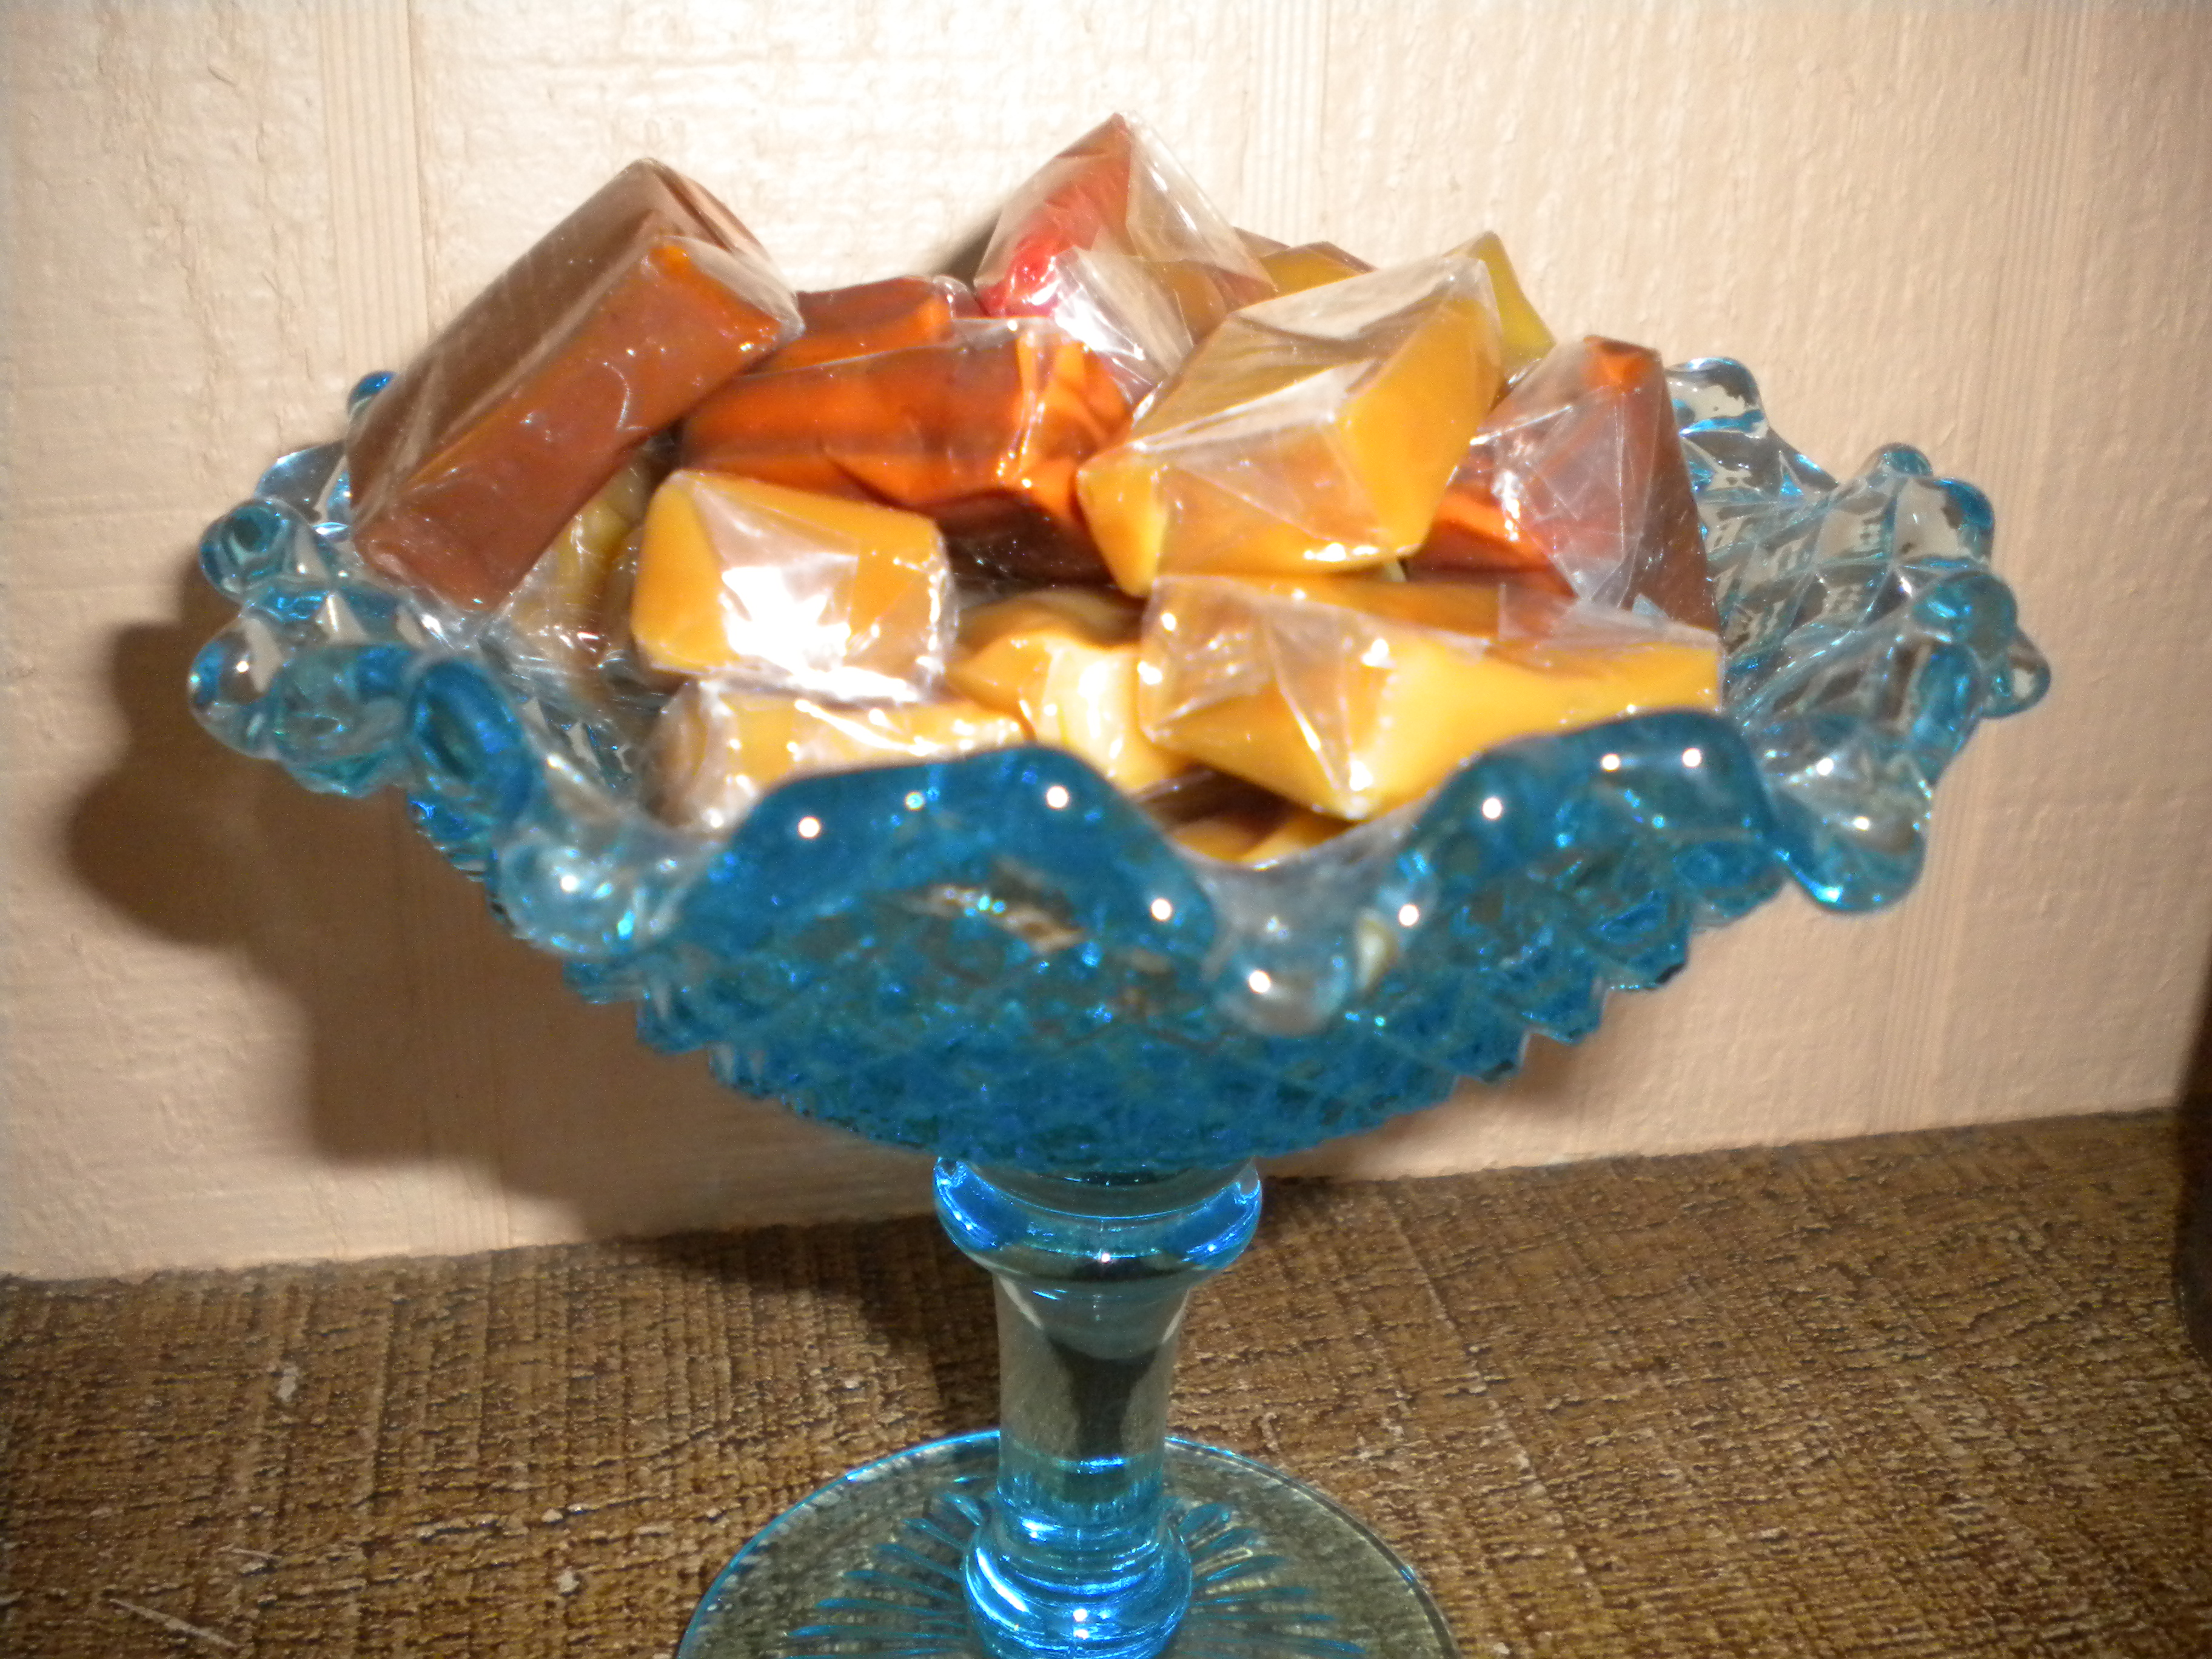
Caramel Lovers, Beware! April 5th is National Caramel Day and who doesn’t like Caramels? Not everyone loves them, but I can’t imagine not liking them. Caramel can come in many forms. Candy, Sauce, Toppings for Ice Cream, Covering for Apples and glue for Popcorn. Incidentally, tomorrow April 3rd is National Caramel Popcorn Day. In addition to sweets caramelization also occurs in cooked food such as onions, apples, even meats. Caramelization adds wonderful flavor to most foods and all it takes is a little bit of sugar and some heat. With some foods, like onions, the sugar occurs naturally and does not have to be added to get the caramelization.
Many popular candy bars are made with Caramel; just go look in the supermarket candy section and you will discover which ones.
A favorite South American Cookie, called Alfajores is also made with Caramel of Dulce de Leche as it is known in Latin Countries. Alfajores are a vanilla cookies sandwiched with Caramel in the middle.
You can buy Caramel Candy in the Supermarket, at the Drugstore or the Candy Store. It just depends in what form you would like to have it. One of my favorites are caramel covered marshmallows. Just heavenly and even better when you keep them in the freezer.
To make Caramel, the general way to do it is to melt some sugar in a saute pan (copper is best, but stainless with a copper or aluminum bottom will also work.) over medium-high heat. Once it melts and starts to color, remove from the heat until you are ready to finish it. When you are ready, add some very heavy cream and cook and stir until all the ingredients are combined. This will results in a very delicious Caramel Sauce.
Since today was National Caramel Day, I also made some Cashew Caramel. To make the Caramel, I heated some granulated sugar in a medium fring pan until it liquified and then I added a small amount of heavy cream. Once the Cream was blended in, I then added the Cashews (roasted, salted ones). Once all the Cashews were covered with the Caramel, I poured the mixture onto a non-stick baking sheet that was placed on a cookie sheet. The mixture was then allowed to set up. If you love Caramel and Cashews as I do, then this is a very good confection to have.
For Caramel Apples and Popcorn Balls, try the Easy Caramel Recipe under our Recipe Section, candy/caramel/
For more Caramel, don’t forget that April 6th is National Caramel Popcorn Day. Another American favorite!
Categories: Dessert Ideas, Food as Gifts, Holiday Ideas, Holiday Meals, Main Tags: butter, Candy, Caramel, Children's Cooking, Cookie Recipes, Cookies, Cream, Dessert Ideas, National Caramel Day, National Caramel Popcorn Day, Sugar