Bread

Baked Products to be used as Bread

APPLE SEASON

Autumn has arrived and with it comes Apple Season.  Apples are good just to eat out of hand but they are also delicious in many different kinds of recipes starting Caramel Apples and Apple Sauce and then going on to numerous baked goods.

In preparation for using Apples in baked goods it is best to pick Apples that are not quite ripe and have few or no bruises.  (Bruised areas can be cut out but if an Apple is extremely bruised it is best not to use it.  Even though the skin is most likely to be removed, I still like to wash before peeling.  Wash them in cold water and place in a colander so the excess water will drip out.  Then dry your Apples before peeling them.  Before peeling the Apples have a large bowl of cold water ready and add the juice of one lemon to the water.  This will help prevent browning of the peeled Apple.  After the skin is removed, cut the Apples in half and remove the cores.  Return each Apple to the Water as the cores are removed.  Next, depending on the intended use of the Apple either quarter or slice them.  Suggestions are below.


APPLE SECTIONING SUGGESTION:


BAKED APPLES – cored and left whole

PIES – Peeled, cored and then sliced into Eighths

TURNOVERS – Peeled, cored and then sliced into Eighths

APPLE SAUCE – Peeled, cored and shredded

COOKIES – Peeled, cored and shredded


You can find many Apple Recipes right here at Sylveeeskitchen.com.  Below you will find the links to these recipes.


                                                                  Apple Kuchen


               Apple Bread


                 Apple Pie


Digg This
Reddit This
Stumble Now!
Buzz This
Vote on DZone
Share on Facebook
Bookmark this on Delicious
Kick It on DotNetKicks.com
Shout it
Share on LinkedIn
Bookmark this on Technorati
Post on Twitter
Google Buzz (aka. Google Reader)

Be the first to comment - What do you think?
Posted by Admin Test - 2022/10/03 at 3:01 PM

Categories: Baking, Bread, Cales, Main, Pastry   Tags: , ,

Culinary Makeover #21 – Trickle Down Leftover Recycling (Burger Buns from Cheesy Cauliflower)


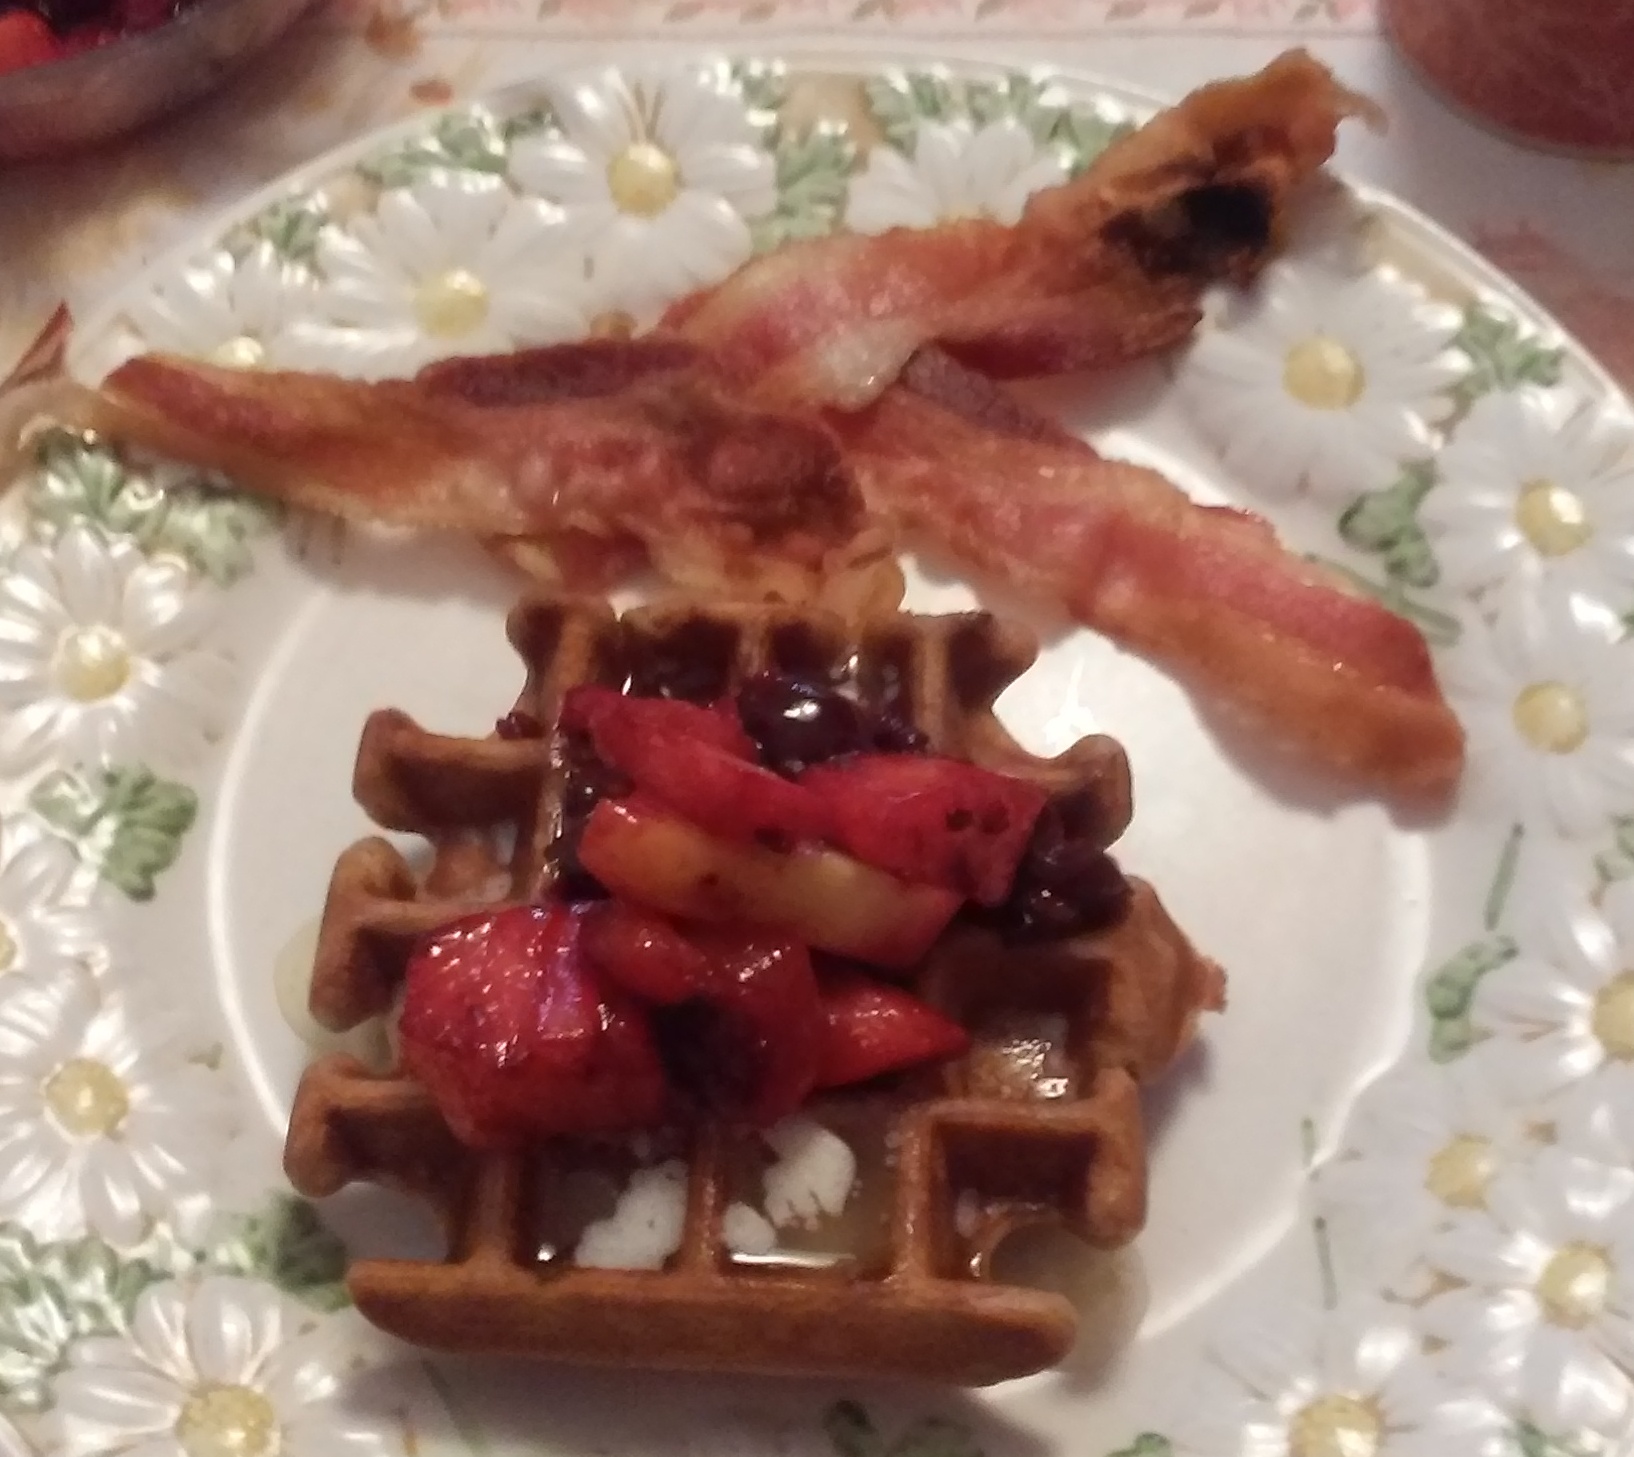
In my previous post I mentioned that I was going to try and use up all the food in my freezer and/or refrigerator.  I have made pretty good progress but have not got around to posting it.  This post will be sort of fun because as the title suggests, it is a ‘trickle-down’ recycle or in other words, recycling the recycled.  Now, it is not really like it sounds.  The main ingredients are recycled only once and the twice recycled is just sort of using the leftovers as you will see when you read the rest of the post.


My husband Everett, loves Mac and Cheese.  I sometimes make it but he wants it so often, that I tried resorting to purchasing small portions of it from Trader Joe’s and/or Bob Evans Mac and Cheese from the local market.  While these are fairly good products, the Mac and Cheese that I make is so much better that I decided to make a large portion of it – having it for dinner one night and then packaging the rest in lunch size container and freezing it for use when needed.  I made so much sauce that there was actually some leftover.  You can put a lot of Cheese Sauce in the Macaroni but only so much!

So, the first recycled product was Cauliflower made with the leftover Cheese Sauce.  Cauliflower is good for you but taste wise, just so so.  But I couldn’t resist the pretty heads that had at our local Farmer’s Market so of course I purchased one.

Before I continue with the recycling portion of this post listed below are the nutritional benefits of cauliflower.


Calories per serving        25

Fiber                             3 grams

Vitamin C                      77% of the RDI

Vitamin K                      20% of the RDI

Vitaming B6                  11%

Folate                           14%

Pantothenic Acid              7%

Potassium                       9%

Manganese                     8%

Magnesuim                     4%

Phosphorus                     4%


So, as you can see whether or not you specifically love or don’t love cauliflower, it is beneficial to eat it.  So, with this in mind I did cook the Cauliflower by separating the segments and washing it thoroughly and then cooking it in the microwave.  Vegetables are about the only thing that I will cook in the microwave and cauliflower cooks up in a manner of a few minutes.  When we were ready to eat dinner, I just put the covered dish of cauliflower into the microwave for about 2-3 minutes depending on the quantity and your microwave.  Then I removed it from the microwave and topped it with the leftover Cheese Sauce from the Mac and Cheese.  Voila!  Cauliflower with a Cheesy Sauce tastes quite good.

But we are only two people who can eat just so much cauliflower at one time and since I don’t like using leftovers without doing something to change them I did do something quite unusual to recycle the Cheesy Cauliflower and this was to make Hamburger Buns!  Yes!  Hamburger Buns made from Cauliflower.  Now, these are not Buns for people who want gluten-free bread products as there is definitely wheat flour in these buns.

Here is the procedure for making the Buns! (Or go to recipes (bread) for more concise directions.


  •  I had approximately 1 cup of Cheesy Cauliflower segments left over which I pulverized in the       Food Processor.


Cheesy Cauliflower


Cauliflower in Processor Workbowl


  •     I added 1 cup of warm water to the pulverized Cheesy Cauliflower along with 1 tablespoon of      Active Dry Yeast and 1 Tbsp. of Sugar.


 Yeast and Sugar Added


  •      Next I added 2 cups All-Purpose Flour to the mixture and ran the processor just long enough       to mix the ingredients together.


2 cups Flour Added


  •    Once the foregoing ingredients were well-blended I changed the chopping blade to the dough       blade and added more Flour to the mixture as needed.  I ended up adding an additional 2 cups       of flour so that there 4 cups used altogether.


  Dough Blade


  • I ran all the ingredients together for one minute and then transferred the dough to a greased and floured bowl and covered it with plastic wrap.


 Dough in bowl Rising


  • Once the Dough had doubled in size (approximately 1 hour depending on the warmth of the room) I punched the Dough down and formed it into buns.
  • I shaped the buns two different ways:
  •         a.  I rolled out the Dough and cut circle with a large round cutter.


     Dough Rolled and Cut


  •         b.  I then kneaded the scraps together and divided them into segments which I rolled into                     balls  and then flattened them.
  •         c.  The second method yielded small buns which would be ideal for children or those with                      small  appetites..  For those with  large appetites, the first method would be more                            appropriate.


   Cauliflower Buns Formed


  •  The shaped buns were placed on greased baking sheets which had been sprinkled with cornmeal       and  then covered.  Once the buns had risen to double their size, I placed them in a cold oven and   turned the heat on to 375 degrees.  Placing the buns in a cold oven gives them a little more raising          time and gives a lighter product.


 Baked Buns


Buns in Oven Baking


  • Baking time was approximately 20 minutes or until they are nicely browned on top and on the          bottom as well.  You can lift one up with a metal spatula to check the bottom.


We used the buns for Burgers and had quite a few leftover for other sandwiches as well.  We used the larger buns for Steak and Mushroom Sandwiches the following night.  Nope – not leftover Steak although there was some leftover from this dinner for lunch the following day.


Burger on Cauliflower Bun

Digg This
Reddit This
Stumble Now!
Buzz This
Vote on DZone
Share on Facebook
Bookmark this on Delicious
Kick It on DotNetKicks.com
Shout it
Share on LinkedIn
Bookmark this on Technorati
Post on Twitter
Google Buzz (aka. Google Reader)

Be the first to comment - What do you think?
Posted by Admin Test - 2020/01/28 at 11:16 AM

Categories: Baking, Bread, Cheese, Cooking for Everyone, Cooking for Kids, Culinary Makeovers, Dairy, Dinner Ideas, Family Fun, Leftovers, Main, One Dish Meals   Tags: , , ,

HAVE APPLES? MAKE APPLE KUCHEN

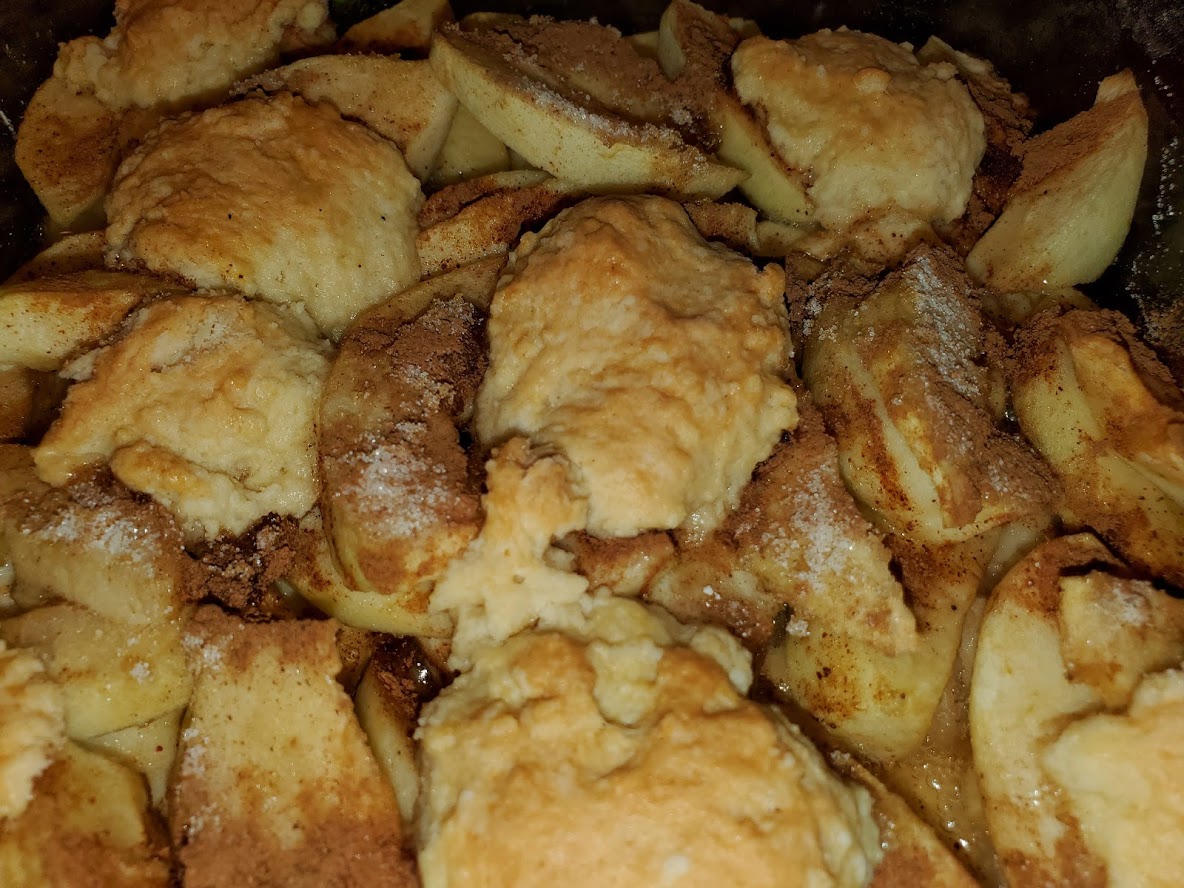
One way to use up some of your Apples (if you have too many) is to make Apple Kuchen.  Kuchen is a great breakfast item or dressed up with whipped cream or Ice Cream, it makes a great dessert for any meal.  Kuchen is simple to make and delicious to eat.  You will find the recipe by using the link above.  Just click on Apple Kuchen and you will be taken to the recipe.  Continue here and you will see some step by step photos to help you with your baking.


The Dough is simple to make and can easily be made by hand in a medium-size mixing bowl.  When making the Kuchen divide the Dough in half and either roll out half (on floured surface – as the recipe says) or just press half the Dough into your greased baking dish.  (8 x 8 or 9 x 9 is best)


Kuchen Dough pressed into Baking Dish


Peel and slice your Apples (don’t worry if they start to turn a little brown – this will disappear when baked)

You can either toss the Apples with the Cinnamon and Sugar in a separate bowl or just arrange the Apples on the Dough and then sprinkle with the Cinnamon and Sugar.  Either way will work.


Apples on Dough


Cinnamon and Sugar Added


Next, either roll out the remaining Dough or just scoop dabs and place on top of the Apples.  ( didn’t have quite enough dough to roll out so I scooped the Dough with a #60 Scoop or you can just used a spoon) I lightly pressed the dabs of dough onto the Apples.  This method worked quite fine.


Bake for the time stated in the recipe at 350 degrees.  Kuchen is best served warm and is quite good with Vanilla Sauce as stated in the recipe.  I reheated the Kuchen the next morning with some Cheddar on top and we ate it for breakfast.  Kuchen can also be served with whipped Cream and/or Vanilla Ice Cream.


  Baked Kuchen


Served with Melted Cheddar


Either way you serve it, it will be delicious!


Digg This
Reddit This
Stumble Now!
Buzz This
Vote on DZone
Share on Facebook
Bookmark this on Delicious
Kick It on DotNetKicks.com
Shout it
Share on LinkedIn
Bookmark this on Technorati
Post on Twitter
Google Buzz (aka. Google Reader)

Be the first to comment - What do you think?
Posted by Admin Test - 2019/11/10 at 10:17 AM

Categories: Baking, Bread, Main   Tags: , , , , ,

SUNDAY BAKING PROJECT #8 – GOUGERES

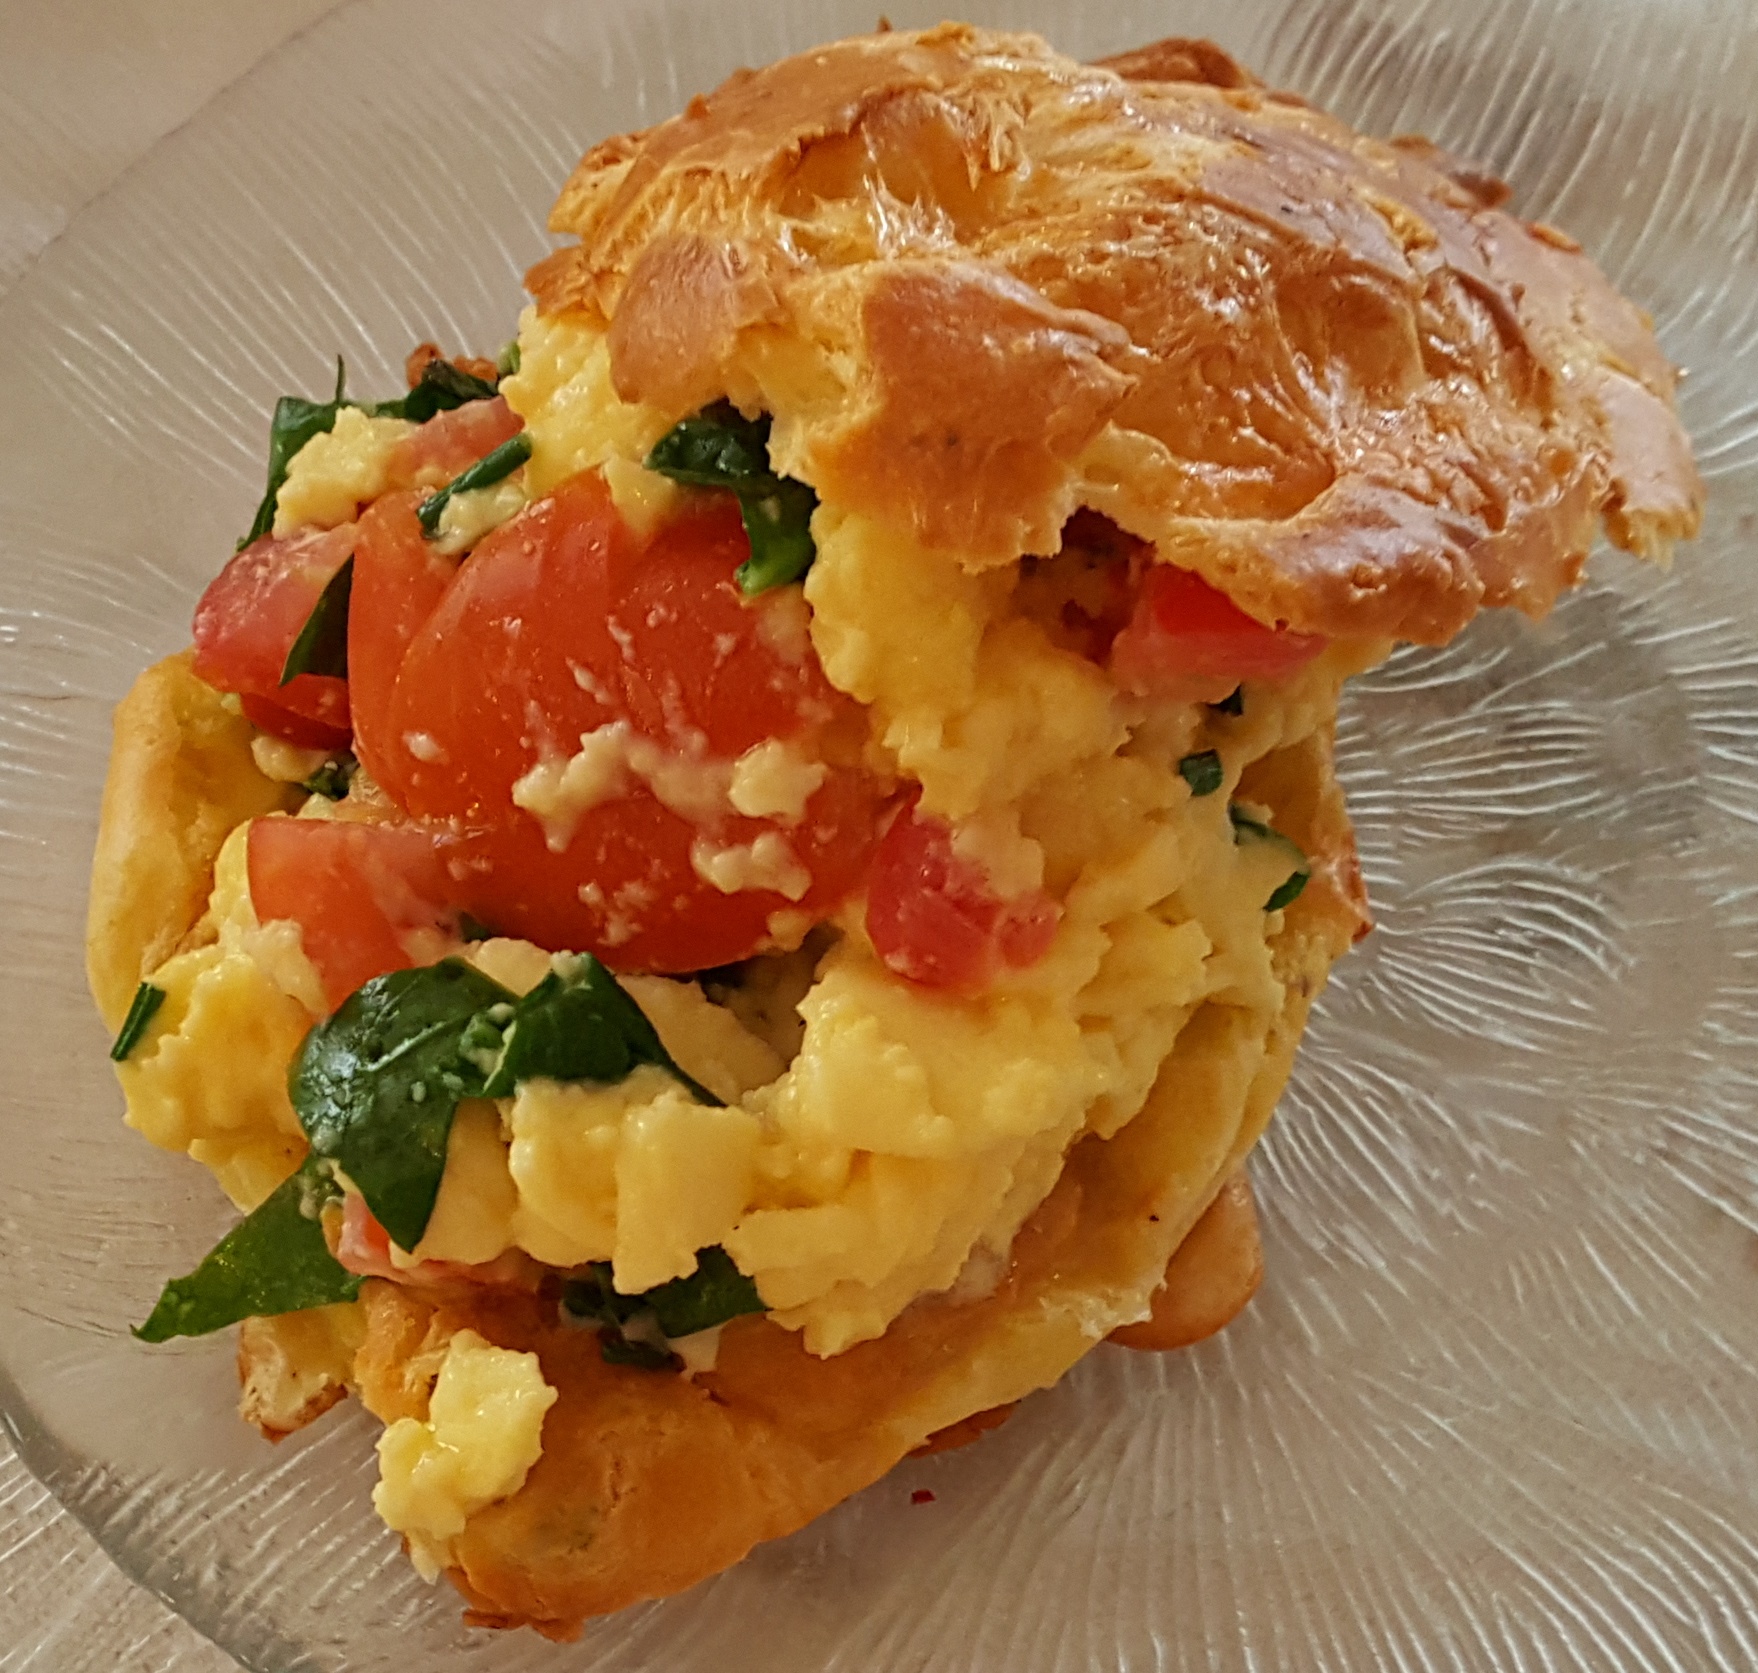
This Week’s Baking Project was Gougeres – a cheesy version of Pate Choux.  In this version the Pate Choux is made with Fat Free Milk instead of water and there is also the addition of Cheese.  I used Gruyere but Parmesan or other types of semi-hard or hard cheeses can be used.  This Project was fun and seemed to have been participated in by more members than any of the others.  At least there certainly was a lot of feedback and posting of photos.  Not only was this one fun but it was relatively simple and took very little time as compared to the first few projects that we did, especially the Lemon Chiffon Cake (which I loved).  The recipe for the Gougeres is posted in the recipe section of this blog but it came from the book “Tartine” which was named after the Restaurant of the same name.

For anyone who has not made Pate Choux before or even for those of us who have, it is always fun to see the marvel of the Choux Dough Puff Up and form these marvelous pockets which can be filled with anything from an Appetizer, to a Main Course or Dessert.  I used mine for Sunday Morning Breakfast with Herb and Tomato Scrambled Eggs along with a Fruit Salad dressed with Fresh Basil and Sweet Mint.


Below are the preparation photos:

The Recipe calls for 1 cup Skim (Fat Free) Milk – I had only 2% so used half milk and 1/2 water.  I may have gotten better height in the Puffs if I had only used water.

            1/2 cup 2% Milk


The Milk or Water (whichever you use) is brought to a boil along with the Butter over medium heat.  Then the Flour is added all at one time and vigorously beaten until the mixture all comes together.  At this time, the mixture is then placed in a Standing Mixer Bowl and the Eggs are added one at a time.  If you don’t have a mixer, this can be done by hand with a wooden spoon, but it will take some energy to do so because the Eggs need to be thoroughly beaten into the Dough.

       Adding the Eggs one at a time


You can also use a Food Processor, but I have found when making Pate Choux n the Food Processor that you usually end up using 1 less Egg than called for.  This is because the speed of the Processor is so fast that the ingredients get incorporated more thoroughly and at a faster speed.


Once all the Eggs have been incorporated then you add the Cheese, Chopped Herbs and Pepper.  Beat these items in by hand with a wooden spoon.

Beating in Herbs, Seasoning & Cheese


Next you can form the Gougeres on a lightly greased (I don’t usually grease the pan because there is plenty of butter in the dough but the recipe in mention does say to do so.  You can also line the pan with baking parchment or use a Silicon Baking Sheet, which is my preference.


 Formed Gougeres


The Puffs are baked at 350 degrees for at least 25 minutes but if you want a darker and crisper puff 45 minutes is recommended.  (The older recipes call for a 400 degree oven but they do seem to rise alright at 350 degrees.

If you make the small size they can be eaten warm as Appetizers or accompaniment to Soup or Salad.  If you make the larger ones, the tops can be cut off and they can be filled with a creamed mixture or scrambled Eggs as I did.  I made Soft Scrambled Eggs using the double boiler and added diced Tomatoes, Baby Spinach and Cilantro just before the Eggs were done.  Serve with Bacon or Sausage and a fresh Fruit Salad.


Baked Gougeres


                           Egg Filled Gougeres   


Below are the Members Photos.


 CM Wolkon


            Jeanne Ackerman


Jeanne’s Experiment  – The one on the left baked at 425 and the one at right at 350.  (There does seem to be a considerable difference in the photo although Jeanne said in reality there really wasn’t much difference)

      Terrie Cooper

             Eileen Delcore Bennet

Digg This
Reddit This
Stumble Now!
Buzz This
Vote on DZone
Share on Facebook
Bookmark this on Delicious
Kick It on DotNetKicks.com
Shout it
Share on LinkedIn
Bookmark this on Technorati
Post on Twitter
Google Buzz (aka. Google Reader)

Be the first to comment - What do you think?
Posted by sylveee - 2018/06/27 at 9:27 PM

Categories: Baking, Baking Tidbits, Bread, Breakfast Ideas, Cheese, Dairy, Eggs, Main, Sunday Baking Project   Tags: , , , ,

SUNDAY BAKING PROJECT #4 – HAM AND CHEESE BRIOCHE PUDDING


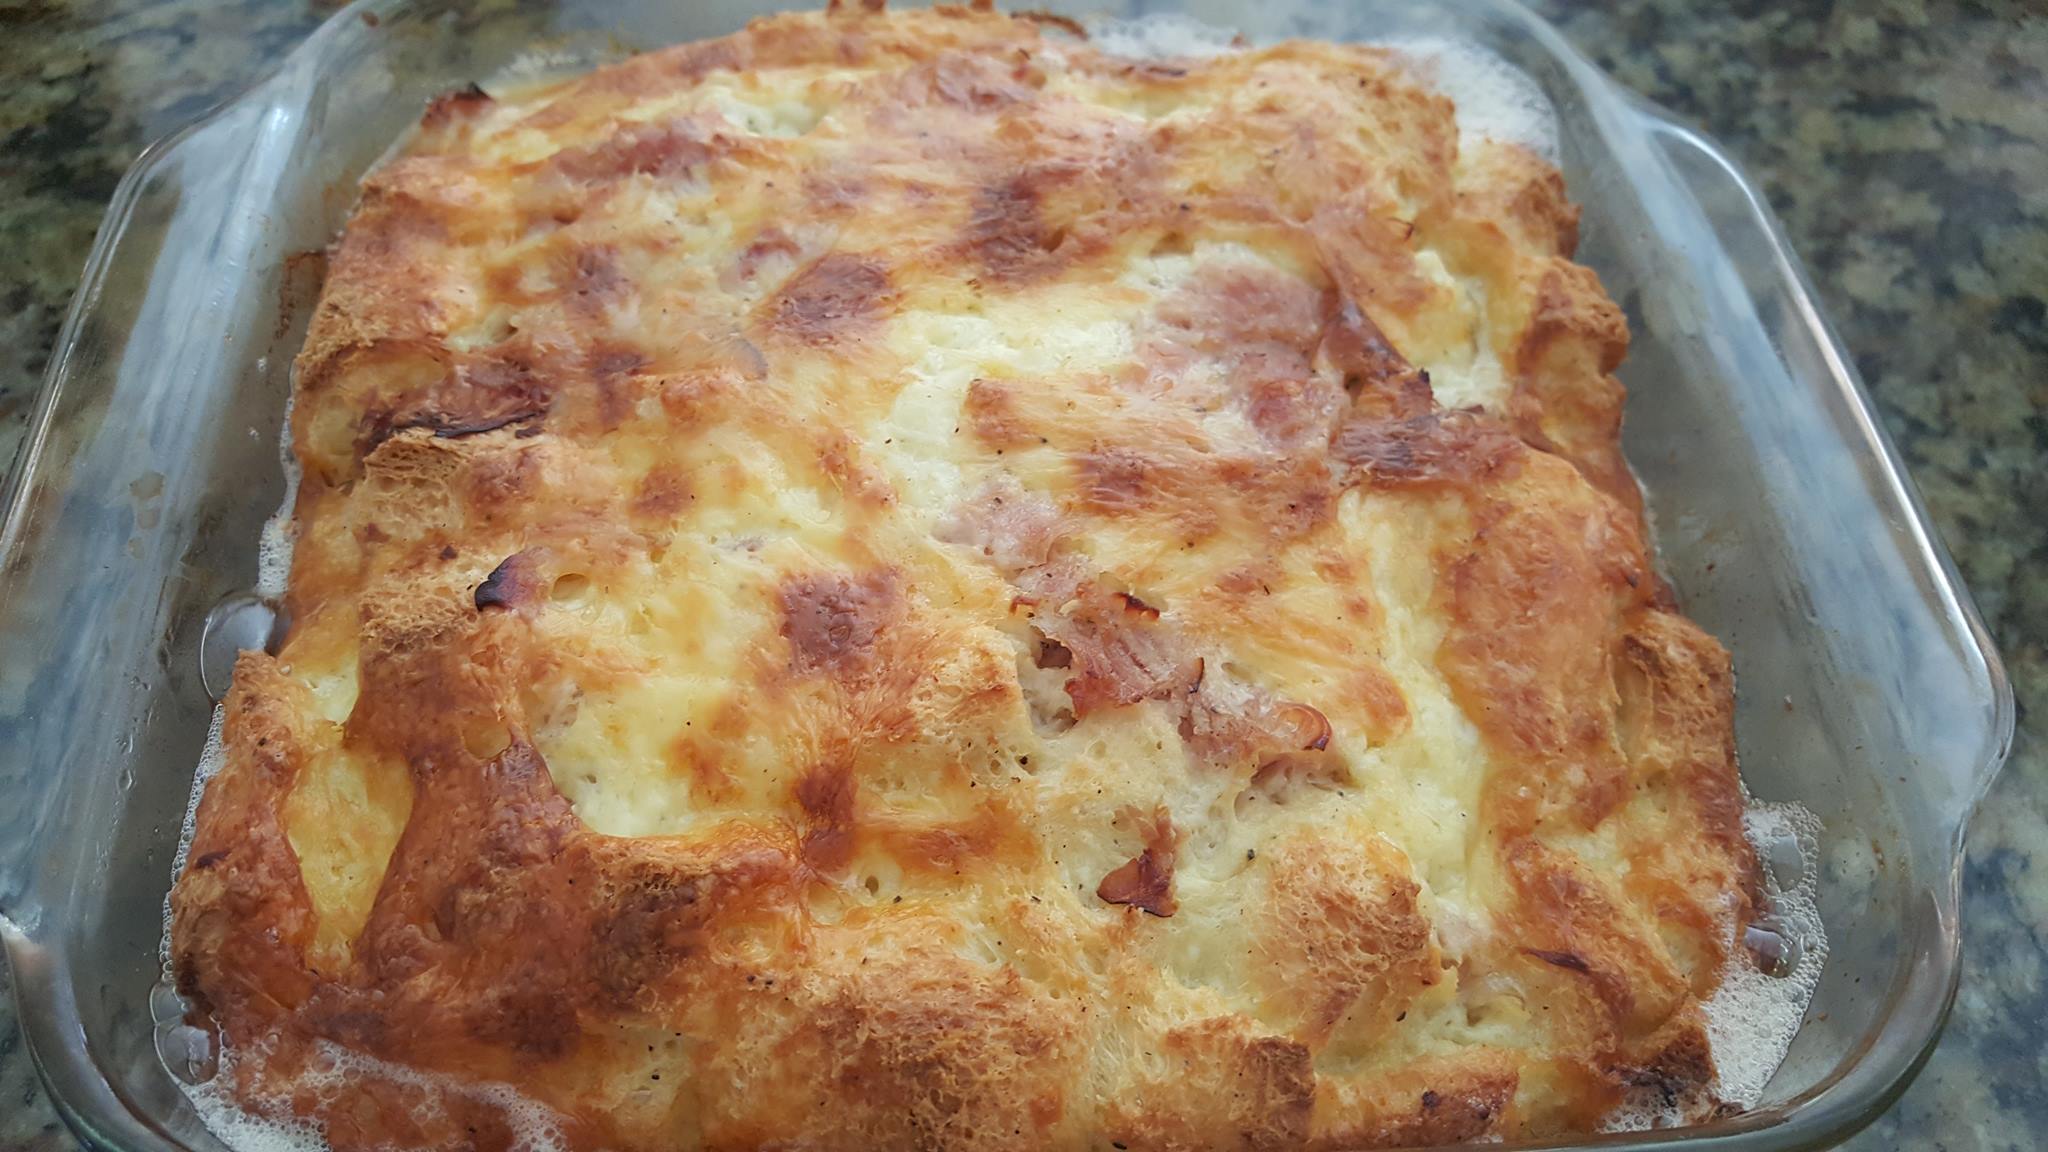
Ham and Cheese Brioche Pudding was the selection for Week 4.  It was decided upon as a nice contrast to the sweet selections from the previous weeks.  Unlike the previous 3 selections which we loved, this one will not go on my favorites list.  My Husband and I both love Bread Pudding, but as a sweet dish; it turns out that the savory version is not so palatable for us.  I am not a fan of Ham but my Husband likes it, and eats Ham and Cheese Sandwiches at least once a week, if not more often, so I decided to stick with the Ham and Cheese Version.  The Bread portion of the Pudding is Brioche.  I used Challah which is very similar to Brioche.  The Pudding itself was beautiful – it raised up and was a beautiful golden brown and had a great texture but would have been more to our liking if it had apples, raisins and some brown sugar in it.

I served the Brioche Pudding for Breakfast along with Maple Syrup and Watermelon on the side.


  With Maple Syrup and Watermelon


To make the Pudding you cut up 12 ounces of Brioche or other similar bread   (I used Challah which is very similar to Brioche) and place in a buttered baking dish (12” x 12” or even 10” x 10” will do).  I made half a recipe and used an 8” x 8” dish which was perfect.

 Cubed Bread

         Bread in Baking Dish


Gouda Cheese


            Shredded Gouda


Prepared Ham 


Combine the Eggs, Milk or Cream or Half and Half along with the seasonings which are Salt, Pepper, Cayenne and Nutmeg.

Custard Ingredients Mixed Together


Pour the Custard mixture over the bread cubes and top with Julienned Ham and Shredded Cheese.


 Custard Added

      Ham and Cheese Incorporated


In the photos above you may see that the Bread and Custard Cubes are in a different dish than the product with the Ham and Cheese.  I mistakenly thought that the half recipe would fit in my ceramic loaf dish but not to be – had to transfer the mixture to my 8 x 8 glass baking dish.


Press everything down so that the bread absorbs the custard and the Ham and Cheese are incorporated into the whole.  Slivered Green Onions  (which I omitted) are sprinkled on top.


The complete recipe can be found at Cooking – New York Times

Normally Bread Pudding is assembled and then refrigerated overnight so that all the custard is absorbed into the bread.  This recipe did not call for that but since we were going to eat it for breakfast, I did do that.  I made it in a glass baking dish, so I had to let it warm up for about an hour before baking it.  The baking took 45 minutes, exactly what was called for in the recipe.  The Pudding should be served immediately or it can be baked and cooled and then cut up into squares as suggested in the recipe or you can just reheat any leftovers that you may have.


              Baked Pudding

              Plated Pudding


With Maple Syrup


Even though I only made a half recipe we still had leftovers which I sent home with my Grandson who loves Ham.  I have yet to hear if he has eaten it and if he likes it.  Will notate that here when I find out.


I am sure that many people will like this version of Bread Pudding, especially if you are a fan of Quiche.  I do like Quiche but never make it with Ham.  I usually use Spinach or Mushrooms.  I am a Vegie Fan, but not a Vegetarian or Vegan.  I am thinking though of becoming a Pescatarian.  I do not get stuffed when I eat fish and/or vegetables like I do when I eat meat.

There are variations among the members of our group – some did use Spinach, another used Bacon, etc.  And a couple of the members made the Brioche Loaf from the recipe that was given.  I did make my bread but it was Challah and since I had it on hand decided to use that instead since it is very similar, both in ingredients used and the end result.


MEMBERS PHOTOS IN THE ORDER THEY WERE POSTED


              Cara Croxton


            CM Wolkon

            Cynthia Allen

    Elizabeth Barnhart Mockapetris


Jeanne Ackerman

    Terrie Cooper Loaf

          Terrie Cooper Pudding


     Terrie Cooper Slice


Digg This
Reddit This
Stumble Now!
Buzz This
Vote on DZone
Share on Facebook
Bookmark this on Delicious
Kick It on DotNetKicks.com
Shout it
Share on LinkedIn
Bookmark this on Technorati
Post on Twitter
Google Buzz (aka. Google Reader)

Be the first to comment - What do you think?
Posted by sylveee - 2018/05/23 at 10:58 AM

Categories: Baking, Baking Tidbits, Bread, Breakfast Ideas, Cheese, Dairy, Ethnic Cuisine, Lunch Ideas, Main, Sunday Baking Project   Tags: , , , ,

GINGERBREAD WAFFLES – A Culinary Makeover


Baking is one of my favorite things to do and during the Winter Holidays I make Gingerbread Houses and I teach other people how to make Gingerbread.  This past December, in addition to my classes I baked and built four different houses.  One for the Cancer Support Community’s Holiday Boutique, one for a sample for my class, one for home and one as a gift.  There are two ways to bake the houses – one is to cut out the pieces from the unbaked dough and the other is to bake the dough first before cutting out the pieces.  The advantage of the second method is that the pieces will all fit together without additional trimming after the baking process.  The disadvantage is that there are going to be a lot of sections of cookie that will not be big enough for any house, except for the chimney and how many of those do you need?  Now we do love to eat the leftovers but when there are a lot of leftovers, you can only so much.


As I said, Baking is one of my favorite things to do, but another one of my favorite culinary activities is to turn leftovers into new products and that is what I did with the leftover Gingerbread pieces.  I pulverized them to a fine crumb in my Food Processor and turned them into a Waffle Batter.  If you like Gingerbread, then you certainly will like Gingerbread Waffles.  Here is how I did it.


  • Break up the leftover Gingerbread pieces into sections that will fit in your Food Processor that has been fitted with the Chopping Blade.  Use the Pulse Button to break up the pieces into small pieces and then turn it on to finely chop the Gingerbread pieces.  You should end up with a medium to fine crumb.
  • Measure the Crumbs – 2 cups of Gingerbread Crumbs will make enough waffles for 3-4 people.


Gingerbread Crumbs

          Gingerbread Crumbs

  • Use your Food Processor (do not wash out the bowl) or a large mixing bowl.  Beat 3 Eggs until well mixed and then add 1 1/2 cups Buttermilk and blend together.
  • Combine the Gingerbread Crumbs with 1 1/2 cups of All-Purpose Flour, 1 tsp. Cinnamon, 1/2 tsp. Ground Ginger and 1/2 tsp. Baking Soda.  Add to the Buttermilk/Egg mixture and Pulse, just until mixed.  If doing in a bowl, with a whisk, just mix until the Ingredients are blended – DO NOT OVER-MIX!  (Over-mixing Waffle, Pancake or Muffin Batter will make the product tough.
  • Stir in 1/4 cup Melted Butter.
Gingerbread Waffle Batter

        Gingerbread Waffle Batter


  • Heat your Waffle Iron until the indicator light tells you the Iron is hot.  If necessary, lightly oil or spray the surface of the Iron.
  • Pour approximately 1/2 cup of Batter on each section of you Waffle Irons Grids (this will vary, depending on the size and shape of our Waffle Iron)


Batter on Grids

              Batter on Grids

  • Close and Bake until the steaming stops.  Keep the baked Waffles warm in a low oven until you are ready to serve them.
Baked Waffles

             Baked Waffles

  • Serve with Fruit Compote and or Maple Syrup and melted Butter.  The Waffles in the Feature Photo are served with crisply cooked bacon.
  • For the Fruit Compote,I melted about 2 Tbsps. of Butter along with Brown Sugar (2-4 Tbsps.).  I then added pitted and halved Cherries, Blackberries and fresh Pineapple pieces.  This will work with just about any fruit – Apples are great with Gingerbread as well as Bananas, Mango or Papaya.
Making Fruit Compote

     Making Fruit Compote


And this is how you use leftover Gingerbread to make Waffles!  As a convenience, I have also listed the ingredients below.


2 CUPS Gingerbread Crumbs

1 1/2 cups Flour

1 tsp. Cinnamon

1/2 tsp. ground Ginger

1/2 tsp. Baking Soda

3 Eggs

1 1/2 cups Buttermilk

1/4 cup melted Butter


Digg This
Reddit This
Stumble Now!
Buzz This
Vote on DZone
Share on Facebook
Bookmark this on Delicious
Kick It on DotNetKicks.com
Shout it
Share on LinkedIn
Bookmark this on Technorati
Post on Twitter
Google Buzz (aka. Google Reader)

Be the first to comment - What do you think?
Posted by Admin Test - 2016/01/15 at 2:47 PM

Categories: Bread, Breakfast Ideas, Cooking for Kids, GINGERBREAD HOUSES, Holiday Meals, Main   Tags: , , , , , , , , , ,

HOMEMADE BREAD – CIABATTA

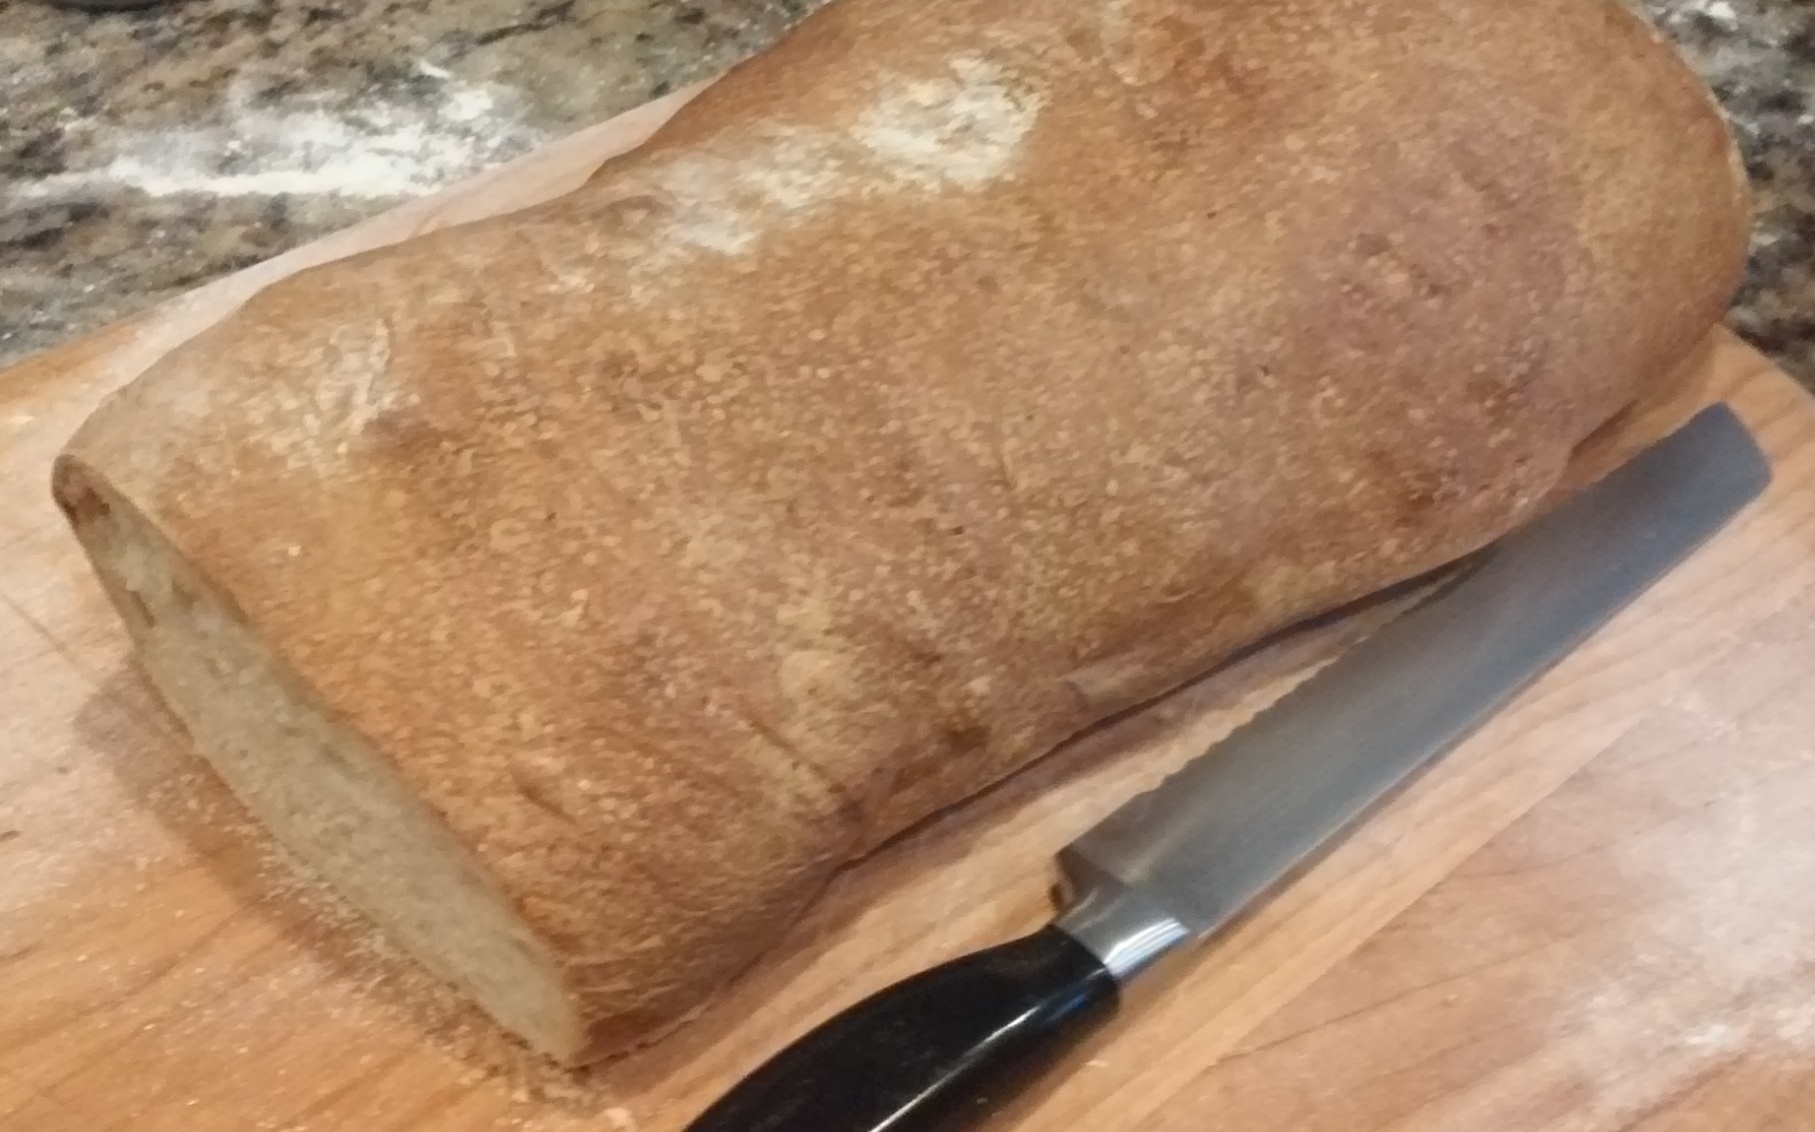
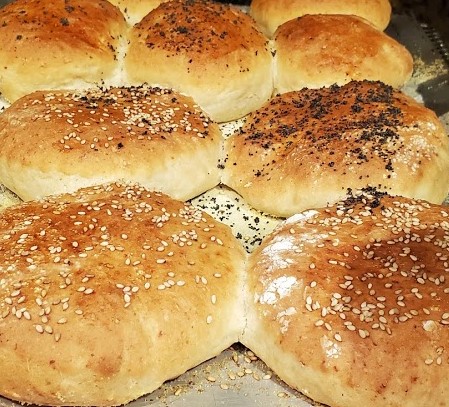
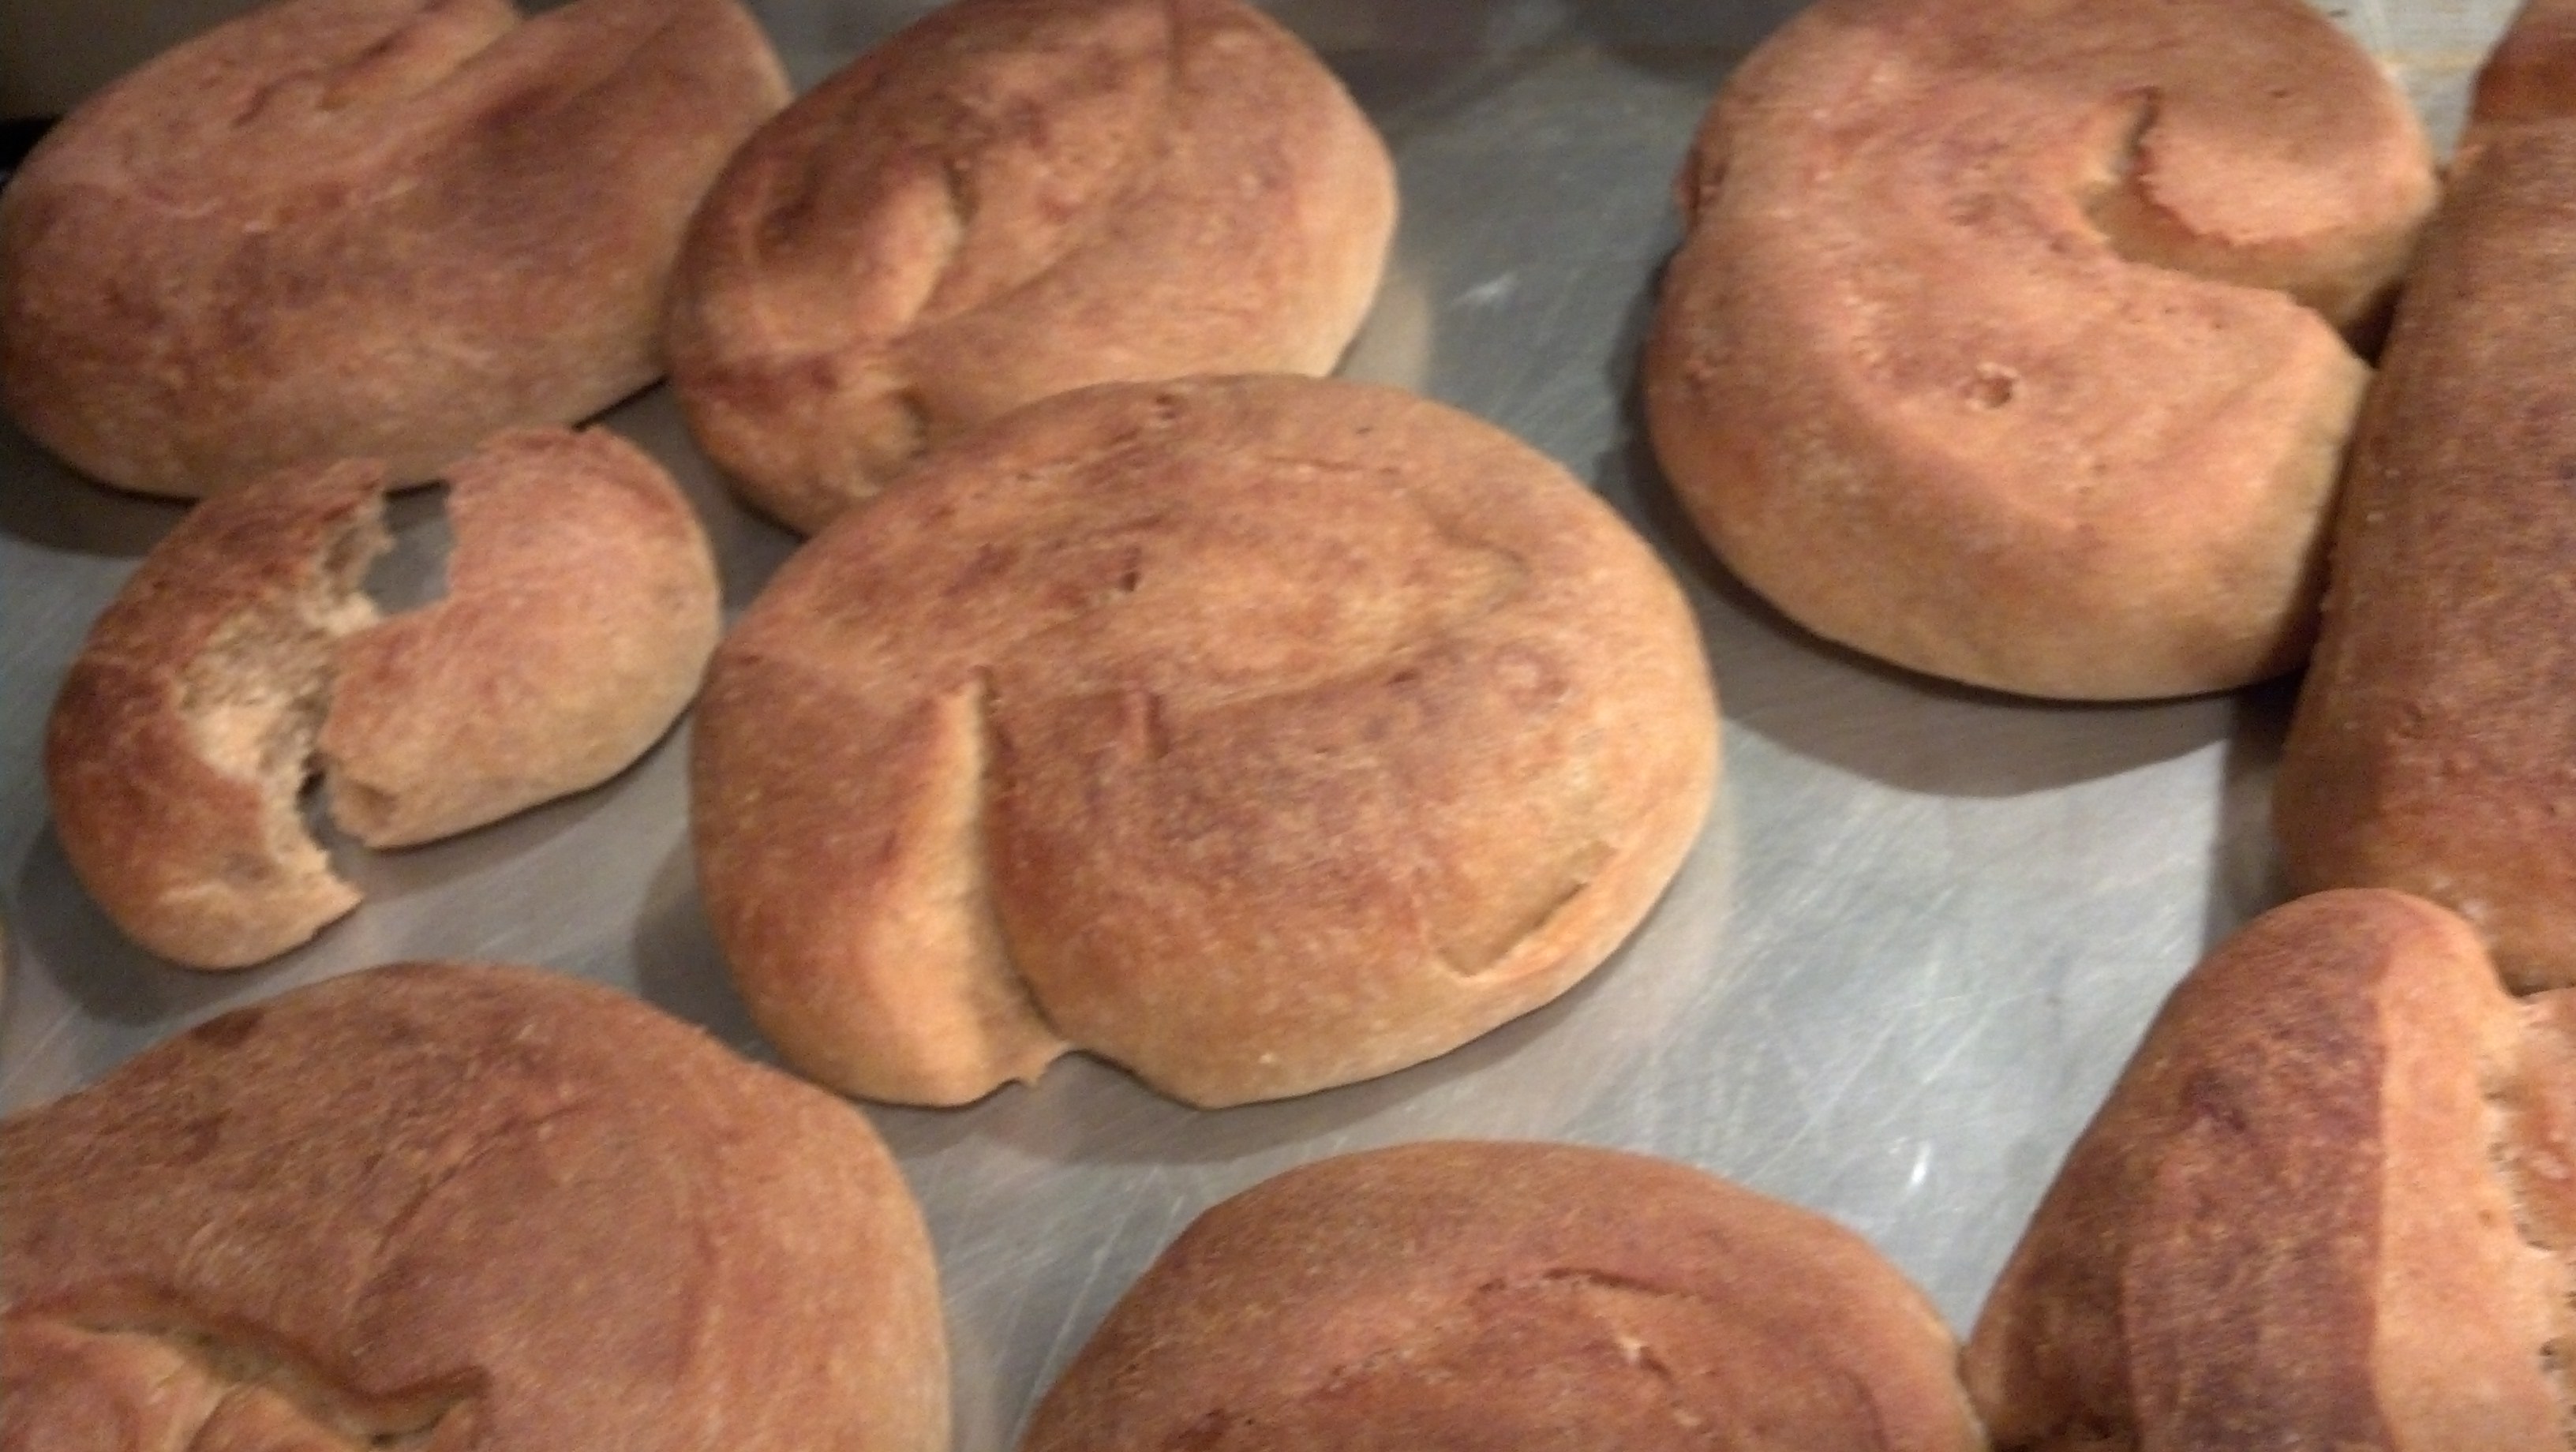
Baking is one of my favorite Kitchen Activities and I especially love making bread and the Winter Months are the ideal time to do it.  Not only will the result be a delicious product but your kitchen and your home will be warm with the fresh fragrance of baking bread and the communal warmth your family will feel when sitting down to the table and enjoying freshly buttered bread with their meals.


I love to watch the dough raise up and the smell of freshly baking bread is indeed heavenly.  When a fresh loaf comes out of the oven your taste buds perk up and your mouth waters for a slice of that hot, buttered bread!


One of my favorite type of breads is Ciabatta. Ciabatta is Italy’s answer to the French Baguette.  It was created in 1982 to stop the influx of French Baguettes into Italy.  The Bakers there were afraid that the use of the Baguette would hurt there business.  Ciabatta is a crusty bread with a chewy inside texture.   It is fairly simple to make, although it does take a little bit of time but if you do spend the time, the dough is so nice and easy to work with it is actually fun, not work to make this bread.  And when you eat it with melting butter it is so good you can practically swoon over it.


So let’s go through the actual steps of making Ciabatta (the complete recipe is at Recipe for Ciabatta


  • You have to make a starter that is called a Poolish.  The best time to do this is the night before you plan to make the bread as it has to proof for at least 10 hours.

Poolish

  Poolish


  • Once the Poolish is proofed, add the Olive Oil and mix it in with a Dough Spatula, if you have one;  if not, then use the next best tool that you have – perhaps a Wooden Spoon.


Dough Hook

     Dough Spatula


Then you add the remaining ingredients and knead the Dough;  a standing Electric Mixer fitted with the Dough Hook is the best to go but if you do not have one, then just make use of your Elbow Grease and knead the dough by hand.


Making Ciabatta (12)Dough Hook


Finish making  the Dough and let it rest for at least 20 minutes.

Next comes the fun – stretching and folding the Dough to develop the gluten.  This is a four step process, although you can shorten the process by eliminating any of the subsequent stretching and folding turns.  (If you do this, your bread won’t have the true Ciabatta texture – somewhat like the texture of sour dough but without the sour taste)  I figure that if you are going to make the Ciabatta and if you have the time, it is well worth it to go through the whole process and not eliminate any of the stretching turns)


Flattened Dough before Folding and Stretching

A


B

B


C

C


D

D


A – Flattened Dough before Stretching

B – Bottom and Top Folds (fold from the side closest to you)

C – Sideways Folds – fold from the right side to the middle and then from the left side over the                 right side fold

D – Complete fold – cover and let rest 20 minutes before flattening and folding again


Once the stretching process is finished, then you allow the dough to rest for another 50 minutes before placing it on your baking sheet for baking.  The Dough can be made into a loaf or cut into rolls – whatever you do, unlike most yeast breads, do not flatten the dough – just gently transfer it to your greased and floured (use cornmeal or Semolina on the pans) baking sheets.


In the photo below left, the loaf is on a Pizza Paddle and below right, the loaf is on a Baking Stone.

The traditional way to bake Ciabatta is to place it on a greased and floured pan and bake it in the middle of the oven with a pan of water on the rack under.  The steaming water helps to give the bread its chewy crust.  The Baking Stone is an alternative way to bake the bread.  It still comes with a nice crusty exterior.

Shaped Dough

                 Shaped Dough

On Stone

On Stone

Digg This
Reddit This
Stumble Now!
Buzz This
Vote on DZone
Share on Facebook
Bookmark this on Delicious
Kick It on DotNetKicks.com
Shout it
Share on LinkedIn
Bookmark this on Technorati
Post on Twitter
Google Buzz (aka. Google Reader)

Be the first to comment - What do you think?
Posted by Admin Test - 2016/01/10 at 3:51 PM

Categories: Baking, Bread, Ethnic Cuisine, Italian, Main   Tags: , , ,

WHAT TO DO WITH THOSE EXCESS APPLES #2


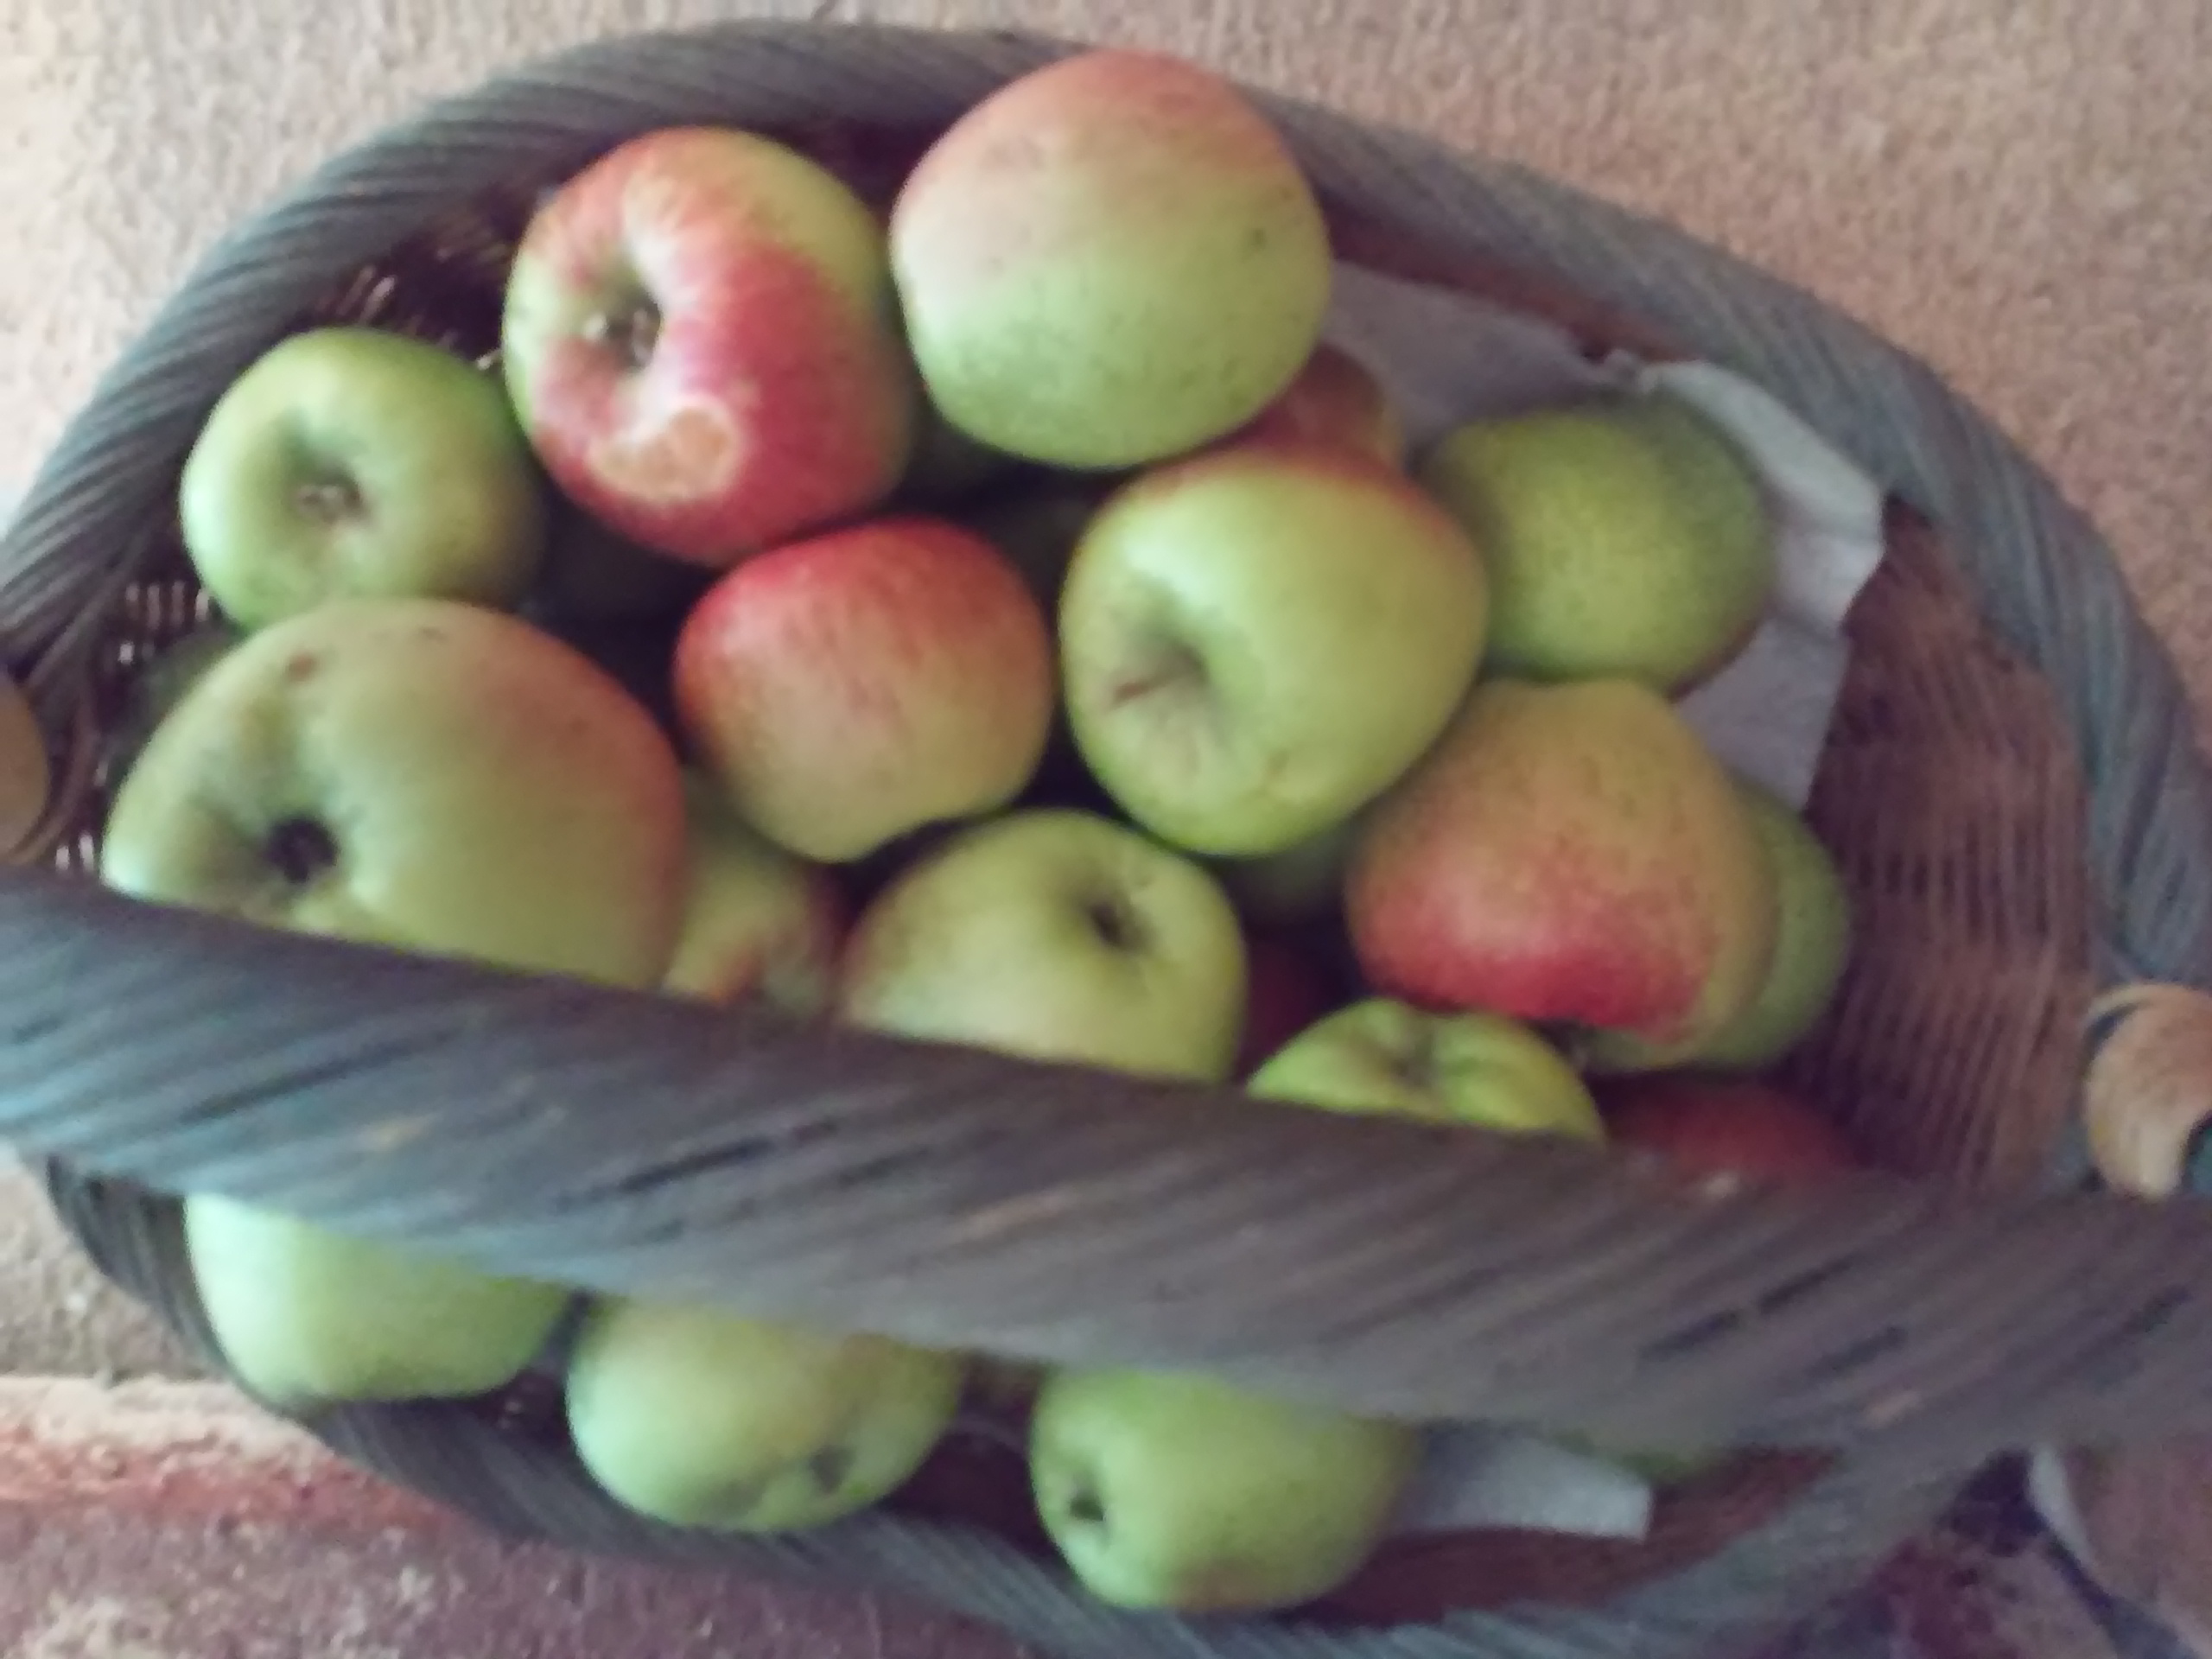
Apple Bread & Muffins:  Use the Apple Bread Recipe to make Muffins as well as Bread


Apple Bread

Apple Bread


Baked Apple Muffins

Baked Apple Muffins


Pies:  Apple Pies can be made as a Double Crust Pie or as a French Apple Tart


Apple Pie

Apple Pie


Apple Pie Slice with Chees

Apple Pie Slice with Cheese


Apple Sauce:  the Apple Sauce pictured is not a true Apple Sauce.  The Apples have been juliened, not pureed.  This gives more texture and flavor.  This version of Apple Sauce is good as a condiment with Ice Cream, Cereal or on top of cake.  To make the Sauce, peel and seed the Apples and then cut into Juiien strips.  If you have a food processor, use the 6 x 6 Julienne Blade to cut them.  Place Julienne Apples in a saucepan that is large enough to hold them along with Brown Sugar (minimum amount), some Water or Apple Juice and cook until the Apples give up their moisture and the resulting mixture is of the viscosity that you want.  If you do a large quantity pack into sterilized canning jars and seal with caps and rings.  Place in a kettle and cover with water to at least 1″ over the tops of the jars and bring to a boil.  Boil for 5 minutes.  Carefully remove from the pot and turn upside down on a clean dish towel.  Turning the jars upside down will insure that the lids will seal.  If you use a pot with a rack inside that can be lifted out, this will be the safest way to remove the jars from the hot water.  Let stand upside down until cool.  Turn right side up and tighten the lids.  Store in a cool dry place.  Apple Sauce is great with Pork, Poultry and Seafood dishes.


Apple Sauce

Apple Sauce


Tarts:  An easy way to make delicious, beautiful tarts is to have on hand some Puff Pastry Sheets.  Peel and slice your Apples and then place on Puff Pastry that has been cut into a circle or square, whichever you prefer.  Place the prepared Puff Pastry on a baking sheet – if you have Silpat, use that or just put the pastry on the ungreased baking sheet.

Layer the Apples on the Puff Pastry, being sure to leave about 1″ uncovered all the way around.

Sprinkle a little Sugar and Cinnamon on top of the Apples.  Bake at 400 degrees for 20-25 minutes or until the edges have puffed up to form a rim and are a nice dark golden brown.

Remove from the oven and brush the Apples with Jelly that has been heated to melt it down to make it brushable.

Once the Jelly has set up, your tarts are ready to serve.


Large Apple Tart

9″ Apple Tart


Apple Turnovers

Apple Turnovers

Apple Turnovers


Use your Apples for eating, baking or cooking.  Have fun and enjoy!


Digg This
Reddit This
Stumble Now!
Buzz This
Vote on DZone
Share on Facebook
Bookmark this on Delicious
Kick It on DotNetKicks.com
Shout it
Share on LinkedIn
Bookmark this on Technorati
Post on Twitter
Google Buzz (aka. Google Reader)

Be the first to comment - What do you think?
Posted by Admin Test - 2015/10/08 at 10:20 PM

Categories: Baking, Bread, Cooking for Kids, Family Fun, Food as Gifts, Fruit, Holiday Ideas, Main, Pastry   Tags: , , , ,

PIZZA PIE DAY

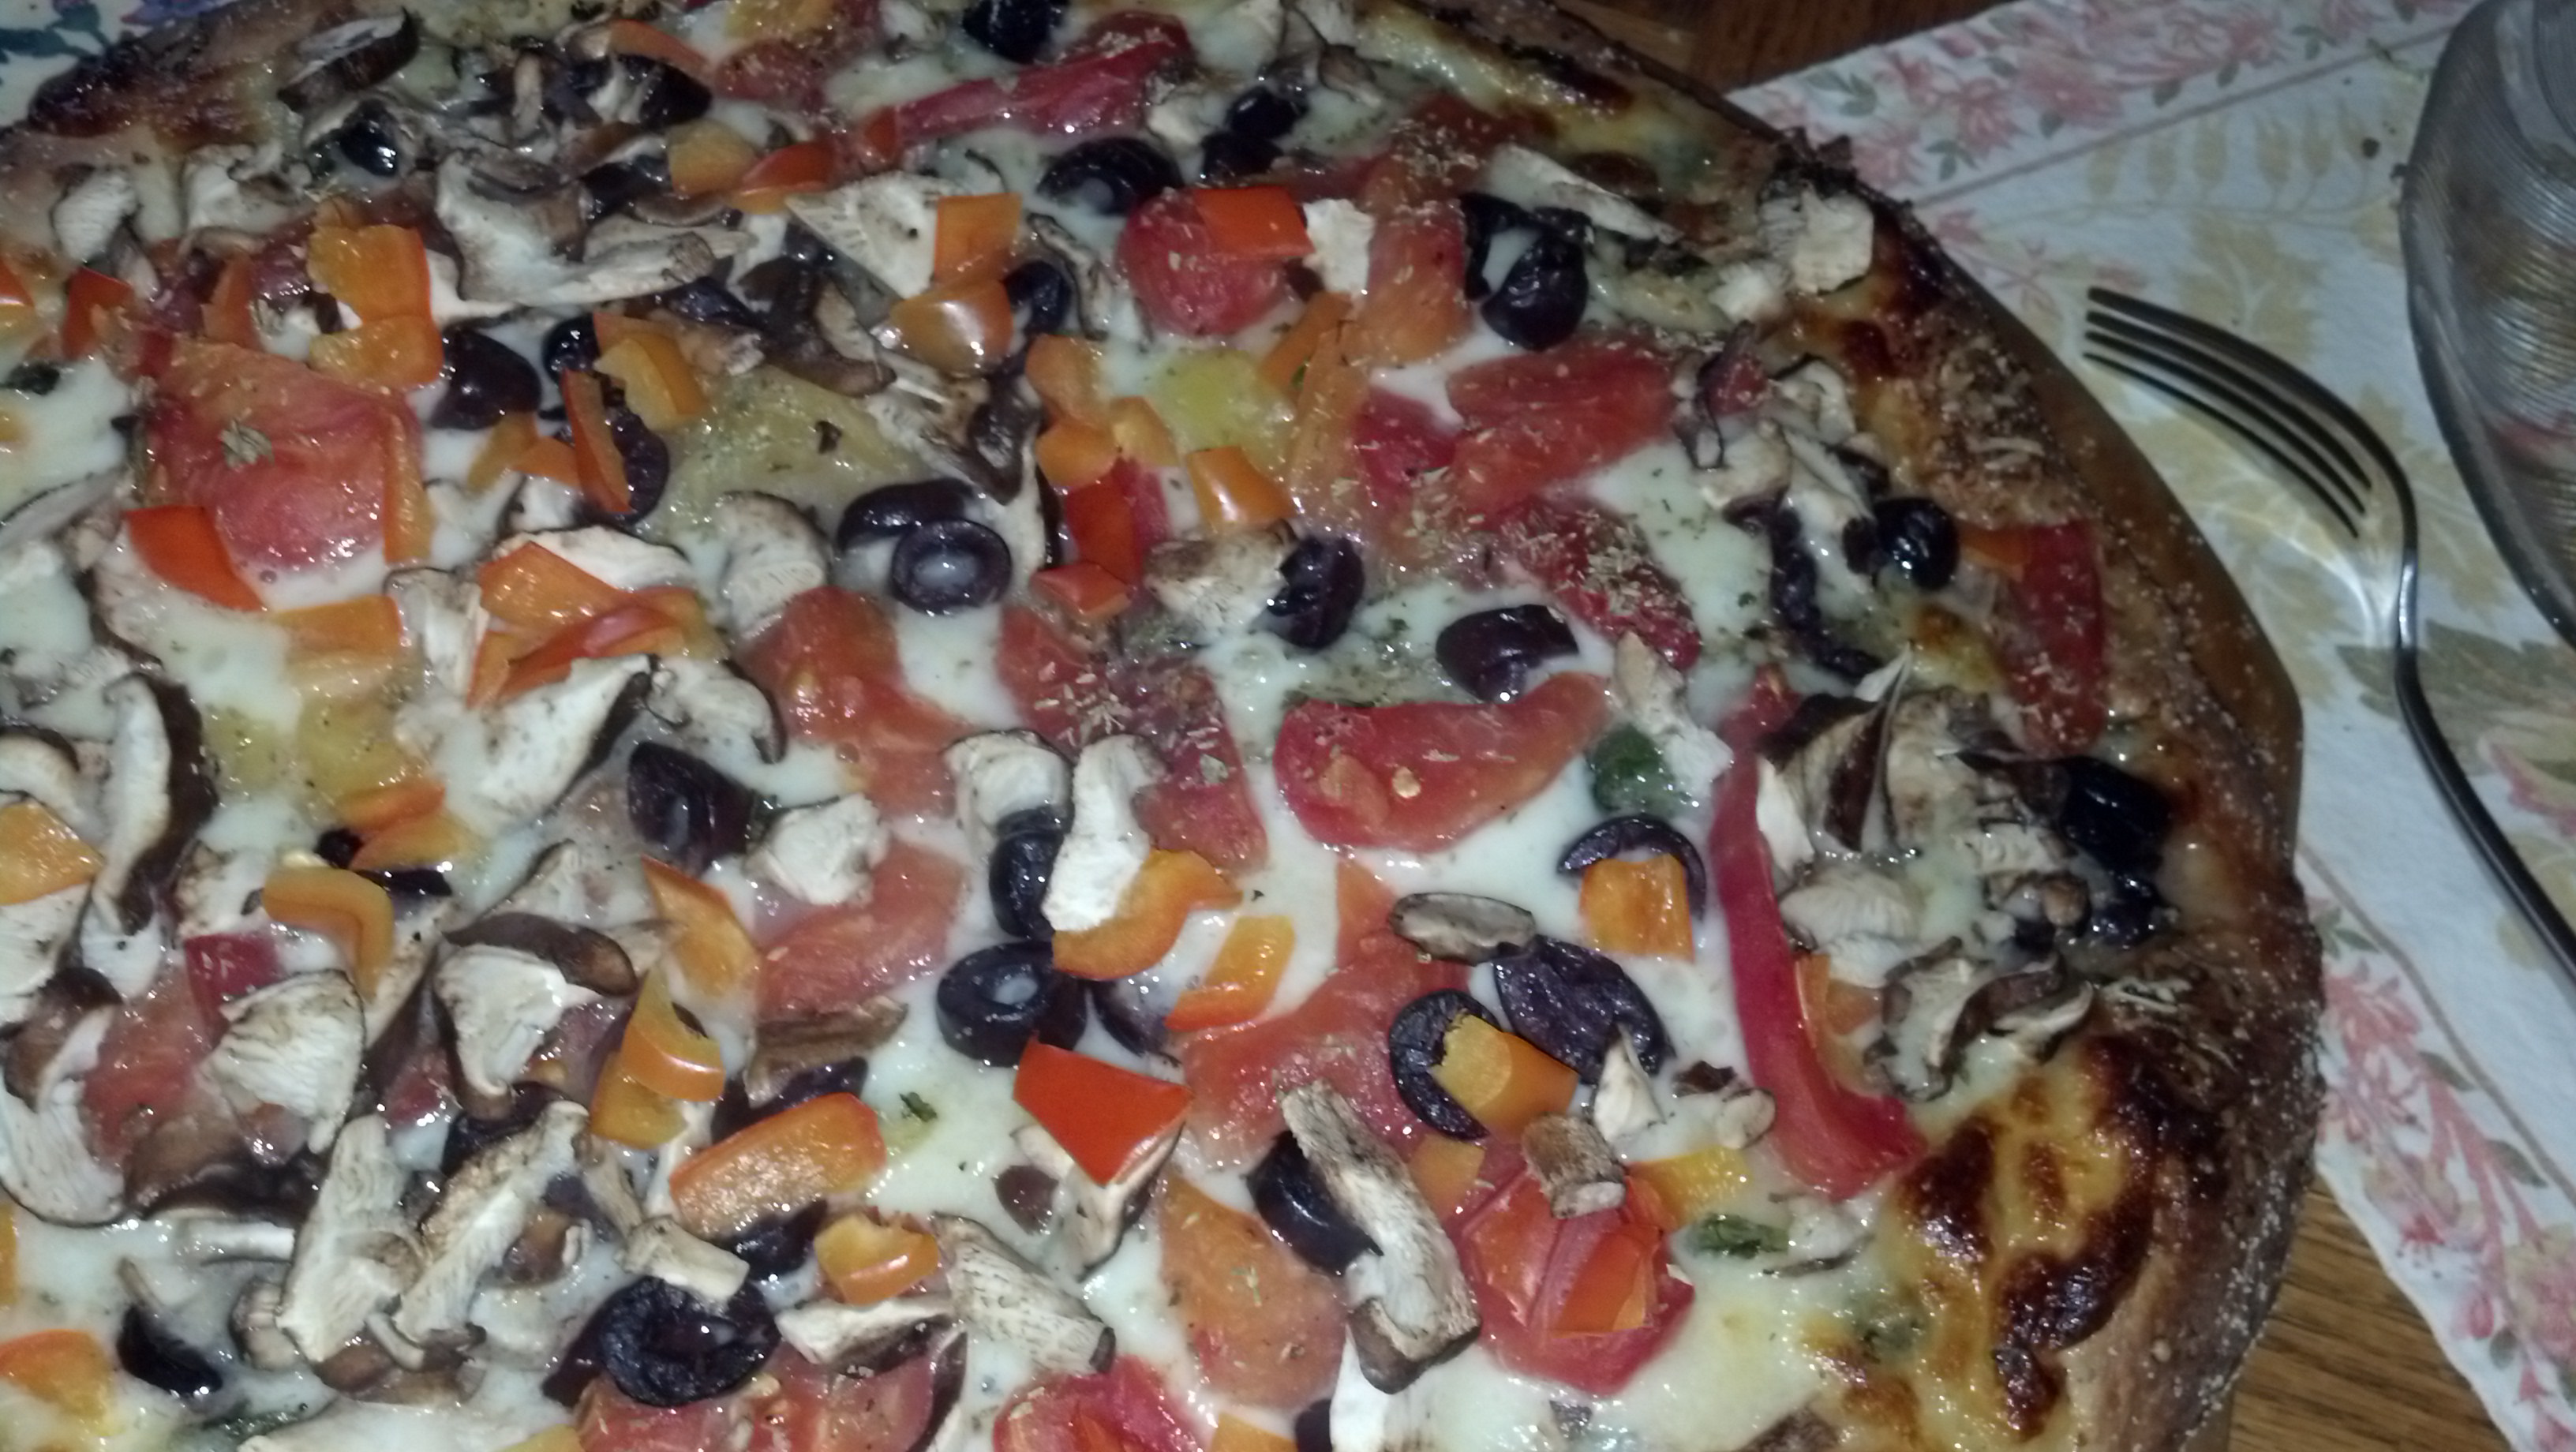
Monday, February 9th is ‘Pizza Pie Day’.  Are you going to go out and have pizza?  Or are you going to make and bake your own?  Homemade Pizza is delicious and easy to make.  I will say that it probably won’t cost you any less to make it than to buy it but the ingredients you use will be better than the ‘Take-Out Pizza’ or the Pizzeria Pizza.


To start with, you need good ingredients.  You could cheat a little and buy the Dough already made at Trader Joe’s or an Italian Deli.  But, if you have a Food Processor or a Sanding Mixer making the Dough is a cinch.  For the recipe see pizza-dough/


Shaped Pizza Dough

Shaped Pizza Dough


For the toppings you will need:  Crushed Tomatoes  (use a good brand – you want a thick one)

Basil, Oregano, Salt & Pepper


Crushed Tomatoes


Whole Milk Mozzarella (whole milk is by far better tasting than low-fat)


Shredded Mozzarella

Shredded Mozzarella


Other additional ingredients:  Mushrooms, Onions, Bell Peppers, Olives,


Vegetable Topped Pizza

Vegetable Topped Pizza

Pepperoni or whatever else you want on your pizza.


Pepperoni and Vegie Pizza

Pepperoni and Vegie Pizza


If you don’t want to create your own, here are some suggestions from other Posts and Pages from Sylveees Kitchen.

Sun-dried Tomato Pizza – -sun-dried-tomato/


Hawaiian Pizza

Hawaiian Pizza

Mexican Pizza                 –   mexican-pizza

Pizza Night                          pizza-time/


Okay everyone, get busy and make some Pizza tonight or tomorrow.  If you don’t get around to it tomorrow which is Pizza Pie Day, you can still do it anytime this week.  The second week in February is ‘American Pizza Bake Week’.


Digg This
Reddit This
Stumble Now!
Buzz This
Vote on DZone
Share on Facebook
Bookmark this on Delicious
Kick It on DotNetKicks.com
Shout it
Share on LinkedIn
Bookmark this on Technorati
Post on Twitter
Google Buzz (aka. Google Reader)

Be the first to comment - What do you think?
Posted by Admin Test - 2015/02/08 at 12:40 PM

Categories: Baking, Bread, Cheese, Dairy, Italian, Main, Mexican, National Food Days, Pizza, Tropical   Tags: , , , , , , , ,

NATIONAL WHEAT BREAD MONTH

January is ‘National Wheat Bread Month’.  What better time than now to start making and baking your own bread.  With what the prices have risen to in fresh bakeries you could make 2-3 loaves for the same price and very little time.  If you have a Food Processor or Kitchen Aid, making your own bread is simple, quick and economical, and much more tasty than what you buy in the markets.  If you don’t have one of the above appliances, you can still make your own bread with just a little elbow grease and it will help to rid you of any anxiety that you may have incorporated into your body.


Just to show that the bread is easy to make and it doesn’t have to turn out perfectly formed to taste good.  Today i made Wheat Bread Dough and then my husband informed that he had just bought some at the market the other day and hadn’t told me about it.  Okay, so what do I do now?  Make my dough into rolls which really was perfect because we were having Pulled Pork Sandwiches for dinner and they don’t really have to be on French Rolls or regular Hamburger Buns.  So here goes – follow the process and see the results.  As you can see far below, the rolls are not so perfectly shaped, but this just adds to the interest – they taste good and because they are different shapes you can have them different uses.


The complete recipe can be found under recipes    /breads/whole-wheat-bread/


Dry Ingredients in Processor

Dry Ingredients in Processor


Dough completely kneaded

Dough completely kneaded

Dough being formed

Dough being formed


In Bowl covered with Plastic Wrap

In Bowl covered with Plastic Wrap


Flattened Risened Dough

Flattened Risen Dough

Risen Dough

Risen Dough

Sliced Dough

Sliced Dough

Shaped into Rolls

Shaped into Rolls


Baked Rolls

Baked Rolls

Digg This
Reddit This
Stumble Now!
Buzz This
Vote on DZone
Share on Facebook
Bookmark this on Delicious
Kick It on DotNetKicks.com
Shout it
Share on LinkedIn
Bookmark this on Technorati
Post on Twitter
Google Buzz (aka. Google Reader)

Be the first to comment - What do you think?
Posted by Admin Test - 2015/01/13 at 7:50 PM

Categories: Baking, Bread, Main, National Food Days   Tags: , , , , , ,

Next Page »