Posts tagged "butter"

THANKSGIVING FAVORITES – DISHES TO CREATE FOR YOUR FAMILY DINNER


Thanksgiving is on the horizon and many families will be busy preparing food and enjoying it with their loved ones.  If you love to cook and even if you don’t but are going to be cooking listed below are the links to some delicious recipes that you may enjoy for your Thanksgiving Meal.  Take a look at them and then try out one or two or three or all.  When you do, please let me know how you, your family and friends enjoyed them.


CREAMED SPINACH  –  Spinach is one of my favorite Vegetables and this version is delicious, even for non-Spinach lovers.  It is also versatile and can be turned into a Creamed Spinach Soup just by adding some Vegetable Stock and a little more Cream or Milk.  A great recipe for Thanksgiving and the days beyond.


Creamed Spinach

           Creamed Spinach


CURRIED FRUIT STUFFING – a little different twist on Thanksgiving Stuffing – the Curry and Fruit give your stuffing additional flavor in a delicious way.  This recipe uses Traditional Stuffing Ingredients with the addition of Apple, Apricots and Golden Raisins or whatever you wish to use plus Curry Powder.  It is delicious and quite tasty with the addition of the fruit.


Juilienned Apples

Juilienned Apples


Dried Apricots


        Golden Raisins


GOLDEN SQUASH JUBILEE – is a simple Vegetable Dish made with only 4 ingredients:

2 lbs. Banana Squash – shredded

1 cup dried Apricots – chopped

½ Cup firmly packed Brown Sugar

¼ cup Butter


This dish can be cooked in the Microwave or baked in the Oven.


MASHED POTATOES – be sure to use Russet Potatoes (you need to use a Potato that will crumble when baked so that they will mash easily


Mashed Potatoes

                                                   Mashed Potatoes


ROASTED ASPARAGUS


Green Asparagus

Green Asparagus


TURKEY FRITTATA – this is a great dish to use most any kind of leftover – it is an omelet made with Onions, Potatoes, Tomatoes and Cheese as well as the leftover Turkey.  A Frittata is good for Breakfast, Lunch or Dinner.


TURKEY CROQUETTES – these are made with leftover Turkey, Onions and a smattering of other Vegetables – they are breaded and then fried and served with Remoulade Sauce.


TURKEY POT PIE – made with leftover Turkey, Vegetables and a Rough Puff Pastry or purchased Puff Pastry if you prefer.  Great for leftover Turkey, Chicken or whatever else you have.  Serve with a Salad and you have a complete meal.


A


Digg This
Reddit This
Stumble Now!
Buzz This
Vote on DZone
Share on Facebook
Bookmark this on Delicious
Kick It on DotNetKicks.com
Shout it
Share on LinkedIn
Bookmark this on Technorati
Post on Twitter
Google Buzz (aka. Google Reader)

Be the first to comment - What do you think?
Posted by sylveee - 2016/11/09 at 9:42 PM

Categories: Culinary Makeovers, Dinner Ideas, Leftovers, Main   Tags: , , , , , , , , , ,

GINGERBREAD WAFFLES – A Culinary Makeover


Baking is one of my favorite things to do and during the Winter Holidays I make Gingerbread Houses and I teach other people how to make Gingerbread.  This past December, in addition to my classes I baked and built four different houses.  One for the Cancer Support Community’s Holiday Boutique, one for a sample for my class, one for home and one as a gift.  There are two ways to bake the houses – one is to cut out the pieces from the unbaked dough and the other is to bake the dough first before cutting out the pieces.  The advantage of the second method is that the pieces will all fit together without additional trimming after the baking process.  The disadvantage is that there are going to be a lot of sections of cookie that will not be big enough for any house, except for the chimney and how many of those do you need?  Now we do love to eat the leftovers but when there are a lot of leftovers, you can only so much.


As I said, Baking is one of my favorite things to do, but another one of my favorite culinary activities is to turn leftovers into new products and that is what I did with the leftover Gingerbread pieces.  I pulverized them to a fine crumb in my Food Processor and turned them into a Waffle Batter.  If you like Gingerbread, then you certainly will like Gingerbread Waffles.  Here is how I did it.


  • Break up the leftover Gingerbread pieces into sections that will fit in your Food Processor that has been fitted with the Chopping Blade.  Use the Pulse Button to break up the pieces into small pieces and then turn it on to finely chop the Gingerbread pieces.  You should end up with a medium to fine crumb.
  • Measure the Crumbs – 2 cups of Gingerbread Crumbs will make enough waffles for 3-4 people.


Gingerbread Crumbs

          Gingerbread Crumbs

  • Use your Food Processor (do not wash out the bowl) or a large mixing bowl.  Beat 3 Eggs until well mixed and then add 1 1/2 cups Buttermilk and blend together.
  • Combine the Gingerbread Crumbs with 1 1/2 cups of All-Purpose Flour, 1 tsp. Cinnamon, 1/2 tsp. Ground Ginger and 1/2 tsp. Baking Soda.  Add to the Buttermilk/Egg mixture and Pulse, just until mixed.  If doing in a bowl, with a whisk, just mix until the Ingredients are blended – DO NOT OVER-MIX!  (Over-mixing Waffle, Pancake or Muffin Batter will make the product tough.
  • Stir in 1/4 cup Melted Butter.
Gingerbread Waffle Batter

        Gingerbread Waffle Batter


  • Heat your Waffle Iron until the indicator light tells you the Iron is hot.  If necessary, lightly oil or spray the surface of the Iron.
  • Pour approximately 1/2 cup of Batter on each section of you Waffle Irons Grids (this will vary, depending on the size and shape of our Waffle Iron)


Batter on Grids

              Batter on Grids

  • Close and Bake until the steaming stops.  Keep the baked Waffles warm in a low oven until you are ready to serve them.
Baked Waffles

             Baked Waffles

  • Serve with Fruit Compote and or Maple Syrup and melted Butter.  The Waffles in the Feature Photo are served with crisply cooked bacon.
  • For the Fruit Compote,I melted about 2 Tbsps. of Butter along with Brown Sugar (2-4 Tbsps.).  I then added pitted and halved Cherries, Blackberries and fresh Pineapple pieces.  This will work with just about any fruit – Apples are great with Gingerbread as well as Bananas, Mango or Papaya.
Making Fruit Compote

     Making Fruit Compote


And this is how you use leftover Gingerbread to make Waffles!  As a convenience, I have also listed the ingredients below.


2 CUPS Gingerbread Crumbs

1 1/2 cups Flour

1 tsp. Cinnamon

1/2 tsp. ground Ginger

1/2 tsp. Baking Soda

3 Eggs

1 1/2 cups Buttermilk

1/4 cup melted Butter


Digg This
Reddit This
Stumble Now!
Buzz This
Vote on DZone
Share on Facebook
Bookmark this on Delicious
Kick It on DotNetKicks.com
Shout it
Share on LinkedIn
Bookmark this on Technorati
Post on Twitter
Google Buzz (aka. Google Reader)

Be the first to comment - What do you think?
Posted by Admin Test - 2016/01/15 at 2:47 PM

Categories: Bread, Breakfast Ideas, Cooking for Kids, GINGERBREAD HOUSES, Holiday Meals, Main   Tags: , , , , , , , , , ,

HOMEMADE BREAD – CIABATTA

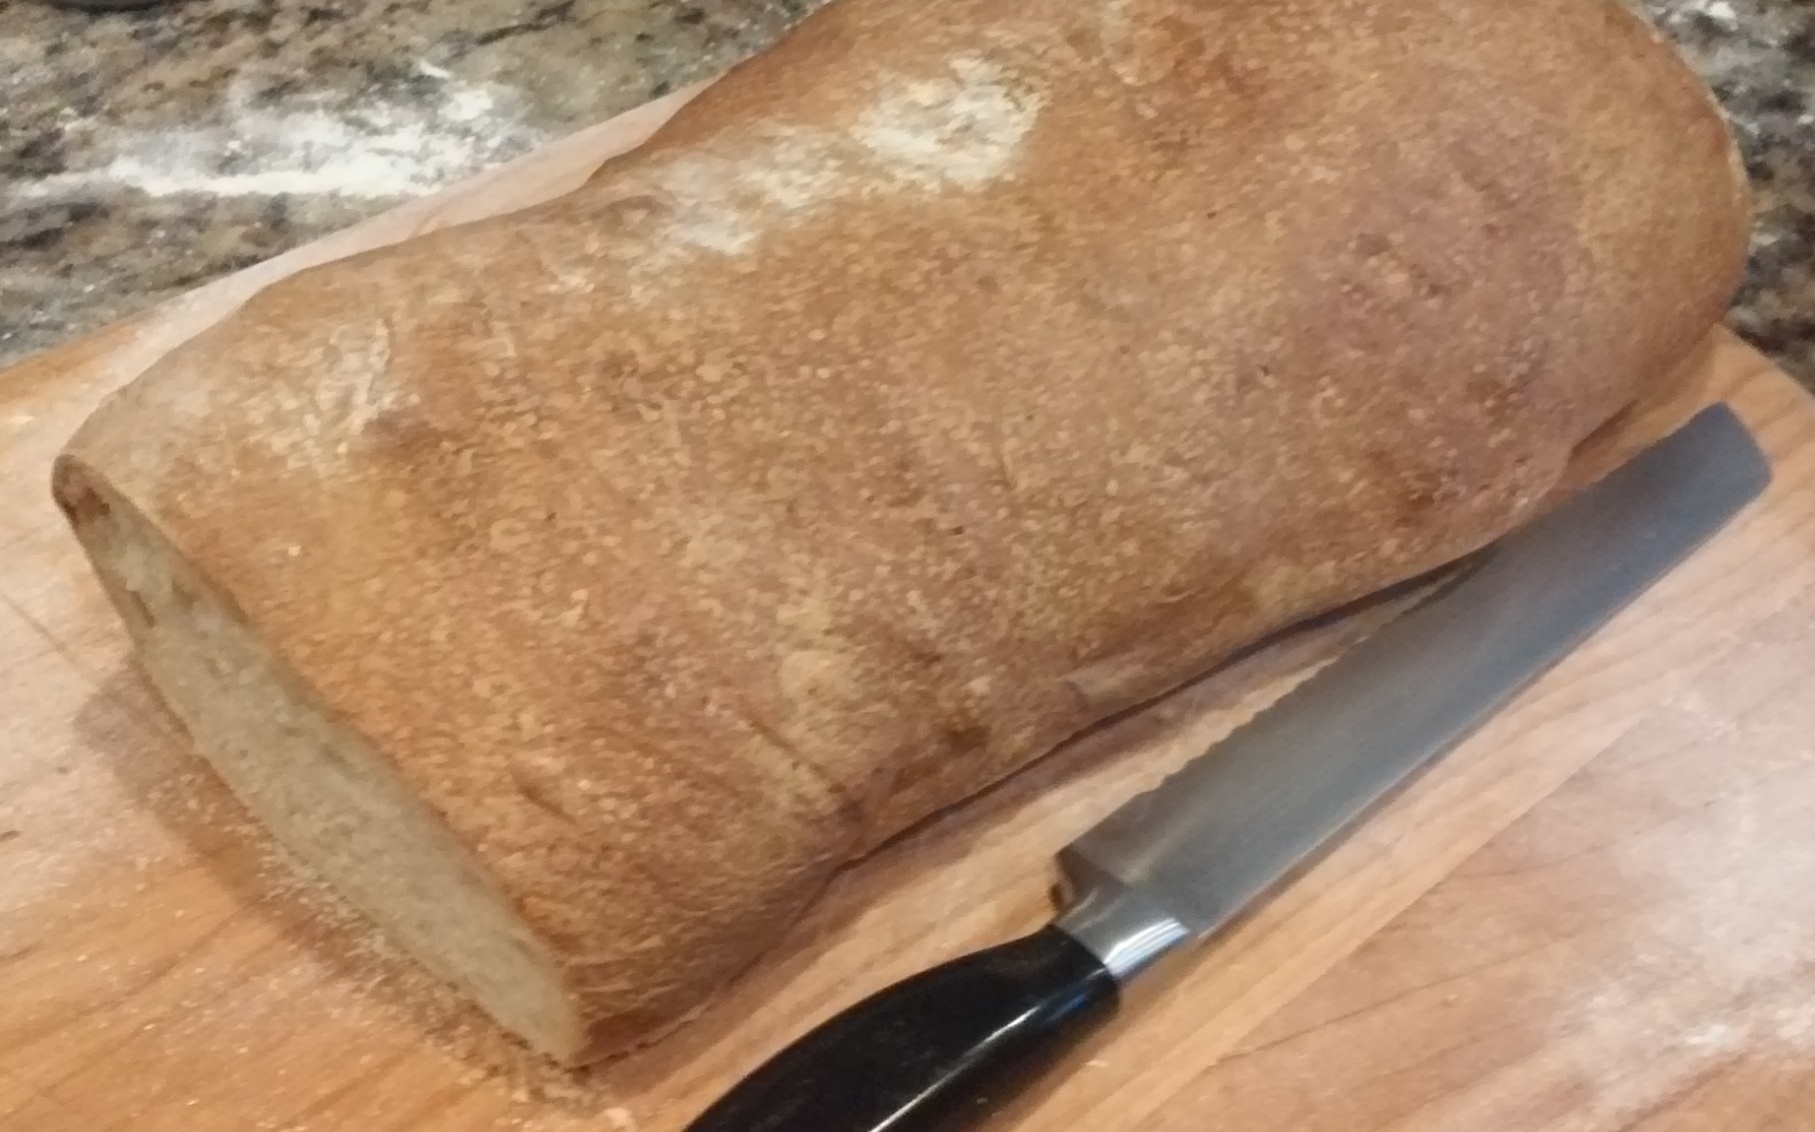
Baking is one of my favorite Kitchen Activities and I especially love making bread and the Winter Months are the ideal time to do it.  Not only will the result be a delicious product but your kitchen and your home will be warm with the fresh fragrance of baking bread and the communal warmth your family will feel when sitting down to the table and enjoying freshly buttered bread with their meals.


I love to watch the dough raise up and the smell of freshly baking bread is indeed heavenly.  When a fresh loaf comes out of the oven your taste buds perk up and your mouth waters for a slice of that hot, buttered bread!


One of my favorite type of breads is Ciabatta. Ciabatta is Italy’s answer to the French Baguette.  It was created in 1982 to stop the influx of French Baguettes into Italy.  The Bakers there were afraid that the use of the Baguette would hurt there business.  Ciabatta is a crusty bread with a chewy inside texture.   It is fairly simple to make, although it does take a little bit of time but if you do spend the time, the dough is so nice and easy to work with it is actually fun, not work to make this bread.  And when you eat it with melting butter it is so good you can practically swoon over it.


So let’s go through the actual steps of making Ciabatta (the complete recipe is at Recipe for Ciabatta


  • You have to make a starter that is called a Poolish.  The best time to do this is the night before you plan to make the bread as it has to proof for at least 10 hours.

Poolish

  Poolish


  • Once the Poolish is proofed, add the Olive Oil and mix it in with a Dough Spatula, if you have one;  if not, then use the next best tool that you have – perhaps a Wooden Spoon.


Dough Hook

     Dough Spatula


Then you add the remaining ingredients and knead the Dough;  a standing Electric Mixer fitted with the Dough Hook is the best to go but if you do not have one, then just make use of your Elbow Grease and knead the dough by hand.


Making Ciabatta (12)Dough Hook


Finish making  the Dough and let it rest for at least 20 minutes.

Next comes the fun – stretching and folding the Dough to develop the gluten.  This is a four step process, although you can shorten the process by eliminating any of the subsequent stretching and folding turns.  (If you do this, your bread won’t have the true Ciabatta texture – somewhat like the texture of sour dough but without the sour taste)  I figure that if you are going to make the Ciabatta and if you have the time, it is well worth it to go through the whole process and not eliminate any of the stretching turns)


Flattened Dough before Folding and Stretching

A


B

B


C

C


D

D


A – Flattened Dough before Stretching

B – Bottom and Top Folds (fold from the side closest to you)

C – Sideways Folds – fold from the right side to the middle and then from the left side over the                 right side fold

D – Complete fold – cover and let rest 20 minutes before flattening and folding again


Once the stretching process is finished, then you allow the dough to rest for another 50 minutes before placing it on your baking sheet for baking.  The Dough can be made into a loaf or cut into rolls – whatever you do, unlike most yeast breads, do not flatten the dough – just gently transfer it to your greased and floured (use cornmeal or Semolina on the pans) baking sheets.


In the photo below left, the loaf is on a Pizza Paddle and below right, the loaf is on a Baking Stone.

The traditional way to bake Ciabatta is to place it on a greased and floured pan and bake it in the middle of the oven with a pan of water on the rack under.  The steaming water helps to give the bread its chewy crust.  The Baking Stone is an alternative way to bake the bread.  It still comes with a nice crusty exterior.

Shaped Dough

                 Shaped Dough

On Stone

On Stone

Digg This
Reddit This
Stumble Now!
Buzz This
Vote on DZone
Share on Facebook
Bookmark this on Delicious
Kick It on DotNetKicks.com
Shout it
Share on LinkedIn
Bookmark this on Technorati
Post on Twitter
Google Buzz (aka. Google Reader)

Be the first to comment - What do you think?
Posted by Admin Test - 2016/01/10 at 3:51 PM

Categories: Baking, Bread, Ethnic Cuisine, Italian, Main   Tags: , , ,

APPLE SEASON – HOMEMADE APPLE STRUDEL

Baked Apple Strudel


Even though our normally very abundantly producing Apple Tree has had a smaller than normal crop, we still have enough Apples to more than meet our needs.  Our needs are specifically baked goods to store in the freezer to be ready when an occasion arises, such as visiting family or friends or just the desire for baked goods loaded with Apples for a scrumptious breakfast.  Our tree is a ‘Beverly Hills Apple’;  one that was developed for the area we live in.  No, not Beverly Hills but close enough to be within almost touching distance.  (As the crow flies, that is)

The Apples produced by our tree are green with blushes of red stripes and are tart when picked early and much sweeter when allowed to remain on the tree until late August or early September.  This year, there is no chance remaining on the tree to sweeten as they have decided to fall off before fully ripening.  In order for us to have some Apples before the Rabbits get them all, I do have to pick them before they fall.

Already in the freezer is a batch of Apples, sugared with Cinnamon and thickener ready for our Thanksgiving Apple Pie.  All I will have to do is to drain off the liquid (freezing makes the cell walls break down and cause them to liquefy) into a saucepan and cook it down to the desired thickness.  This will prevent the pie crust from getting soggy.  And of course, I will have to make the Pie Crust, roll it out and ease it into the pan.  Add the Apples and top Crust, Bake and Voila there is the Apple Pie all ready to serve and eat.

Enough about Apple Pie.  The last batch of Apples that I picked, we decided that Apple Strudel would be in order.  If you are ambitious and want to spend several hours making your own Strudel Dough, that is fine, but if not, purchased Phyllo (sometimes spelled ‘filo’) works very well.  If fresh Phyllo is available in your neighborhood (usually at a Middle Easter Market) that would definitely be superior.  If not, frozen work well too.  Just be sure and buy a good quality frozen dough and defrost it in your refrigerator overnight.

Phyllo Dough is very thin and fragile and requires careful handling.  When your filling is ready and you are ready to wrap the fruit up in it do the following:


  • On your work surface or a large sheet pan, place a damp clean kitchen towel.  On top of the damp towel, place a clean dry kitchen towel. 
  • Carefully unwrap and unfold the Phyllo Dough and place on the dry towel.
  • Place another clean dry kitchen towel on top of the Dough and then place a clean, damp kitchen towel on top of the dry towel.  (This procedure will help to keep the dough from drying out and tearing – if it does tear slightly, don’t worry.  Just wrap another layer of dough around it)

To make your strudel, prepare the fruit.  Apples are the common fruit for strudel but other types of fruit such as Apricots or Peaches may also be used.  Since we do not use pesticides on our trees, our Apples usually have worms that are attracted to the fruit.  If this is the case with your homegrown Apples, do not let that deter you.  If the worms are there, the Apples are probably pretty good.  Just be prepared to cut away the worms (probably dead) and any debris that may be inside.

Traditional Apple Strudel usually contains Walnuts and/or Raisins in addition to the Apples.  While I do like Raisins but not Nuts, I usually do not put them in.  Since we like the taste of the Apples so well, I usually also leave out the Raisins.  Save them for something else!  So, here is the procedure that I followed in making my Apple Strudel:

Select the Apples you are going to use and then wash and dry them.  Even if you plan to peel them, I always wash them first, especially if they just came off the tree.

Apples ready for Peeling


Next peel the Apples and then cut them into quarters.  Remove the seeds and any blemish portions there may be (including worms), then rinse them again with cold water and dry them well withpaper towels.


Peeled Apples

Peeled and Quartered Apples


After the Apples are peeled and quartered, slice each quarter into 3 to 4 pieces.

Sauté the Apples in melted Butter along with Sugar (I use Brown Sugar) and Cinnamon.  Once the liquid has been released from the Apples, cover with a lid and cook for 10-15 minutes or until most of the liquid has been absorbed.  Our Apples contain very little moisture so it only took about 5 minutes to cook out most of the liquid.  Even though I make Apple Pie with raw Apples, Apples Strudel should always be made with cooked Apples.  The reason for this is that the Strudel Dough is very thin and fragile and soggy apples will just make the Strudel soggy.


Cooked Apples

Place the cooked Apples on a non-reactive tray and allow to cool.  Melt your Butter (unsalted Butted – at least 1/4 lb) and place it next to your prepared Phyllo Dough.  You will need a flat surface to place the Dough(a large pastry board is perfect).

Have all your ingredients and equipment close by, once you are ready to assemble your Strudel.

  • Carefully place two sheets of Phyllo Dough on your work surface and gently brush with the melted Butter.
  • Add two more sheets of Phyllo and brush again.  (Notice that there are slight tears in the dough – these will be covered up when you wrap the Apples in the Dough.


  • Spread  the filling along the length of the dough about 3 inches  from the edge; leave at least 3” at either end free.  (DO NOT OVER-STUFF THE DOUGH – YOU WILL PROBABLY HAVE ENOUGH APPLES FOR AT LEAST TWO STRUDEL.  IN THE RECIPE I USED, I MADE 4 MINI-STRUDEL AND 1 FULL-SIZE ONE)
  • Fold the 3” piece over the filling and then fold the whole thing over until all the dough is completely wrapped around the filling.  Butter the dough as you  fold.  Fold the corners of the edges in and under the strudel.


Wrapping the Apples


  • Carefully transfer to a parchment covered baking sheet.
  • Bake in the middle of a 375 degree oven for 45 minutes or until the dough is baked through and crisp.  It should be a dark golden brown.

Note:  The complete recipe can be found under the recipe section of this blog /pies-pastry/apple-strudel/

Digg This
Reddit This
Stumble Now!
Buzz This
Vote on DZone
Share on Facebook
Bookmark this on Delicious
Kick It on DotNetKicks.com
Shout it
Share on LinkedIn
Bookmark this on Technorati
Post on Twitter
Google Buzz (aka. Google Reader)

Be the first to comment - What do you think?
Posted by sylveee - 2013/08/20 at 7:40 PM

Categories: Breakfast Ideas, Dessert Ideas, Fruit, Main   Tags: , , , , , , , ,

ZUCCHINI BREAD – BAKING DAY – CLEAN OUT THE REFRIGERATOR/FREEZER

Shredded Carrots and Zucchini


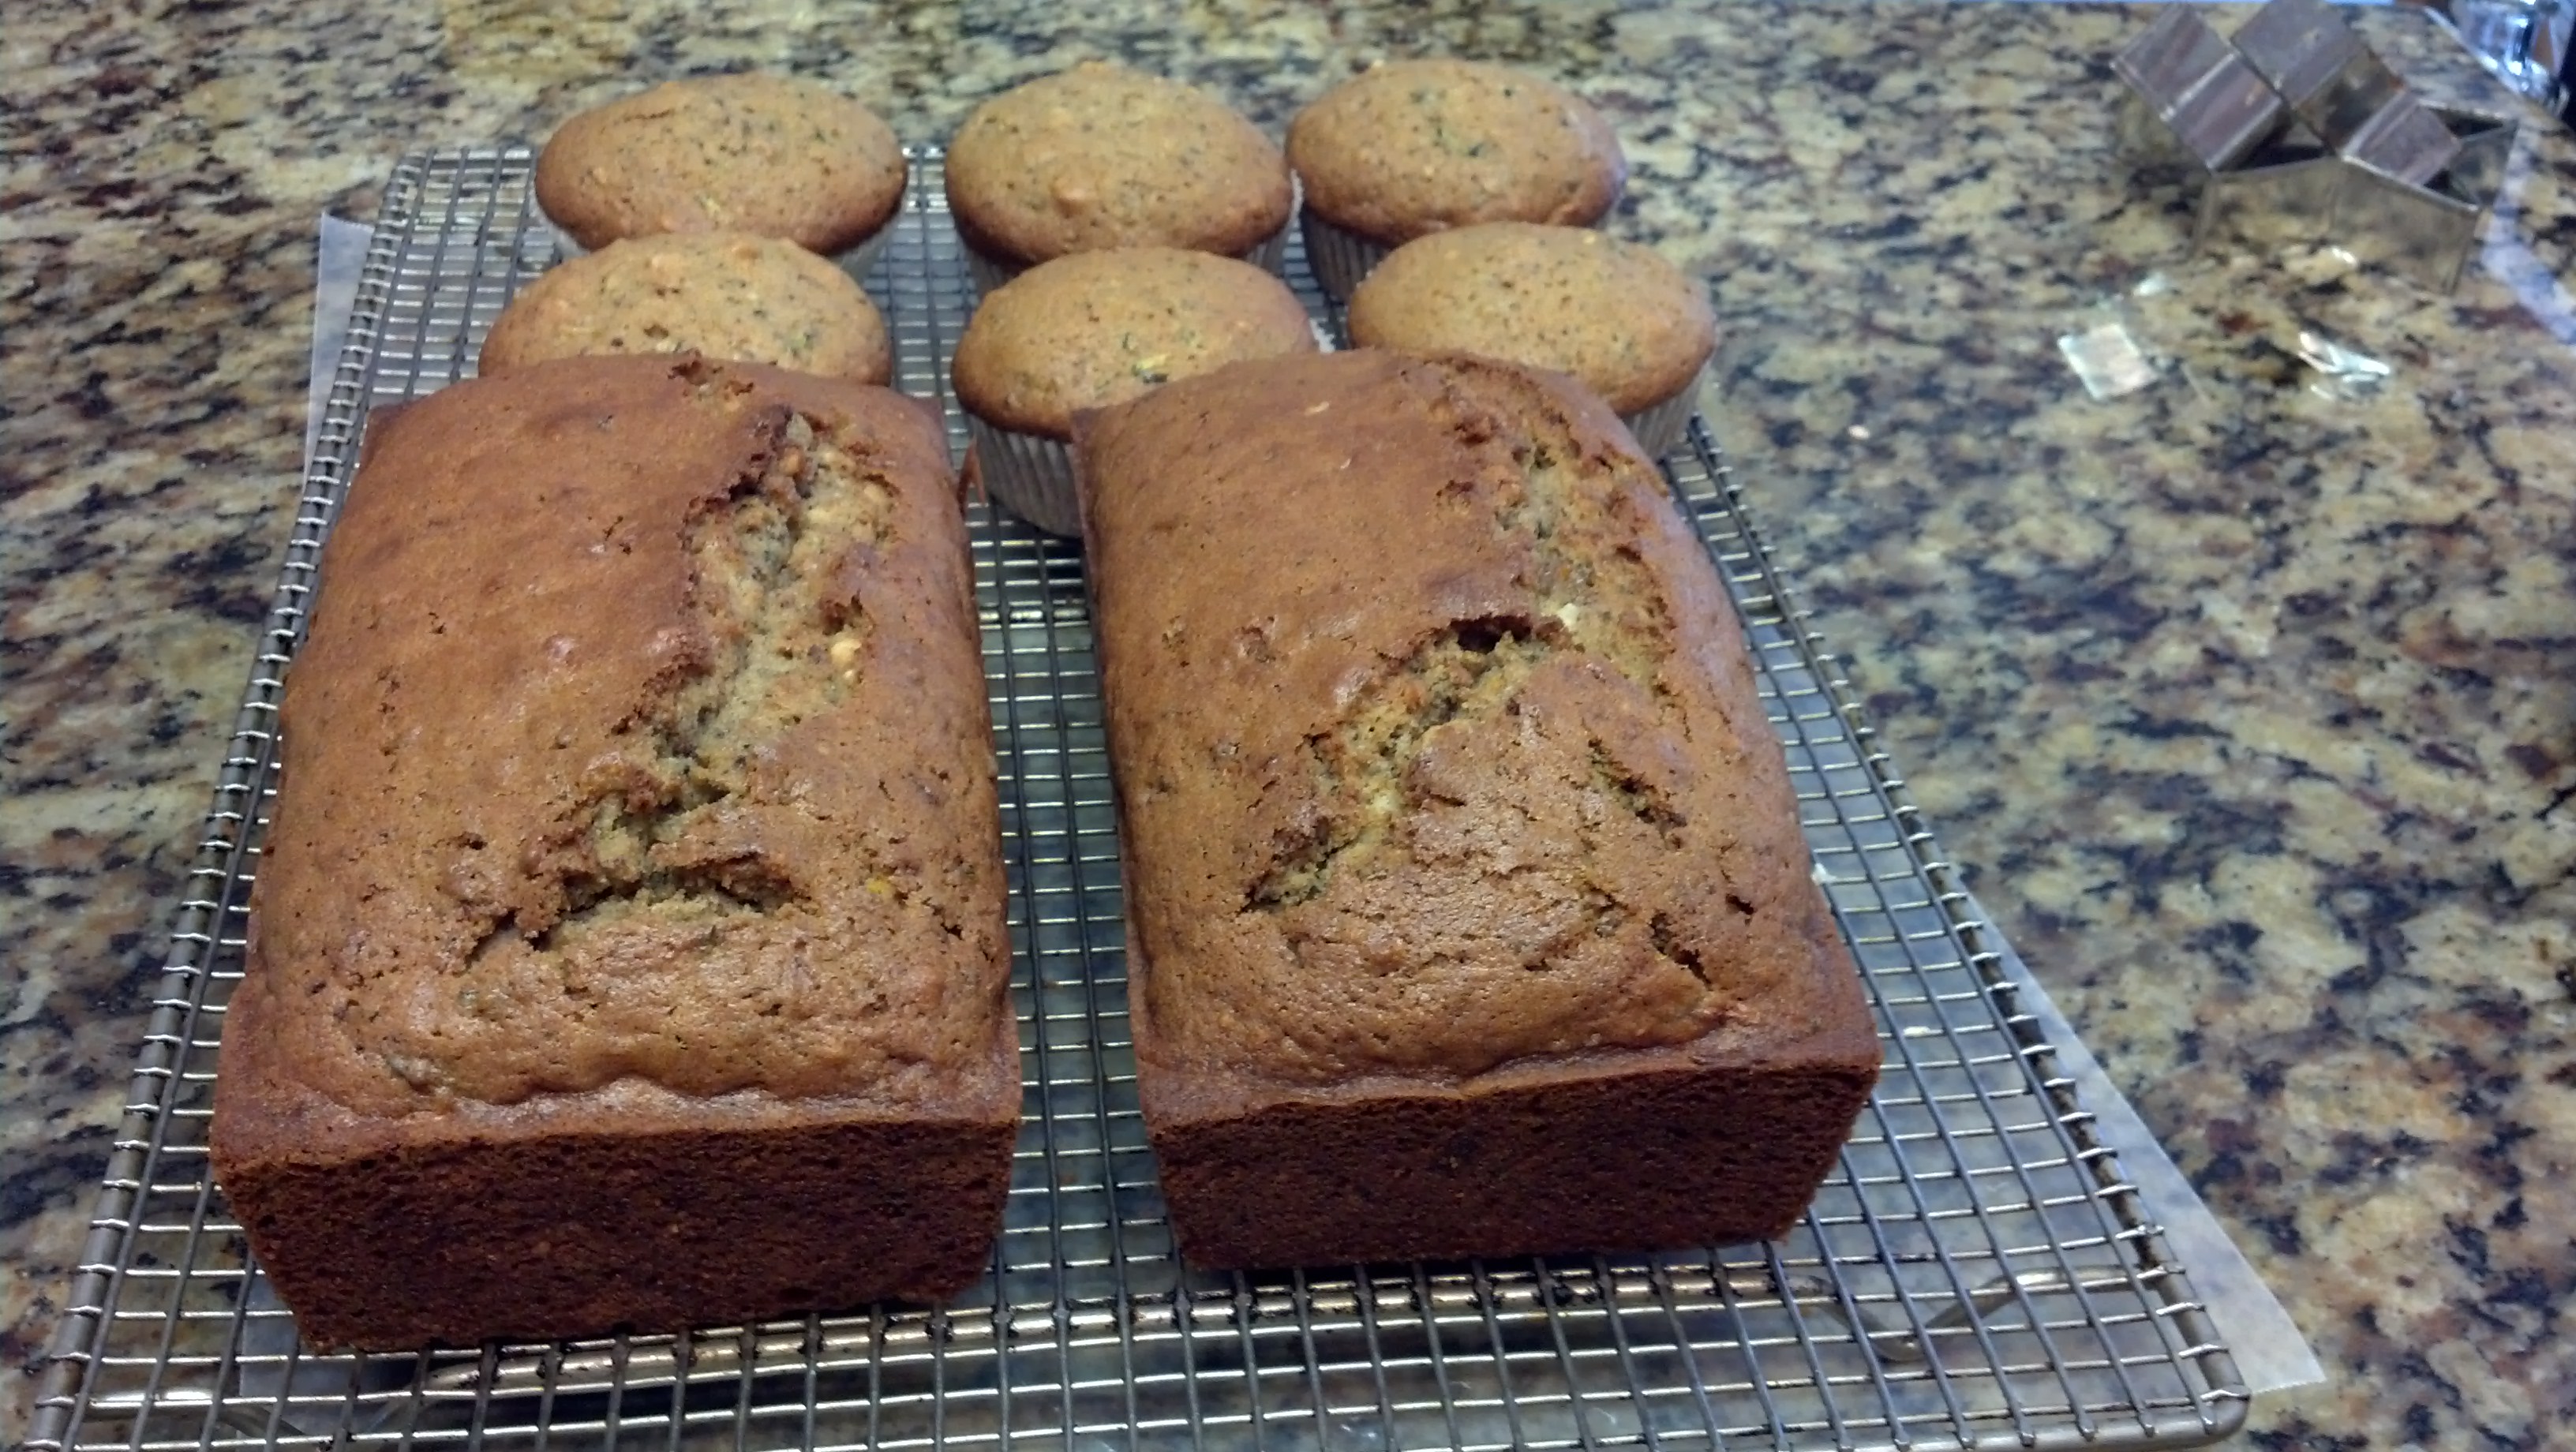
Today I wanted to get rid of some of the items in my refrigerator and freezer, so i decided to make a non-traditional Zucchini Bread, using Zucchini, Carrots, Chocolate Cookie Crumbs and chopped Macadamia Nuts and dried Pineapple.


Since I ended up with 4 cups of shredded fruit/Vegetable (yes, Zucchini is a fruit) I doubled my normal recipe./zuchinni-muffins/  The ingredients that I used are:

6 Eggs

2 cups Brown Sugar*

1 cup granulated Sugar

1 cup Butter

1/2 cup Vegetable Oil

1 Tbsp. Vanilla

4 cups shredded Zucchini and Carrots

5 cups Flour

1 cup finely chopped Chocolate Cookie Crumbs

2 tsps. Baking Soda

1/2 tsp. Baking Powder

2 tsps. Salt

2 tsps. ground Cinnamon

1/2 tsp. ground Cloves

*I never use the total amount of Sugar and Oil that the original recipe calls for.  Tastes just as good with less sugar and lasts just as long with less oil.
For a  bread with more chocolate flavor you can substitute 1/2 cup flour with 1/2 cup baking Cocoa.
Be sure and grease/spray your baking pans before getting started.  If you are making muffins, you can use paper liners instead of greasing the pan.
It is best to measure the flour and mix it together with the other dry ingredients before you get started.  The oven should be preheating while you are making the batter.
  • Beat the Eggs with a paddle beater in your electric mixer or whisk by hand.
  • Add the Sugars and Vanilla;  beat in.
  • While still beating, slowly add the oil and then stir in the shredded fruit/vegetables.
  • Stir in the Flour mixture;  mix until well combined.
  • Finally stir in the chopped Nut/dried Pineapple mixture.

Pour into the prepared pans (half full) and bake as directed above.

The fruit used can be varied – almost any fruit will do in this recipe.

When a toothpick inserted in the middle of the breads comes out clean, they are done.  However, I usually bake them about 5 minutes longer so that the tops are more brown and crispy.  If you are muffin top lover, then definitely bake them just a little bit longer than necessary.

Zucchini Bread and Muffins


As an added note, this recipe produces a relatively healthy product.  You have your vegies in the Zucchini and Carrots (Vitamin A here).  I used Red Carrots which seem to have much more pigment than the orange ones – this means more Vitamin A as the pigment is where the Vitamins are.  In the photo at the top of the page, the carrots look orange (dark orange!) but if you look closely you will see the red.  Most of the red is on the outside, but the orange is much darker than on regular orange carrots, thereby probably containing more Carotene (Vitamin A source)

The recipe also contains Eggs, Macadamia Nuts and dried Pineapple.  The Butter and/ or  Oil are also essential products for a healthy body.  Whether you think it or not, oils are essential for survival!

Try my version or create your own.  This is a very flexible recipe and you can do a lot with it.  By the way, I usually use Raisins (good source of Iron) but since I had the Pineapple and am trying to clean out my fridge and freezer, I used that.  You can use whatever you have on hand!  Enjoy!


Digg This
Reddit This
Stumble Now!
Buzz This
Vote on DZone
Share on Facebook
Bookmark this on Delicious
Kick It on DotNetKicks.com
Shout it
Share on LinkedIn
Bookmark this on Technorati
Post on Twitter
Google Buzz (aka. Google Reader)

Be the first to comment - What do you think?
Posted by sylveee - 2013/04/24 at 7:33 PM

Categories: Baking, Baking Tidbits, Bread, National Food Days   Tags: , , , , , , , , ,

CULINARY MAKEOVERS # 15 – Macaroni & Cheese Supreme

Macaroni and Cheese Suprema


Tonight is the Oscard Awards Ceremony and we  wanted to have something simple, easy and quick for dinner.  The only way to really do this is to either have it sent in or make something ahead.  I opted for the ‘Make Something Ahead’ meal.  This is my Macaroni and Cheese Suprema Dish.  I have a standard recipe on line, but I never ever or hardly ever make it as stated.  The recipe is just a guide and I use whatever happens to be on hand, especially if I have leftovers to get rid of.


I am a person who just cannot throw out leftovers until they are really no good to eat.  But when I do use them, I can make some really good dishes from them and no one would ever know they were made from leftovers unless I tell them.


Todays leftovers were:

Drawn Butter

Onion (the only non-leftover item – only used half so it is now a leftover)

Shredded Cheddar/Jack (in freezer)

Brie

Fusili Pasta (in freezer)

Orange Bell Pepper

Chives


In addition to the leftovers I added some:

2 Tbsps. Flour

Cream

Half/Half

Dijon Mustard


I made the Mac and Cheese in this wonderful stainless steel oval shaped stove-top to oven casserole pan.  I use it for almost everything and it is perfect for the two of us and if we have company will hold at least enough for 4 people, maybe even six.


PROCEDURE:


  1. Melt the Butter in the Pan over low heat.  While the Butter is melting, dice the Onion and then add it to the melted Butter.
  2. Stir in the Flour and cook until the Flour is well-blended with the Onions and Butter.  Continue to cook for about another minute and then add 1 cup of Cream or Half/Half or even Milk.
  3. Cook and stir until the mixture thickens and then add about 1-2 Tbsps. of Dijon Mustard along with 1/2 tsp. of Salt and 1/4 tsp. White Pepper.
  4. Stir in the Brie, in any amount up to 1 cup,  (Cream Cheese can also be used) and the shredded Cheese (about 2 cups)
  5. Stir well to combine;  if the mixture is too thick add additional Half/Half or Milk.  Taste for seasonings and adjust to your taste.
  6. Stir in the Cooked Macaroni with a rubber or silicone spatula;  be sure to have all the Macaroni covered with the Cheese Sauce.
  7. Dice the Bell Pepper and add to the Cheesy Pasta; combine well or just leave on top for a garnish.
  8. Snip the Chives with pair of Kitchen Shears and sprinkle on top for a Garnish. (Green Onions may be used instead or even dill if you like dill with Cheese)
  9. The dish is now ready to serve.  If you are planning on serving it later in the day or even tomorrow, refrigerate until about one hour before serving time.
  10. If you are using a metal pan like mine, then you can put it in the oven while it is cold, but if it is a ceramic or glass dish, allow it to come to room temperature before placing it in the hot oven.  Alternatively, place it in a cold oven and then turn the oven or even better, Microwave it for a minute or two to warm up the dish)
  11. Serve and enjoy!


For the full recipe please see macaroni-and-cheese-supreme/


Digg This
Reddit This
Stumble Now!
Buzz This
Vote on DZone
Share on Facebook
Bookmark this on Delicious
Kick It on DotNetKicks.com
Shout it
Share on LinkedIn
Bookmark this on Technorati
Post on Twitter
Google Buzz (aka. Google Reader)

Be the first to comment - What do you think?
Posted by sylveee - 2013/02/24 at 11:49 AM

Categories: Dinner Ideas, Leftovers, Lunch Ideas, Pasta   Tags: , , , , , , , ,

SHORTBREAD – National Shortbread Day

January 6th is ‘National Shortbread Day’.  Shortbread is a cookie that is made frequently in the British Isles (namely Sotoland which is known for its Scottish Shortbread).  There are also Shortbread recipes from the Scandinavian Countries.

What exactly is Shortbread and why is this confection called Shortbread?   Shortbread  falls into the Cookie Category but is certainly different from most cookies that we are familiar with.  Shortbread is definitely a ‘melt in your mouth’ type cookie.  It can have the texture of sand, yet it is very rich and usually very tasty.

Why are these cookies called Shortbread?  I don’t where the ‘bread’came from, but I do know why they are called ‘short’.  Possibly the ‘bread’ part is because that maybe all baked goods were at one time called ‘bread’.

To explain this, first you have to think about why ‘shortening’ is called shortening.  What is Shortening?  Well, most people think of Shortening as a baking product that comes in a can and is very white.  This is most often the case, but things other than vegetable shortening such as Crisco ® are also shortening.  But in order to understand this, first you have to know why shortening is called shortening and then you will understand why  ‘Shortbread’ is called ‘Shortbread’ rather than cookies.

What purpose does ‘shortening’ serve in a baked product?  First of all you have to think about the flour which in most cases is glutinous and is in long strands. (Microscopically speaking)  If you mix Flour and Water together and bake it, you have nothing more than crackers which will be very crisp and break apart easily.  This is where shortening comes in.  Shortening helps to break up the strands of gluten (fiber) and tenderizes it and flavors it.

Many products can be used as shortening.  These are in order of preference and flavor:  Lard which provides the best flavor and flakiness in baked products.  Lard is preferred by many bakers and cooks (not me though).  In blind taste tests that I have conducted with my students, the products with lard always come out on top in both flavor and texture)


Vegetable Shortening – 3 lb. Can

Butter is my preference even though it does not provide the flakiest of products, it is certainly the best tasting (as far as I am concerned)  Sweet Butter is the preferred Butter for baking and cooking.  Vegetable Shortenings come next and those include margarines which I do not recommend.

Oil is also used for shortening and there are pie crust recipes that specify oil.  Many cake recipes also use vegetable oi in them.

Unsweetened Butter


Butter, unwrapped


To cut the strands of fiber, a solid shortening is usually cut into the flour mixture.  This can be done with a ‘pastry blender’ which is a multi-wire tool held together with a wooden or plastic handle.


Pastry Blender


The shortening product can also be rubbed in with your fingers, preferably rubbing between your thumb and forefinger or it can be cut in with the use of 2 table knives, which is what we used to do before pastry blenders were readily available.  You can also cut it in with your food processor, although I can tell you that this method will not produce the flakiest product, but it will certainly save a lot of time.

Baked products in which the shortening is cut in are Pie Crusts and Shortbreads.  Everyone knows what a pie crust is and Shortbreads are really a cookie.  The ration of butter to flour is so high, that the Shortbread cannot be easily rolled and there it is usually patted into a round and marked with the back side of a knife.  After it is baked, it is then cut again.

A truly good shortbread will melt in your mouth, but will hold together when you pick it up to eat.  If you want to try your hand at making shortbread (it is actually very easy) try my Pineapple/Macadamia Nut Shortbread Recipe in this blog /pineapple-macadamia-shortbread-cookies/


Digg This
Reddit This
Stumble Now!
Buzz This
Vote on DZone
Share on Facebook
Bookmark this on Delicious
Kick It on DotNetKicks.com
Shout it
Share on LinkedIn
Bookmark this on Technorati
Post on Twitter
Google Buzz (aka. Google Reader)

Be the first to comment - What do you think?
Posted by sylveee - 2013/01/06 at 2:35 PM

Categories: Baking, Dessert Ideas, Main, National Food Days   Tags: , , , , , ,

PEACH FRENZY


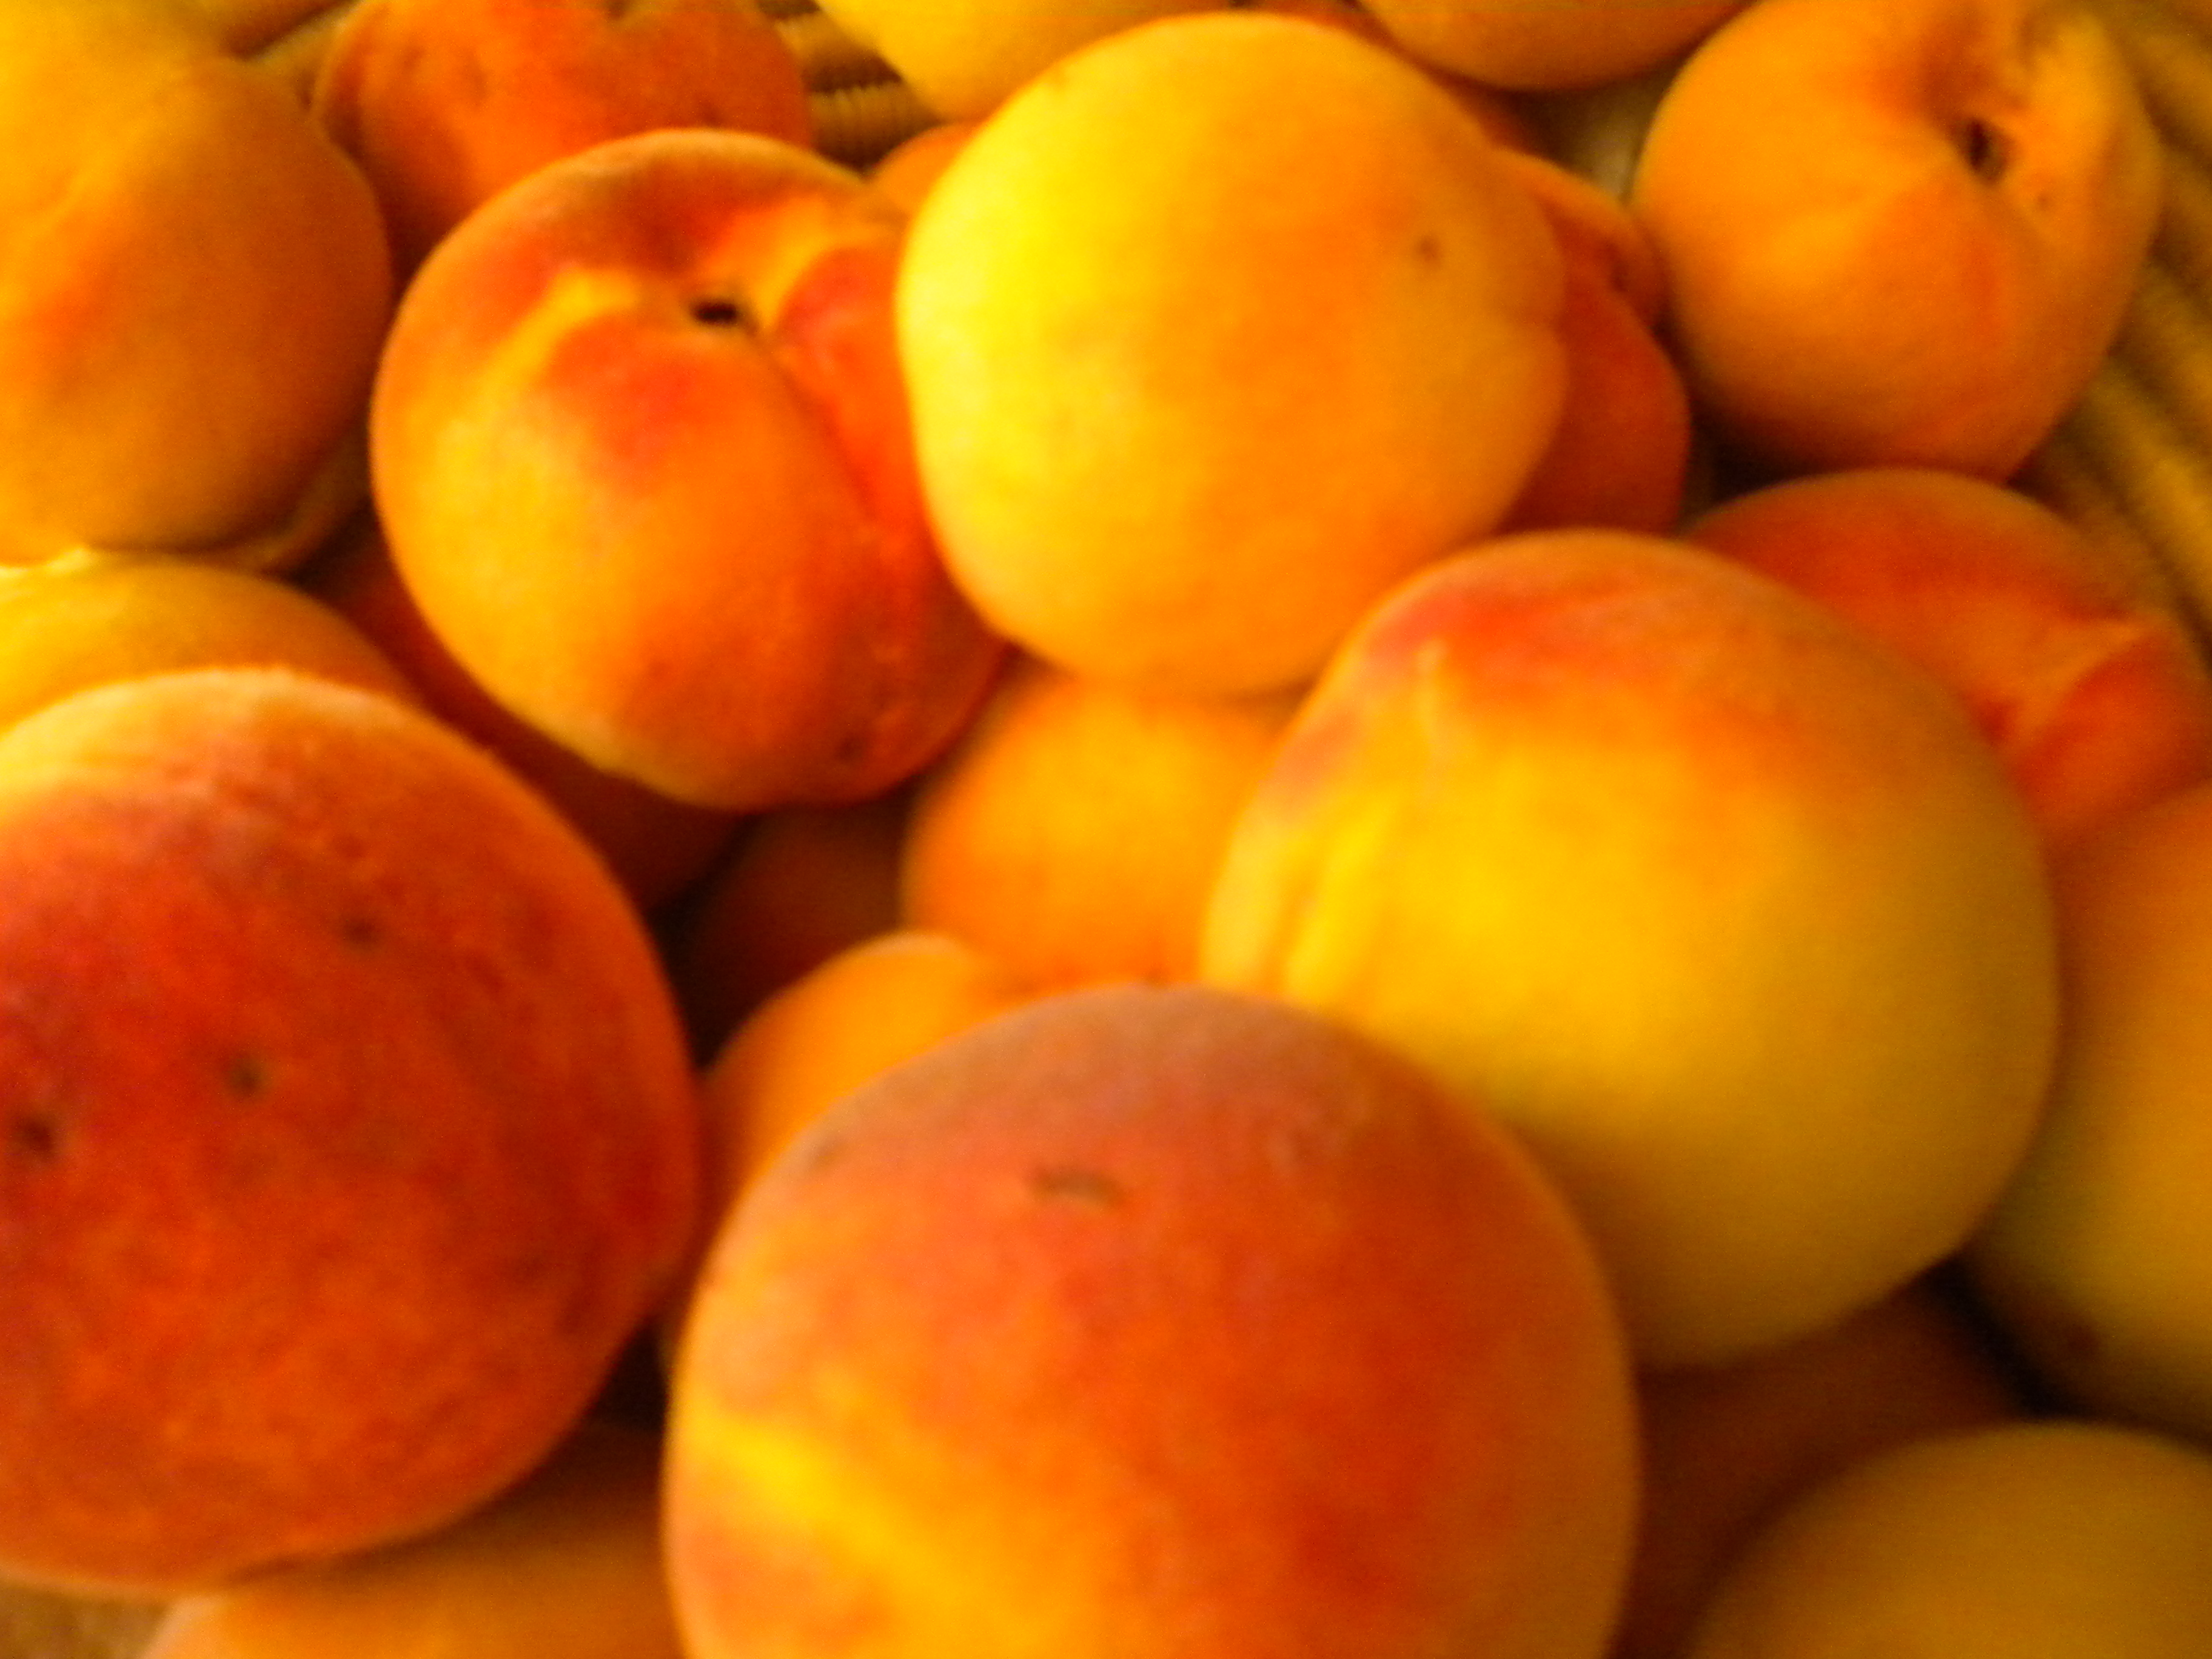
A week and a half ago, our peaches were too green to pick.  Now they are falling off the tree and it is all I can do to keep up with them.  Of course, the Squirrels and Birds are helping us do that, but they started even before the peaches were ripe enough for us to eat or to even cook with.  Fortunately, there is an ample amount for all of us.  Every morning I go out and pick the ripest peaches, (the ones that come off the tree easily) and then clean up the half-eaten ones on the ground.  Would love to leave them there for the animals, squirrels, birds and rabbits, but unfortunately, they also attract fruit flies, so unless we get them picked up, we have a fruit fly infestation and that is not good.

The peaches are very good this year, but one can only eat so many peaches at one time, so the secret is to use them for items that can be frozen or canned.  Tuesday, we gave a big bag to the cleaning people to take home and yesterday, I proceeded to use them to make peach jam, peach muffins and peach gelato.  On Sunday, I made a fresh peach pie that we had for breakfast on Monday and Tuesday and even had some left over for snacking.  It was a deep dish pie and used a lot of peaches.  The more the better.

PEACH PIE:

To make the peach pie, the first thing you want to do is to make the crust.  You can use a basic pie crust  /pies-pastry/peach-pie/or a sweet tart crust. sweet-tart-and-pie-pastry/ It all depends on how you want to present your pie.  I used the basic crust and instead of using all butter which is what I usually use, I used half Crisco®.  Using Crisco® will give you a flakier crust whereas I think the all-butter crust tastes better.  It is 6 of one and half a dozen of the other.  Refrigerate the dough for the crust while you are preparing your pie filling.

The next step is to peel, pit and slice the peaches.  If the peaches are not totally ripe, it may be possible to remove the skin with a serrated peeler.  If that doesn’t work, then you need to boil a small pot of water and have a bowl of ice water handy.  Make a cross – wise slit in the top and bottom of the peaches and then lower one or two at a time into the boiling water.  (A slotted spoon or spider would be a handy tool to do this with so that you do not get burned by the hot water.)  Leave the peaches in the boiling water for a minute or two, (this will depend on the ripeness of the peaches) and then remove them and place them in the ice water.  When the peach is cool enough to handle, take a paring knife and starting at the top, peel off the skin.  It should come off easily.  If it doesn’t, then put it back in the boiling water for another minute or two.


Peeled Peach

I have found that the following procedure works well:

  1. Place the first two peaches in the boiling water for about two minutes, then transfer them to the ice water.
  2. After you have peeled the first peach, put another one or two in the boiling water and then peel the second one.
  3. Slit the tops and bottoms of the next two peaches, transfer the ones in the boiling water to the ice water, place the new ones in the boiling water and then repeat the procedure until all the peaches have been peeled.

Once all the peaches have been peeled, make a cut around the peach,   lengthwise, and using your thumbs, pull them apart.  Remove the pit from the half it remains in and then slice the peaches into the desired thickness.


Place the sliced peaches in a large bowl; mix a proportionate amount of thickener (usually cornstarch) together with sugar, (I use brown sugar), spices such as cinnamon, cloves and nutmeg.  Add the peaches and gently toss to coat all the peaches.  If your peaches are quite ripe, the sugar will extract a lot of liquid from the peaches.  Let them sit in the bowl until the moisture has been extracted, then place a colander over a saucepan and pour the peaches into the colander.  Place the saucepan with the peach liquid on the stove over medium heat and cook, stirring constantly until the sugar/liquid mixture has thickened.  Return the peaches in the colander back into the bowl and add the thickened mixture.


Re-adding the thickened liquid


           Toss gently and then pour into the pie pan.


In Pie Shell


Add either a lattice top crust or a full top crust and then bake according to your recipes instructions.


Lattice Top

Top Crust Added


Pie Baked with complete Top Crus

PEACH JAM:

To make the Peach Jam, the first thing I did was to wash and sterilize the jars.  Boil them in water for 5 minutes or run through the dishwasher.  Place your lids and seals in a small saucepan and boil for 3 minutes.

I peeled the peaches (see above) and then removed the pits and placed the fruit in the food processor fitted with the chopping blade.  I chopped the peaches, measured them and put them in the jam pot.  A large 6-8 quart saucepan will do.  I then measured the sugar and lemon juice and combined it all with the chopped peaches.  I used commercial pectin for this jam.  Just follow the directions on the package of pectin.  If you do not want to use pectin, you use equal parts fruit and sugar and about ¼ cup lemon juice.  You do have to know how to test the cooked fruit to see if it has reached the proper temperature for setting. It is easier just to use the pectin, especially if your fruit is very ripe.


Peach Jam in Dish


Peach Jam in Jars – sealed and coolin upside down to seal lids


Once the jam is made, ladle it into the sterilized jars, seal and then turn upside down.  To be sure that no bacteria is alive inside the jars, process them for 5 minutes in a boiling water bath.  The water must be at least one inch over the tops of the jars.  Remove, turn upside down on a clean dish towel and allow to sit until cool and the jam is set.


While preparing the fruit for the jam, I prepared twice as much as I needed which gave me four more cups of chopped fruit to work with.  I made Peach Muffins with half and Peach Ice Cream with the other half.  Lots of peaches, but really good.  If you can’t use all the muffins (or make it in a loaf pan) at once, freeze some for a later use.   /fruit-muffins/


Giant Peach Muffins


The remainder of the chopped peaches was used for Peach Ice Cream.  /fresh-peach-ice-cream/


Digg This
Reddit This
Stumble Now!
Buzz This
Vote on DZone
Share on Facebook
Bookmark this on Delicious
Kick It on DotNetKicks.com
Shout it
Share on LinkedIn
Bookmark this on Technorati
Post on Twitter
Google Buzz (aka. Google Reader)

Be the first to comment - What do you think?
Posted by sylveee - 2012/07/19 at 11:45 PM

Categories: Baking, Dessert Ideas, Fruit, Main, Pastry   Tags: , , , , , , , ,

MACARONI DAY

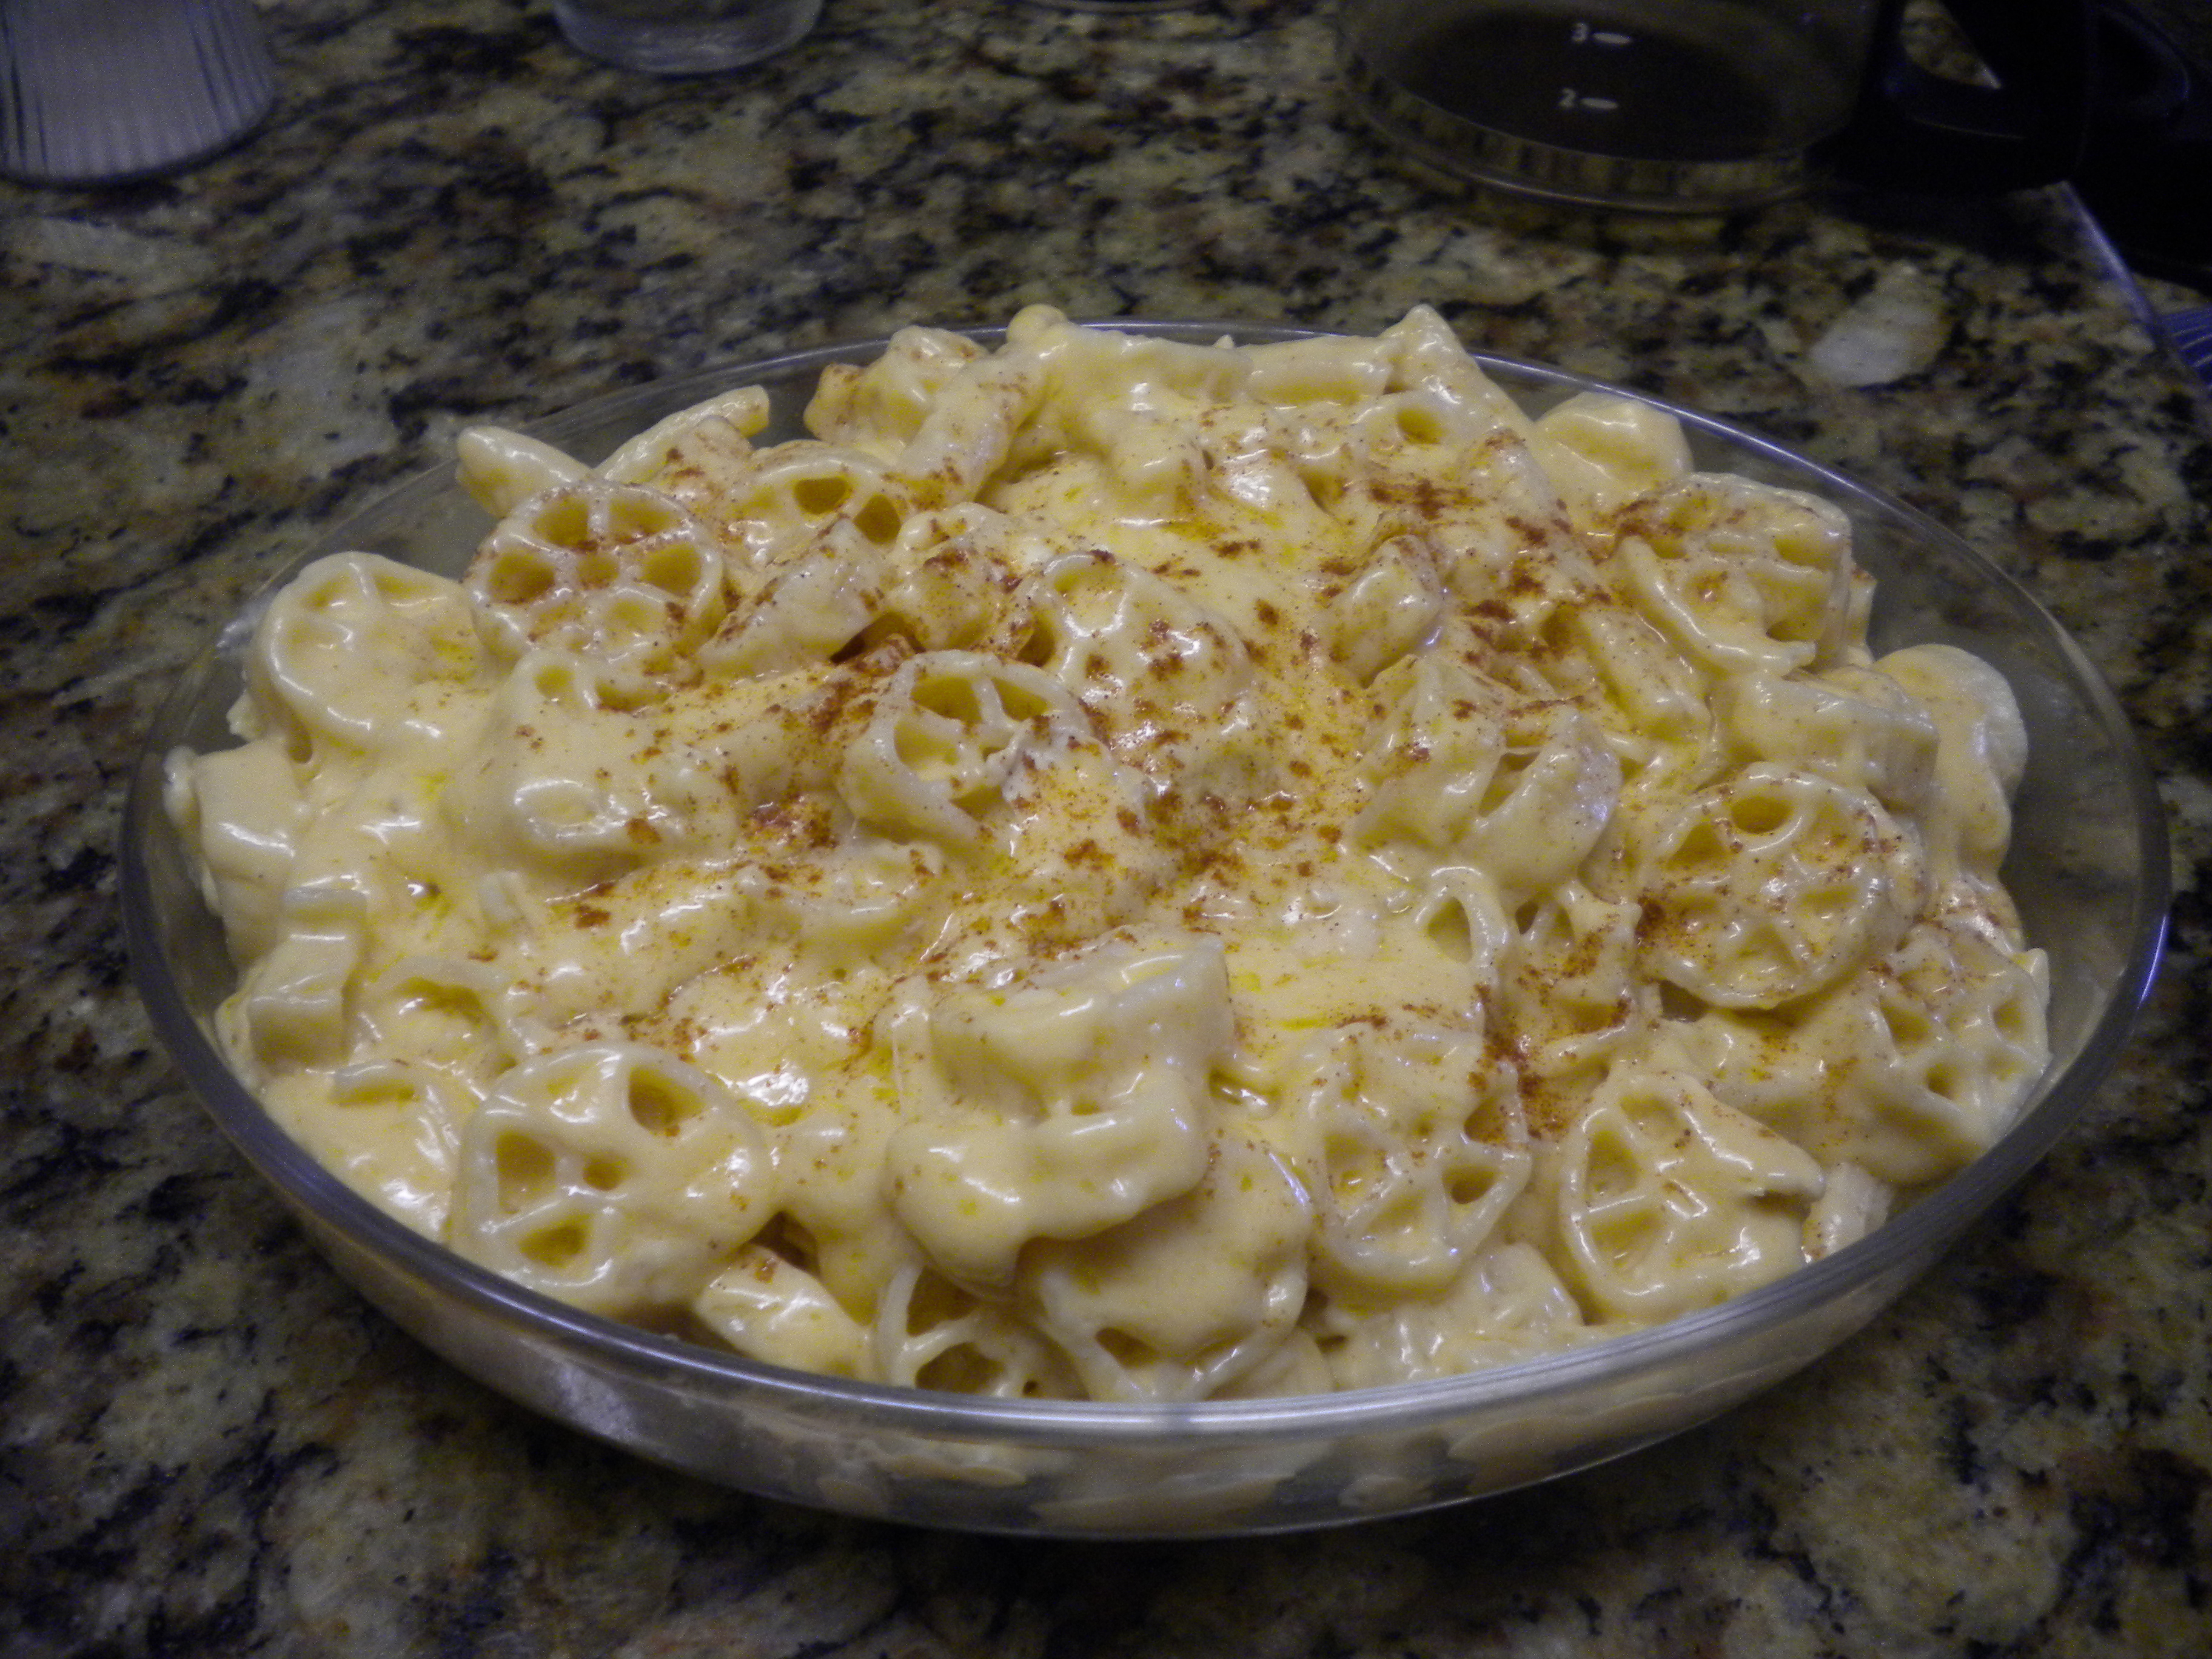
July 14th is Bastille Day in France but in the United States it is Macaroni Day.  What better way to consume your macaroni than in the All American Favorite – Macaroni and Cheese.  There are many ways in which you can make this yummy dish and there is a whole range of pasta shapes that one can use.  One of the favorites of my family is Wagon Wheels, the shape that is reminiscent of the American Pioneer’s trek westward.

Macaroni and Cheese is traditionally made with Cheddar Cheese, but the addition of other cheese gives more depth of flavor and creaminess.  To make Mac & Cheese you will need:

½ lb. Pasta

½ lb. Cheddar Cheese

¼ lb. Gouda or Cream Cheese (for creaminess)

Diced Onion

4 Tbsps. unsalted Butter

4 Tbsps. All-Purpose Flour

2 cups Milk, Cream or Half & Half

1 tsp. Dijon Mustard

Dash Worcestershire Sauce

Salt & Pepper  (to taste)

Chives

Paprika


Bring at least 4 quarts of salted water to a rapid boil.  The salt adds flavor to the pasta and also increases the temperature point of the water, thus making the pasta cook faster.  Once the water comes to a rolling boil, add the Pasta, stir and continue boiling (uncovered) for anywhere from 8 – 12 minutes.  (This will depend on the pasta used)  It can be just a tad undercooked if the Mac & Cheese is to go into the oven.  All pasta should be cooked to ‘al dente’ which gives it just a little bite.

While the Pasta is cooking, begin making your Cheese Sauce.  Shred your Cheese if you purchased block cheese and set it aside.

Shredded Cheddar


In the photo above, the Cheese is sitll in the Food Processor but with the blade removed.


Dice your Onion (about ¼ cup will do); using the Onion is optional but it does give nice flavor to the cheese.

Use a large Saucepan and melt the Butter over low heat; add the Onion and cook until soft.  Next stir in the Flour and continue stirring until a paste is formed.  Slowly add the Milk, stirring continuously.  If the mixture seems to be a little lumpy, use your whisk to smooth it out.  Cook and stir until the mixture thickens (it should be able to coat the back of a metal spoon).  Once the White Sauce is of the desired consistency, add the Shredded Cheese and the Cream Cheese.  If Gouda is used instead of Cream Cheese, this should be shredded along with the Cheddar Cheese.


Adding the Cheese to the White Sauce


Shut the heat off and continue stirring until all the Cheese is melted.  Add the Mustard, Worcestershire and Salt and White Pepper to taste.  (Approximately 1 tsp. Salt and ½ tsp. White Pepper)

Pour the cooked Pasta into a colander and shake out all the water.

Cooked & Draied Pasta


If you don’t add the Cheese Sauce immediately, rinse the Pasta with warm water to keep it from sticking together.  Return the Pasta to its cooking pot and slowly add the Cheese Sauce.  Gently mix, over and under, to coat all the macaroni.


Adding the Cheese Sauce to the Pasta


Transfer the Cheese coated Pasta to a baking dish.  About ½ hour before serving time, place the dish in the oven and heat until the Mac & Cheese is thoroughly heated through.  (This will take about 20 minutes)  Mac & Cheese can be made early in the day or the night before, but be sure to refrigerate it until ready to use.  If you do refrigerate it, allow the dish to warm up before baking or place it uncovered, in a cold oven and then turn the oven on.  This will allow the dish to warm up slowly without being stressed to the point of breaking.

This is just one way to enjoy Macaroni.  You can use any shape pasta you desired and any combination of cheeses.  So enjoy Macaroni Day with your own creation of Mac & Cheese or a Macaroni Salad.


Digg This
Reddit This
Stumble Now!
Buzz This
Vote on DZone
Share on Facebook
Bookmark this on Delicious
Kick It on DotNetKicks.com
Shout it
Share on LinkedIn
Bookmark this on Technorati
Post on Twitter
Google Buzz (aka. Google Reader)

Be the first to comment - What do you think?
Posted by sylveee - 2012/06/23 at 11:49 PM

Categories: Dinner Ideas, Lunch Ideas, National Food Days   Tags: , , , , , , , ,

MY CULINARY DIARY – MAKING CROISSANTS

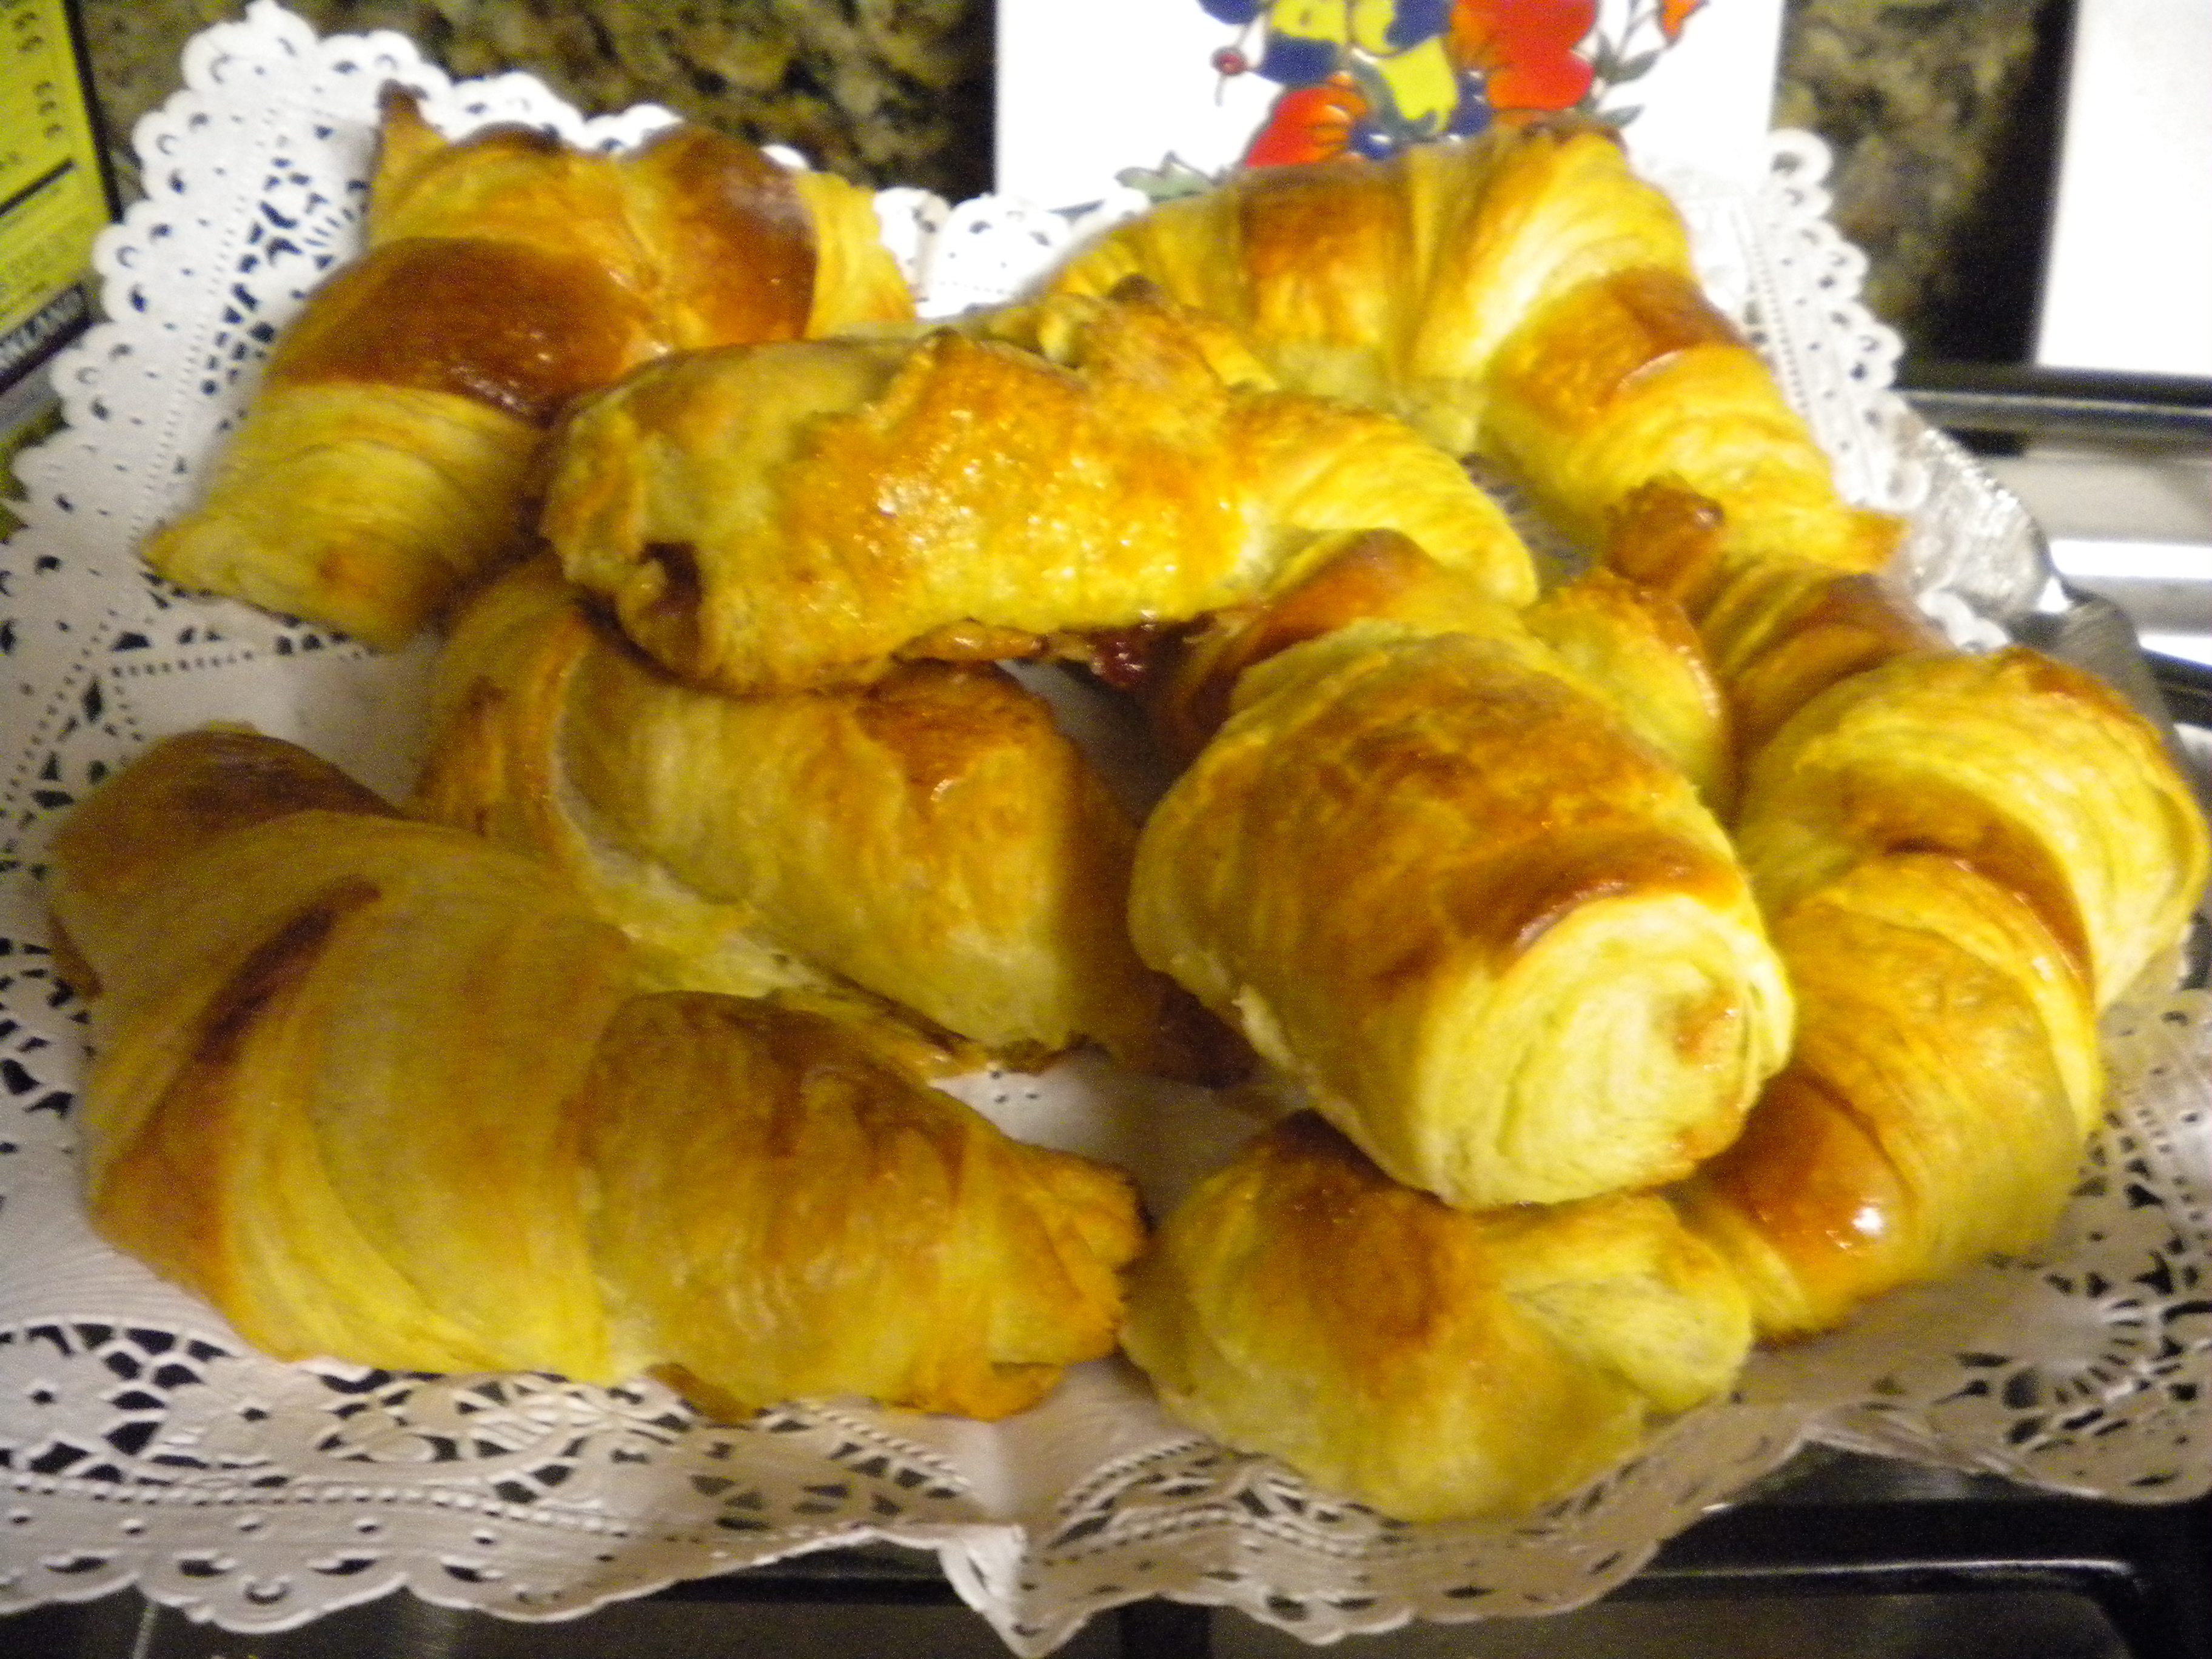
Week of 4/08/12

My significant achievement this week was to make Croissants.  On Tuesday, I went to a friend’s for lunch and asked what I could bring.  She said that anything that went with a Shrimp Salad would be good, so I thought bread or rolls would be ideal.  With that in mind, I decided to make Croissants. I hadn’t made them in a long time and this would be a good excuse.  Croissants are not hard to make – they are just time consuming.  Luncheon was going to be on Tuesday, so I figured that I would need to be able to bake the Croissants by Monday evening as the proofing time for them would be several hours and if I waited until the morning, I might not have enough time as I had an 11:30 appointment before going to lunch at Mary’s.

We were scheduled to go to a BBQ lunch at Jenny & John’s (Ev’s Grandaughter & Grandson In-Law) Sunday afternoon so  I set to work to make the Croissant Dough in the morning.  The Dough is a yeast dough and uses 2 cups Bread Flour and 1 cup of All-Purpose Flour.  Unlike a normal yeast dough, the yeast is dissolved in a cup of cold milk.  (Normally you don’t want to use cold milk without first scalding it, because the enzymes in milk prevent the yeast from working to it’s full capacity)

Next you combine the Flours, Sugar and Salt and then work in ¼ lb. of Butter.  This can be done with your fingers, a pastry blender or a food processor.  In any case the butter should be cut up into several small pieces (8 works best) to facilitate working it in.  I preferred to do it with my food processor as it cuts it in very evenly and distributes the butter throughout the flour.

Next, the Flour mixture is added to the Yeast/Milk Mixture.  The two mixtures are then stirred to combine and then kneaded until you have a smooth dough.  It takes about 7-8 minutes in a Standing Mixer fitted with the Dough Hook and about 10-12 minutes if you are kneading by hand.  After the Dough is kneaded, it is shaped into a ball, scored on time with an X cut going across the whole top of the ball and then wrapped tightly in plastic wrap and refrigerated for at least 5 hours.

By the way, Croissant Dough as Danish Dough, is a Laminated Dough and is a pleasure to work with.  This Dough comes out really well and feels really nice to the touch.  It is not sticky or dry!

Once the chilling time is over and you are ready to roll in the Butter Block, make the Block.  The Butter Block consists of ¾ lb. of Butter and it is easiest to make if you use Butter that comes in 4 pieces per pound.  Cut each of the 3 Sticks in half down the middle to make 6 pieces no thicker than 1inch.  Place the 6 pieces of butter on a piece of parchment paper that has been dusted with Flour and then dust the top of the butter with flour and cover with another piece of parchment.  Take your rolling pin and tap the butter over the parchment to soften it.  Once it has softened sufficiently (not melted!) shape it into a 6 inch square.

The next step is to roll out the dough and encase the butter in it.  Once that has been accomplished, and you have turned it, you then wrap it and refrigerate it for 30 minutes and roll and turn again.  This step must be repeated a total of 3 times.  After the 3rd time the dough should be refrigerated for several hours but not more than 24.

Enclosing the Butter Block


Butter Block Sealed into the Dough


When you are ready to roll out the dough you roll it into a 12 x 18 rectangle and cut the rectangle in half horizontally.  You then mark it every 5 inches on top and bottom with a sharp knife.


Marking the Dough with Knife Slits


You then cut diagonal lines from left to right, using the marks as a guide.  Next you cut more horizontal lines from right to left.  This leaves with triangular pieces of dough which then cut rolled up from the point to the wide end to form a Crescent Shape.  This recipe was supposed to make 14 large Croissants and 4 Minis but somehow I got about 18 large Croissants and several minis.  I made the large Croissants just normal Croissants without filling.  I used Almond Paste and Strawberry Jam (homemade) to fill the smaller and odd-shaped Croissants.

The rolled Croissants filled up two parchment covered baking sheets which I then covered with Plastic Wrap which was lightly sprayed with a Vegetable Oil Spray.  I placed them in my oven (not turned on) to proof.  The dough was still cold so they took about 3 hours to proof.  Unlike most yeast doughs, do not wait for the Croissants to double in bulk, because this will not happen.  (Remember the cold milk affects the action of the Yeast)  When they are completely proofed, the Croissants will feel light but will not have doubled in bulk.

Shaped and placed on Parchment Covered Sheet


Next you brush them with an Egg Wash (1 whole Egg + 1 Yolk).  The additional Yolk helps the Croissants to brown well.  Preheat your oven and place one pan on the middle shelf and bake for 12 minutes.  After twelve minutes the pan was rotated back to front and the heat reduced, then the Croissants were baked for approximately another 20 minutes or until they were nicely browned.  Repeated the process with the second pan.

Brushed with Egg Wash


Croissants In Oven


In the end we had a nice batch of Croissants, six of which I packed and brought to Mary’s house for lunch on Tuesday.  Another 6 or so were packed and frozen for later use.  We still had ample Croissants to eat at home and we did have them for breakfast at least 2 days in a row and there were still some leftover to snack on.

Baked and Cooling Croissants


Plated Croissants


Croissants are fun to make and it is really exciting to see how the laminated dough puffs up when baking.  Don’t forget, Croissants as other puff pastries, need a HOT oven for the puffing action to take place!  For the full recipe just type in Croissant Recipe in your browser and many will come up.


Digg This
Reddit This
Stumble Now!
Buzz This
Vote on DZone
Share on Facebook
Bookmark this on Delicious
Kick It on DotNetKicks.com
Shout it
Share on LinkedIn
Bookmark this on Technorati
Post on Twitter
Google Buzz (aka. Google Reader)

Be the first to comment - What do you think?
Posted by sylveee - 2012/04/13 at 11:22 AM

Categories: Baking, Bread, Breakfast Ideas, Cooking for Everyone, Food as Gifts, Main   Tags: , , , , , , , ,

Next Page »